How to Adjust the Cache Size of the Temporary Internet Files Folder in Microsoft Internet Explorer
Summary: This article provides information on the procedure to adjust the cache size of the temporary internet files folder in Internet Explorer.
This article applies to
This article does not apply to
This article is not tied to any specific product.
Not all product versions are identified in this article.
Symptoms
Table of Contents:
- The Temporary Internet Files Folder Contains a Kind of Travel Record of the Web Pages Visited
- Adjust the Cache Size of the Temporary Internet Files Folder
Issue 1 - The Temporary Internet Files Folder Contains a Kind of Travel Record of the Web Pages Visited
Often referred to as the cache, the Temporary Internet Files folder contains a kind of travel record of the items you have seen, heard, or downloaded from the Web, including images, sounds, web pages, and even cookies. Typically these items are stored in the Temporary Internet Files folder. Storing these files in the cache can make browsing the Web faster because it usually takes the computer less time to display a web page when it can call up some of the page's elements or even the entire page from your local Temporary Internet Files folder.
However, having too much cache may also affect the system's performance and disk space. For this reason, it is important to maintain a balance between the factors that may affect performance. Generally, cache sizes above 80 megabytes use up disk space and can actually cause slower performance.
Issue 2: Adjust the Cache Size of the Temporary Internet Files Folder
- Open an Internet Explorer browser window.
- Select Tools from the menu bar and click Internet Options (Internet Explorer 7 or greater has its menu bar hid. Press <Alt> to display it).
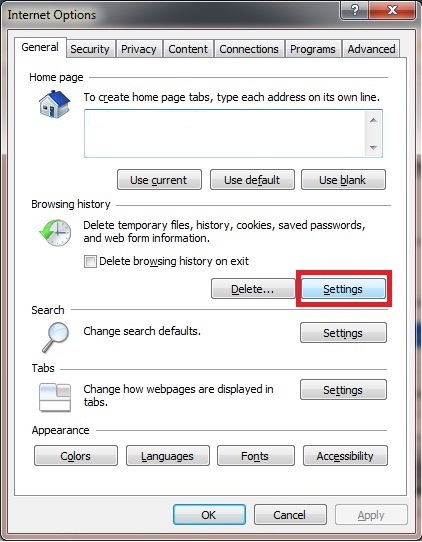
- When the Internet Options dialog appears, look for the Browsing History section and click Settings (Figure 1 (English only)).

Figure 1: Internet Options Window
- Change the setting by to the desired size. The default is 250MB.
- When you have selected the cache size, click OK to close the Settings dialog, and click OK to close the Internet Options dialog.
Back to Top
Cause
Resolution
Article Properties
Article Number: 000130917
Article Type: Solution
Last Modified: 23 Apr 2021
Version: 5
Find answers to your questions from other Dell users
Support Services
Check if your device is covered by Support Services.