「Dell Data Security ServerでSMTP設定を構成する方法(英語)」
Summary: 次の手順に従って、Dell Data Security/Dell Data ProtectionサーバーのSimple Mail Transfer Protocol (SMTP)設定を構成できます。
Symptoms
この記事では、Dell Security Management Server(旧Dell Data Protection | Enterprise Edition)およびDell Security Management Server Virtual(旧Dell Data Protection | Virtual Edition)に関するSMTPサーバー情報を設定する手順について説明します。
対象製品:
Dell Security Management Server
Dell Data Protection | Enterprise Edition
Dell Security Management Server Virtual
Dell Data Protection | Virtual Edition
影響を受けるバージョン:
v8.0.0以降
対象オペレーティング システム:
Windows
Linux
Cause
適用されません。
Resolution
SMTP設定は、Dell Security Management ServerまたはDell Security Management Server Virtualに対して手動で実行されます。詳細については、該当するサーバー タイプをクリックしてください。
SMTPサーバー情報を入力するには、次の手順を実行します。
- Dell Security Management Serverにログインします。
- [製品]サービスをすべて停止します。
- [製品] =
- v8.15以降 = Dell
- v8.14.1以前 = Dell Data Protection
- 詳細については、「Dell Security Management Server/Dell Data Protection Enterprise Edition Serverのサービスを停止および開始する方法(英語)」を参照してください。
- Windowsエクスプローラーで、
C:\Program Files\Dell\Enterprise Edition\Server Configuration Tool\に移動し、Credant.Configuration.exeをダブルクリックして[Server Configuration Tool]を開きます。

- [Server Configuration Tool]で、[SMTP]タブをクリックします。

- [SMTP]メニューから、次の操作を実行します。
- SMTPのホスト名を入力します。
- SMTPサーバーのユーザー名を入力します。
- ユーザーのパスワードを入力します。
- Eメール メッセージの送信元アドレスを入力します。
- SMTPポートを入力します。
- [Authentication]を[True]または[False]として選択します。
![[SMTP]メニュー](https://supportkb.dell.com/img/ka06P000000Y5mpQAC/ka06P000000Y5mpQAC_ja_3.jpeg)
- ホスト名、アカウント、ポート、設定は、環境によって異なる場合があります。
- お使いの環境で認証の中継が必要な場合は、[Authentication]を[True]に設定します。認証の中継が必要ない場合は、[Authentication]を[False]に設定します。
- [Configuration]をクリックし、[Save]を選択します。

- 「はい」をクリックします。
![[Save Confirmation]](https://supportkb.dell.com/img/ka06P000000Y5mpQAC/ka06P000000Y5mpQAC_ja_5.jpeg)
- [Configuration]をクリックし、[Exit]をクリックします。

- すべての[製品]サービスを開始します。
Dell Security Management Server VirtualにSMTPサーバー情報を入力する手順は、バージョンによって異なります。詳細については、適切なバージョンをクリックしてください。バージョン情報については、「Dell Data Security/Dell Data Protection Serverのバージョンを識別する方法(英語)」を参照してください。
SMTPサーバー情報を入力するには、次の手順を実行します。
- デフォルト管理者(
delluser)の認証情報を使用して、Dell Security Management Server Virtual管理コンソールにログインします。

- Dell Security Management Server Virtualのデフォルト認証情報は次のとおりです。
- ユーザー名:
delluser - パスワード:
delluser
- ユーザー名:
- 管理者は、製品の[Virtual Appliance Menu]内でデフォルトのパスワードを変更できます。
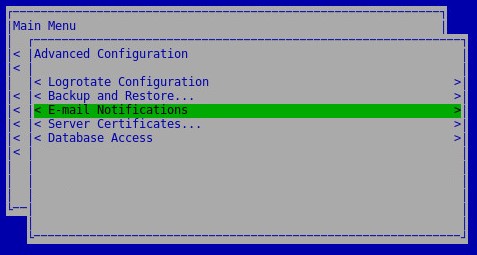
- [Main Menu]から、[Advanced Configuration]を選択してEnterを押します。
![[Advanced Configuration]](https://supportkb.dell.com/img/ka06P000000Y5mpQAC/ka06P000000Y5mpQAC_ja_8.jpeg)
- [E-mail Notifications]を選択し、Enterを押します。

- [Setup E-mail Notifications]メニューから、次の手順を実行します。
- [Enable E-mail Alerts]をオンにします。
- SMTPサーバーのホスト名を入力します。
- SMTPポートを入力します。
- SMTPユーザーを入力します。
- SMTPユーザーのパスワードを入力します。
- 通知の送信元のアカウントを入力します。
- サーバー ステータスの送信先のEメールを入力します。
- パスワード変更の送信先のEメールを入力します。
- ソフトウェア アップデートの送信先のEメールを入力します。
- 必要に応じて、[Service Alert Reminder]をオンにし、[Reminder Interval](分単位)を入力します。
- [Summary Report]の頻度を選択します。
- [OK]を選択します。
- <Enter>を押します。
![[Setup E-mail Notifications]メニュー](https://supportkb.dell.com/img/ka06P000000Y5mpQAC/ka06P000000Y5mpQAC_ja_10.jpeg)
- ホスト名、アカウント、ポート、設定は、環境によって異なる場合があります。
- 複数のEメール アドレスはセミコロンで区切って指定できます。
SMTPサーバー情報を入力するには、次の手順を実行します。
- デフォルト管理者(
ddpuser)の認証情報を使用して、Dell Security Management Server Virtual管理コンソールにログインします。

- Dell Security Management Server Virtualのデフォルト認証情報は次のとおりです。
- ユーザー名:
ddpuser - パスワード:
ddpuser
- ユーザー名:
- 管理者は、製品の[Virtual Appliance Menu]内でデフォルトのパスワードを変更できます。
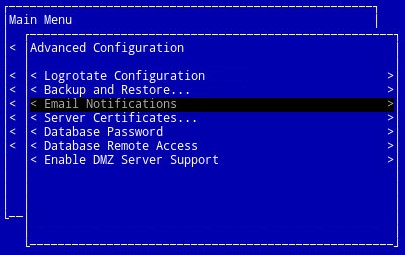
- [Main Menu]から、[Advanced Configuration]を選択してEnterを押します。
![[Advanced Configuration]](https://supportkb.dell.com/img/ka06P000000Y5mpQAC/ka06P000000Y5mpQAC_ja_12.jpeg)
- [Email Notifications]を選択し、Enterを押します。

- [Setup Email Notifications]メニューから、次の手順を実行します。
- [Enable Email Alerts]をオンにします。
- SMTPサーバーのホスト名を入力します。
- SMTPポートを入力します。
- SMTPの送信元アドレスを入力します。
- SMTPユーザーを入力(Enter)します。
- SMTPユーザーのパスワードを入力します。
- VEステータスの通知の送信先のEメールを入力します。
- パスワード変更の通知の送信先のEメールを入力します。
- ソフトウェア アップデートの通知の送信先のEメールを入力します。
- 必要に応じて、[Service Alert Reminder]をオンにし、[Reminder Interval](分単位)を入力します。
- [Summary Report]の頻度を選択します。
- [OK]を選択します。
- <Enter>を押します。
![[Setup Email Notifications]メニュー](https://supportkb.dell.com/img/ka06P000000Y5mpQAC/ka06P000000Y5mpQAC_ja_14.jpeg)
- ホスト名、アカウント、ポート、設定は、環境によって異なる場合があります。
- 複数のEメール メッセージは、コンマまたはセミコロンで区切って指定できます。
SMTPサーバー情報を入力するには、次の手順を実行します。
- デフォルト管理者(
ddpuser)の認証情報を使用して、Dell Security Management Server Virtual管理コンソールにログインします。

- Dell Security Management Server Virtualのデフォルト認証情報は次のとおりです。
- ユーザー名:
ddpuser - パスワード:
ddpuser
- ユーザー名:
- 管理者は、製品の[Virtual Appliance Menu]内でデフォルトのパスワードを変更できます。
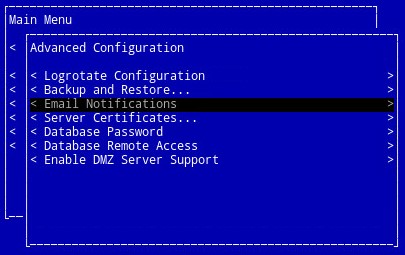
- [Main Menu]から、[Advanced Configuration]を選択してEnterを押します。
![[Advanced Configuration]](https://supportkb.dell.com/img/ka06P000000Y5mpQAC/ka06P000000Y5mpQAC_ja_16.jpeg)
- [Email Notifications]を選択し、Enterを押します。

- [Setup Email Notifications]メニューから、次の手順を実行します。
- [Enable Email Alerts]をオンにします。
- SMTPサーバーのホスト名を入力します。
- SMTPポートを入力します。
- SMTPの送信元アドレスを入力します。
- SMTPユーザーを入力(Enter)します。
- SMTPユーザーのパスワードを入力します。
- VEステータスの通知の送信先のEメールを入力します。
- パスワード変更の通知の送信先のEメールを入力します。
- ソフトウェア アップデートの通知の送信先のEメールを入力します。
- [OK]を選択します。
- <Enter>を押します。
![[Setup Email Notifications]メニュー](https://supportkb.dell.com/img/ka06P000000Y5mpQAC/ka06P000000Y5mpQAC_ja_18.jpeg)
- ホスト名、アカウント、ポート、設定は、環境によって異なる場合があります。
- 複数のEメール メッセージは、コンマまたはセミコロンで区切って指定できます。
サポートに問い合わせるには、「Dell Data Securityのインターナショナル サポート電話番号」を参照してください。
TechDirectにアクセスして、テクニカル サポート リクエストをオンラインで生成します。
さらに詳しい情報やリソースについては、「デル セキュリティ コミュニティー フォーラム」に参加してください。