Welcome
Welcome to Dell
- Place orders quickly and easily
- View orders and track your shipping status
- Create and access a list of your products
How to Install Windows From a Dell ISO - Download the Windows 11 and Windows 10 ISO
Summary: Install or reinstall Windows 11 or 10 on Dell computers using ISO recovery media. Download the ISO, create a bootable USB or DVD, and restore or repair your system.
Instructions
- Must install Windows 11 or Windows 10.
- Use the recovery media to repair Windows 11 or Windows 10 if the Dell computer is not booting to the operating system.
Table of Contents:
- Install Windows from DVD or USB
- Installing Windows 11 and Windows 10 from the ISO
- Manual Driver Load from PE Command Prompt
Dell provides Windows 11 and Windows 10 recovery media to the customer in an ISO format. You can download this ISO recovery media from the Dell Operating System Recovery Image website. This ISO file is not tied directly to the computer's service tag and can be used again if another reinstallation is needed. It can be used on another Dell computer if you want to install or reinstall Windows 11 or Windows 10. To use the recovery image as-is, see KB article How to Download and Use the Dell Operating System Recovery Image.
- The Windows 10 ISO can also be downloaded using the Windows 10 Media Creation tool
. Once you create either the DVD or the USB flash drive, you can boot to your Windows 10 media to install Windows 10.
- The Windows 11 ISO can also be downloaded from Microsoft Software Download utility
Install Windows from DVD or USB
Duration: 01:04
When available, closed caption (subtitles) language settings can be chosen using the Settings or CC icon on this video player.
Installing Windows 11 and Windows 10 from the ISO
Follow the steps below to install Windows using the Dell installation media:
- Insert the USB that you created using the Dell Windows Recovery Image.
- Restart your computer and tap the F12 key on your keyboard when you see the Dell logo. The boot menu that is shown in Figure 1 [English Only] should appear.
- Select UEFI boot as the boot option and ensure that the computer is in UEFI mode as shown in Figure 1 [English Only].
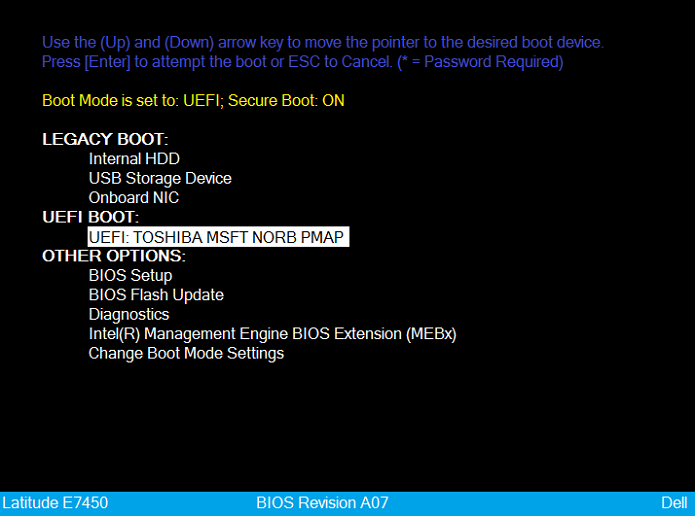
Figure 1: UEFI Boot Selected - Select your language and keyboard layout.
- Choose the Troubleshoot option. (see Figure 2 [English Only])

Figure 2: Choose the Troubleshoot boot option - Select Recover from a drive.
- Select either of the recovery options to perform a clean installation. (see Figure 3 [English Only])
NOTE: Fully cleaning the drive may take several hours.

Figure 3: Selecting a recovery options - Click Recover to start the process.
Manual Driver Load from PE Command Prompt
- Download the drivers for your computer from the Dell Support Site.
- Use a utility like 7zip to extract the installation files, and save them to a folder on a separate USB flash drive.
- Plug the USB flash drive with the drivers and the Dell Windows 10 media into the same computer.
NOTE: The images below use the IRST driver as an example.
- Boot to the respective Dell Windows 11 or Windows 10 media and select your computer and keyboard languages to get to the Home screen.
- Select Troubleshoot → Advanced Options → Command Prompt. (See Figure 4 [English Only].)

Figure 4: Selecting the Command Prompt Option - Browse to the drive that contains the needed drivers using the "dir" command to view the drive contents, as shown in Figure 5 [English Only]. The correct drive is usually the D:, E:, or F: Drive.
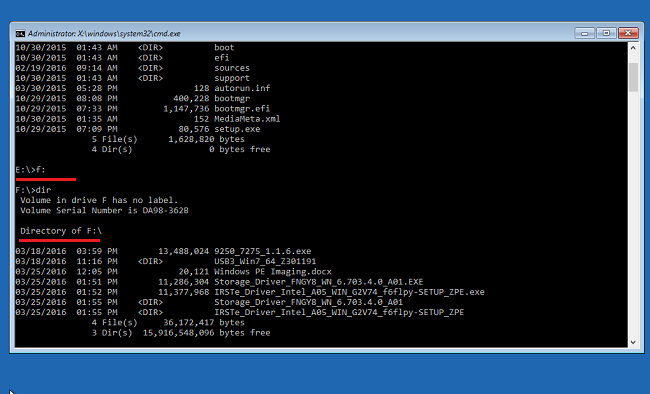
Figure 5: Navigating of the file system to locate the driver file location - Use the CD command to navigate through the folders to the *.inf driver location. Use dir as necessary to see the contents of each folder. See (Figure 6 [English Only]).
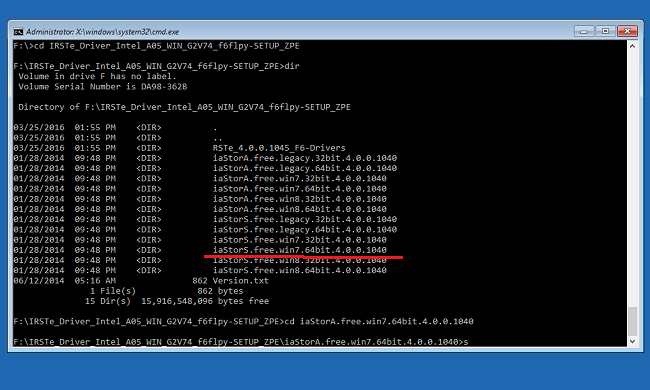
Figure 6: Navigating of the file system to locate the driver file location - Find the .inf file that is needed for the device being installed in order to load Windows, as shown in Figure 7 [English Only].
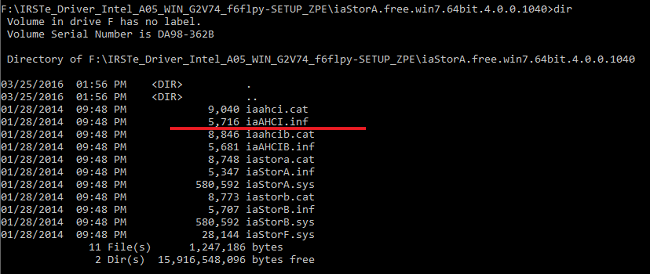
Figure 7: Locating the driver .inf file - Use the following command to load the appropriate driver to the computer and press Enter. (See Figure 8 [English Only] for an example.)
drvload.exe [.inf path/filename]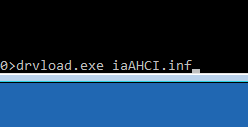
Figure 8: Manually loading the inf file
Additional Information
 Out of warranty? No problem. Go to the Dell.com/support website and enter your Dell Service Tag and view our offers.