PowerEdge: How to Reconfigure a Virtual Disk or Add More Hard Drives
Summary:This article shows how to add additional disks to a virtual disk or reconfigure a virtual disk.
Please select a product to check article relevancy
This article applies to This article does not apply toThis article is not tied to any specific product.Not all product versions are identified in this article.
Note: If you have multiple Virtual Disks (VD) created on the same set of disks or you have a RAID 50 or RAID 60, the option to reconfigure will not be available.
Reconfiguration and capacity expansion is non-data destructive as an operation. If there are underlying issues with the RAID array, data can be lost, so ensure that a tested backup is available before starting any operation.
Caution: Reconfiguring Virtual Disks typically impacts disk performance until the reconfiguration operation is complete. It is highly recommended that the procedure is done during a maintenance window.
What is Online Capacity Expansion (OCE)?
Online Capacity Expansion is a process that allows a virtual disk's capacity to be expanded to existing free space on the disk group or the hard drives it contains. It also allows for new hard drives to be added to a disk group to expand the capacity of the virtual disk. The process allows for expansion without the requirement of re-creating the virtual disk.
What is RAID Level Migration (RLM)?
RAID Level Migration is the process of changing a virtual disk's RAID level while not requiring the virtual disk to be re-created. Physical disks can and sometimes must be added to fulfill the requirements of the new RAID level.
You can find a table of RAID level migration options in the Additional Information part of this article.
Steps:
Access the BIOS by F2 > Device Settings Figure 1: Expand Virtual Disk
Select RAID Controller Figure 2: Expand Virtual Disk
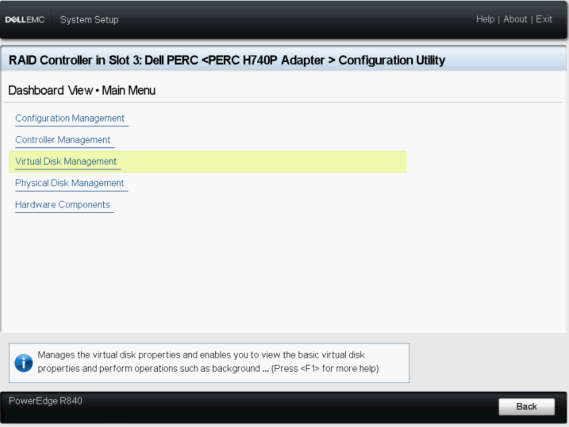
In the Dashboard view, select Main Menu Figure 3: Expand Virtual Disk
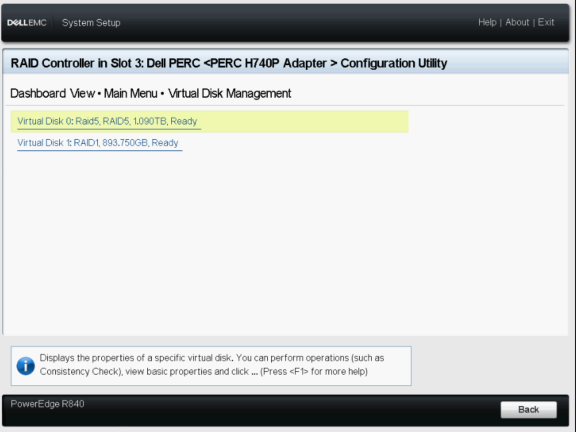
Select Virtual Disk Management Figure 4: Virtual Disk Management
Select the Virtual Disk to be changed Figure 5: Select the Virtual Disk
In the drop-down, select Reconfigure Virtual Disks and press the GO button Figure 6: Expand Virtual Disk
Select the RAID Level and press Choose the Operation button Figure 7: Select RAID Level for Virtual Disk
Select the disks to be added to Virtual Disk and press Apply Changes button Figure 8: Apply Changes to Virtual Disk
Confirm the operation and click YES. Figure 9: Confirm the Virtual Disk changes
Press the Start Operation button Figure 10: Start the Virtual Disk Expansion
Press the OK button to complete the operation. Figure 11: Ok to complete Virtual Disk expansion
To view the status of the Virtual Disk Figure 12: View Status of Virtual Disk expansion
After the reconstruction starts, the system can be left in the RAID BIOS until complete, or the system can be rebooted into the operating system.
Note: If the system is rebooted into the operating system, the system performance is impacted until the rebuild has been completed.
How to change the RAID Level or Size of a configured Virtual Disk.
Duration: 00:01:22 (hh:mm:ss)
When available, closed caption (subtitles) language settings can be chosen using the settings or CC icon on this video player.
Possible RAID Level Migrations:
Note:
The controller changes the write-cache policy of all virtual disks undergoing an RLM/OCE to Write-Through until the RLM/OCE is complete.
Spanned virtual disks such as RAID 50 and 60 cannot be reconfigured.
Source RAID
Target RAID
Required Number of Physical Disks (Beginning)
Number of Physical Disks (End)
Capacity Expansion Possible
Description
RAID 0
RAID 0
1
2 or more
Yes
Increases capacity
RAID 0
RAID 1
1
2
No
Converts nonredundant virtual disk into a mirrored virtual disk by adding one disk
RAID 0
RAID 5
1 or more
3 or more
Yes
At least one drive must be added for distributed parity data.
RAID 0
RAID 6
1 or more
4 or more
Yes
At least two drives must be added for dual distributed parity data.
RAID 1
RAID 0
2
2 or more
Yes
Removes redundancy while increasing capacity
RAID 1
RAID 5
2
3 or more
Yes
Maintains redundancy while doubling capacity
RAID 1
RAID 6
2
4 or more
Yes
Two drives must be added for distributed parity data.
RAID 5
RAID 0
3 or more
3 or more
Yes
Converts to a nonredundant virtual disk and reclaims disk space that is used for distributed parity data
RAID 5
RAID 5
3
4 or more
Yes
It increases capacity by adding disks.
RAID 5
RAID 6
3 or more
4 or more
Yes
At least one drive must be added for dual distributed parity data.
RAID 6
RAID 0
4 or more
4 or more
Yes
Converts to a nonredundant virtual disk and reclaims disk space that is used for distributed parity data
RAID 6
RAID 5
4 or more
4 or more
Yes
Removes one set of parity data and reclaims the disk space that is used for it
RAID 6
RAID 6
4
5 or more
Yes
It increases capacity by adding disks.
RAID 10
RAID 10
Less than 32
32
Yes
It increases capacity by adding disks.
Note: If the controller already contains the maximum number of virtual disks, you cannot perform a RAID level migration or capacity expansion on any virtual disk.