Dell Data Security에 대한 정책 업데이트를 확인하는 방법
Summary: 이러한 지침에 따라 Dell Data Security 또는 Dell Data Protection 소프트웨어에 대한 정책 업데이트를 확인하는 방법에 대해 알아봅니다.
This article applies to
This article does not apply to
This article is not tied to any specific product.
Not all product versions are identified in this article.
Symptoms
참고:
- 2021년 2월부터 Mac용 Dell Encryption Enterprise에 대한 유지 보수가 종료됩니다. 이 제품 및 관련 문서는 더 이상 Dell에서 업데이트하지 않습니다.
- 2022년 5월부터 Dell Endpoint Security Suite Enterprise 유지 보수가 종료됩니다. 이 제품 및 관련 문서는 더 이상 Dell에서 업데이트하지 않습니다.
- 2019년 1월 현재 Dell Endpoint Security Suite Enterprise 유지 보수가 종료됩니다. 이 제품 및 관련 문서는 더 이상 Dell에서 업데이트하지 않습니다.
- 자세한 내용은 Dell Data Security에 대한 제품 수명주기(지원 종료 및 EOL) 정책을 참조하십시오. 다른 문서에 대한 질문이 있는 경우 영업 팀에 문의하거나 endpointsecurity@dell.com으로 문의하십시오.
- 최신 제품에 대한 자세한 내용은 엔드포인트 보안을 참조하십시오.
이 문서에서는 Dell Data Security(이전의 Dell Data Protection)를 사용하여 정책 업데이트를 확인하는 방법에 대해 설명합니다.
영향을 받는 제품:
- Dell Encryption Enterprise
- Dell Data Protection | Enterprise Edition
- Mac용 Dell Encryption Enterprise
- Mac용 Dell Data Protection | Enterprise Edition
- Dell Encryption Enterprise SED(Self-Encrypting Drive) Manager
- Dell Data Protection | SED(Self-Encrypting Drive) Manager
- Dell Encryption External Media
- Dell Data Protection | External Media Edition
- Dell BitLocker Manager
- Dell Data Protection | BitLocker Manager
- Dell Endpoint Security Suite Pro
- Dell Data Protection | Endpoint Security Suite
- Dell Endpoint Security Suite Enterprise
- Dell Data Protection | Endpoint Security Suite Enterprise
- Dell Full Disk Encryption
영향을 받는 운영 체제:
- Windows
- Mac
Cause
해당 사항 없음
Resolution
정책 업데이트 확인은 사용 중인 제품의 운영 체제에 따라 다릅니다. 자세한 내용을 확인하려면 Windows 또는 Mac 을 클릭하십시오.
Windows
정책 업데이트는 다음 간에 다릅니다.
실드
- Dell Encryption Enterprise
- Dell Data Protection | Enterprise Edition
- Dell Encryption External Media
- Dell Data Protection | External Media Edition
EmAgent(Encryption Management Agent)
- Dell Encryption Enterprise SED(Self-Encrypting Drive) Manager
- Dell Data Protection | SED(Self-Encrypting Drive) Manager
- Dell BitLocker Manager
- Dell Data Protection | BitLocker Manager
- Dell Endpoint Security Suite Pro
- Dell Data Protection | Endpoint Security Suite
- Dell Endpoint Security Suite Enterprise
- Dell Data Protection | Endpoint Security Suite Enterprise
- Dell Full Disk Encryption
자세한 내용을 확인하려면 Shield 또는 EMAgent 를 클릭하십시오.
실드
정책 업데이트는 UI 또는 레지스트리를 사용하여 확인할 수 있습니다. 자세한 내용을 확인하려면 해당 옵션을 선택하십시오.
참고: 이 옵션은 엔드포인트 정책에 Display Local Encryption Processing Control이 True로 설정된 경우에만 사용할 수 있습니다.
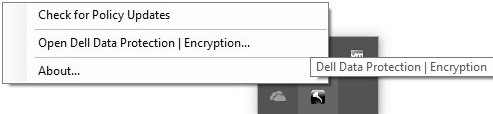
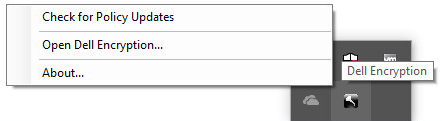
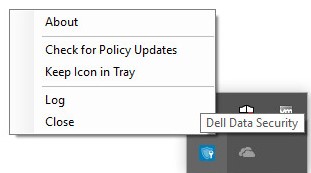
- Windows 컴퓨터에 로그인합니다.
- Windows 시스템 트레이에서 Dell Encryption(이전의 Dell Data Protection | Encryption) 아이콘을 마우스 오른쪽 버튼으로 클릭한 다음 Check for Policy Updates를 선택합니다.
| v8.0.0 ~ 8.13.0 | v8.15.0 이상 |
|---|---|
|
|
|
참고: 성능 문제를 방지하기 위해 Check for Policy Updates 통신은 1분으로 제한됩니다.
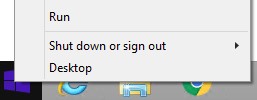
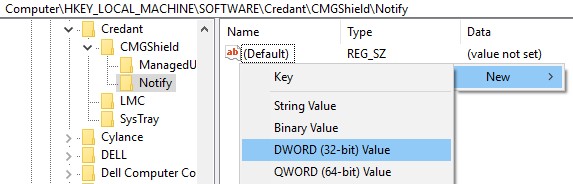
- Windows 시작 메뉴를 마우스 오른쪽 버튼으로 클릭한 다음 Run을 클릭합니다.
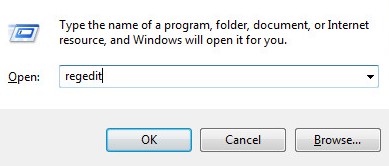
- Run UI(User Interface)에서
regedit을 입력한 다음 OK를 누릅니다. 레지스트리 편집기가 열립니다.
- Registry Editor에서
HKEY_LOCAL_MACHINE\Software\Credant\CMGShield\Notify로 이동합니다. - Notify 폴더를 마우스 오른쪽 버튼으로 클릭하고 New를 선택한 다음 DWORD (32-bit) Value를 클릭합니다.
- DWORD 이름을
PingProxy로 지정합니다.

PingProxy를 두 번 클릭합니다.
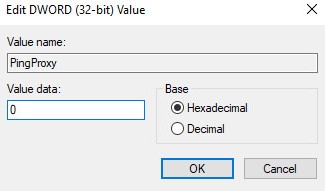
- Value data를
1로 채우고 OK를 클릭합니다.

참고: 엔드포인트에서 서버를 쿼리하면
PingProxy 값 데이터가 0으로 돌아갑니다.
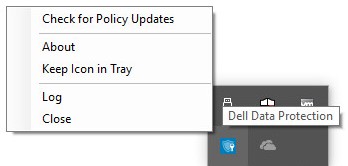
EMAgent
- Windows 컴퓨터에 로그인합니다.
- Windows 시스템 트레이에서 Dell Data Security(이전의 Dell Data Protection) 아이콘을 마우스 오른쪽 버튼으로 클릭한 다음 Check for Policy Updates를 선택합니다.
| v8.0.1 ~ 8.13.0 | v8.15.0 이상 |
|---|---|
|
|
|
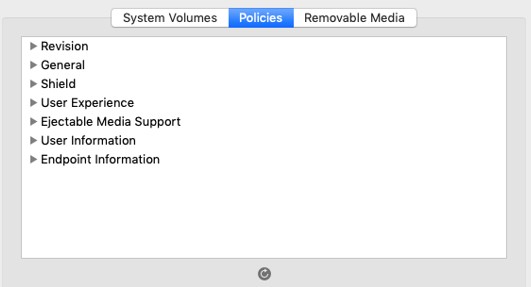
Mac
- Mac 컴퓨터에 로그인합니다.
- System Preferences를 클릭합니다.

- Dell Encryption Enterprise(이전 Dell Data Protection)를 두 번 클릭합니다.
| v8.0.0 ~ 8.13.2 | v8.15.0 이상 |
|---|---|
|
|
|


- Policies를 클릭합니다.

- 창 하단 근처의 새로 고침 버튼을 클릭합니다.
참고: 성능 문제를 방지하기 위해 Check for Policy Updates 통신은 1분으로 제한됩니다.
지원 부서에 문의하려면 Dell Data Security 국제 지원 전화번호를 참조하십시오.
온라인으로 기술 지원 요청을 생성하려면 TechDirect로 이동하십시오.
추가 정보 및 리소스를 보려면 Dell 보안 커뮤니티 포럼에 참여하십시오.
Additional Information
Videos
Affected Products
Dell EncryptionArticle Properties
Article Number: 000126722
Article Type: Solution
Last Modified: 24 Oct 2023
Version: 10
Find answers to your questions from other Dell users
Support Services
Check if your device is covered by Support Services.