How to Configure TACACS+ in Cisco Unified Computing System
Summary: This article explains how to configure TACACS+ in Cisco Unified Computing System Manager (UCSM) and provides helpful troubleshooting steps if the authentication requests are not working. ...
This article applies to
This article does not apply to
This article is not tied to any specific product.
Not all product versions are identified in this article.
Instructions
Facts:
Cisco Unified Computing System Manager (UCSM)
TACACS+ server
Procedure:
TACACS+ is a protocol that is used to handle Authentication, Authorization, and Accounting services.
In UCSM, TACACS+ can be configured as an authentication protocol:
 Figure 2: Create TACACS+ Provider Group

Cisco Unified Computing System Manager (UCSM)
TACACS+ server
Procedure:
TACACS+ is a protocol that is used to handle Authentication, Authorization, and Accounting services.
In UCSM, TACACS+ can be configured as an authentication protocol:
-
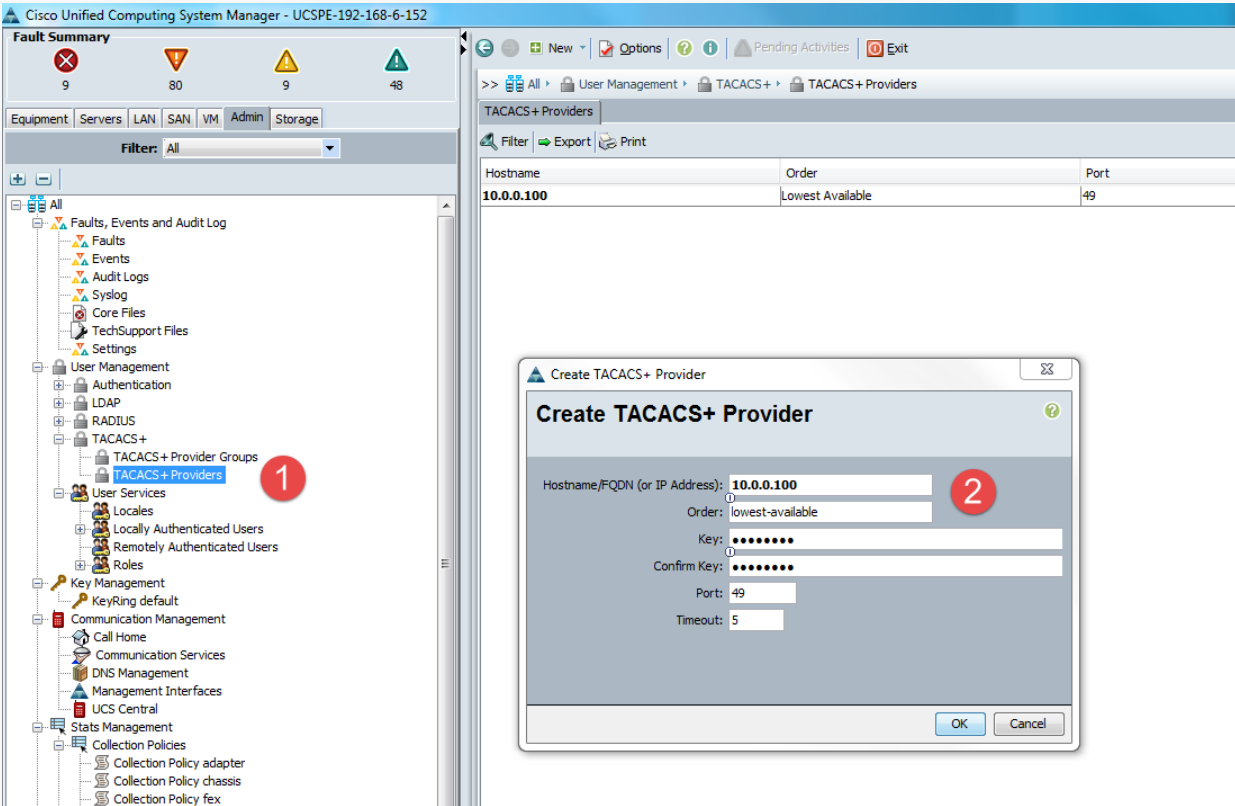
Create your TACACS+ Providers:
- Go to the Admin tab and under User Management, expand TACACS+. Right-click TACACS+ Providers and click Create TACACS+ Provider.
- Enter the TACACS+ server's configuration and click OK.
- Repeat this step if there is more than one TACACS+ server used.

Figure 1: Create TACACS+ Provider
- Create a TACACS+ Provider Group:
- Go to the Admin tab and under User Management, expand TACACS+. Right-click TACACS+ Provider Groups and click Create TACACS+ Provider Group.
- Give the group a name (for example, location) and click the servers that you configure. Once you have the servers that are selected, click the ">>" button to add them to the group. Click OK to finish. If there is more than one server, give each server an order number. This is the order UCSM uses to authenticate the users.
 Figure 2: Create TACACS+ Provider Group
- Create an Authentication Domain to be used with TACACS+. Cisco recommends not changing Native Authentication configuration as that can be used as the fallback authentication method in the event your AAA servers are not available:
- Go to the Admin tab and under User Management, expand Authentication. Right-click Authentication Domains and click Create a Domain.
- Give it a short name. This is presented as a drop-down option when logging in to UCSM.
- Under Realm, select TACACS+, and under Provider Group, select the TACACS+ group that was created, then click OK.

Figure 3: Create a Domain
Helpful Troubleshooting Steps:
-
Are the TACACS+ servers pingable? If pings fail, review the network to see why the TACACS+ servers are not pingable.
# connect local-mgmt

# ping x.x.x.x
-
Is it possible to connect to port 49 (default) on the TACACS+ servers? This port is configurable, so verify what port is being used.
In a successful connection, the console should go to a black screen. A failed connection results in a timeout error.
If telnet fails, review with the security team to see if traffic is dropped by a firewall or router.
# connect local-mgmt

# telnet x.x.x.x 49
-
Is it possible to log in using the credentials entered? There should be a message if the credentials were entered correctly, similar to "User has been authenticated."
# connect nx-os

# test aaa server tacacs+ [server IP] [username] [password]
Additional Information
Related Article:
For more information, see Cisco article Cisco's TACACS authentication documentation .
.
For more information, see Cisco article Cisco's TACACS authentication documentation
 .
.Affected Products
VxBlock and Vblock SystemsArticle Properties
Article Number: 000207079
Article Type: How To
Last Modified: 06 Jan 2023
Version: 2
Find answers to your questions from other Dell users
Support Services
Check if your device is covered by Support Services.