PowerEdge: PCI Passthrough "Module 'DevicePowerOn' Power on Failed" when Using GPUs with Virtual Machines on vSphere
Summary: The VM does not turn on after configuring PCI Device passthrough on the ESXi host and adding the device to the VM. It gets stuck at 80% and then results in an error "total number of pages needed (4206594) exceeds the limit (917504)." ...
Instructions
2022-04-22T03:04:15.771Z| vmx| | I005: PCIPassthru: total number of pages needed (4206594) exceeds limit (917504), failing
2022-04-22T03:04:15.771Z| vmx| | I005: Module 'DevicePowerOn' power on failed.

Preliminaries
Your host BIOS must be configured correctly to enable NVIDIA GPU for passthrough, and the virtual machine that is destined to run these accelerated workloads must meet specific requirements. This section describes all these requirements.
Which Devices?
This article is only relevant if your PCI device maps memory regions whose sizes total more than 16 GB. Follow VMware KB 1010789 published instructions to enable passthrough devices under vSphere. As a rule, cards that require more than 16 GB of memory mapping are high-end cards. You should follow the instructions in this article to enable them for use in passthrough mode within a virtual machine.
Host BIOS
Your host BIOS must be configured to support the large memory regions needed by these high-end PCI devices. To enable this, find the host BIOS setting for "memory mapped I/O above 4 GB" and enable it.

Note: This option is not available on 16G, but by default it is activated and you could allocate 48 GB GPU in passthrough to a VM.
Guest OS
To access these large memory mappings, connect to VMware site Guest OS must boot with EFI
Editing the PCI Device Availability on the Host Server
An installed PCI-compatible GPU hardware device is initially recognized by the vSphere hypervisor at server boot time without having any specific drivers that are installed into the hypervisor.
vSphere recognizes all PCI devices in this way. You can see the list of PCI devices that are found in the vSphere Client tool by choosing the particular host server that you are working on, and following the menu choices: Configure > Hardware > PCI Devices > Edit to see the list, as seen in the example in Figure 2 below.
If the particular GPU device has not been previously enabled for DirectPath I/O, you can place the GPU device in Direct Path I/O (passthrough) mode by clicking the check box on the device entry as seen in the NVIDIA device example.

Enabling High-end Devices in VM file
With the above requirements satisfied, two entries must be added to the VM’s VMX file, either by modifying the file directly or by using the vSphere client to add these capabilities. The first entry is:
pciPassthru.use64bitMMIO="TRUE"
Specifying the second entry requires a simple calculation. Sum the GPU memory sizes of all GPU devices(*) you intend to pass into the VM and then round up to the next power of two. For example, to use passthrough with 4 16 GB A2 devices, the value would be: 32 + 32 = 64, rounded up to the next power of two to yield 128. Use this value in the second entry:
pciPassthru.64bitMMIOSizeGB="128"
With these two changes to the VMX file, follow the VMware KB 1010789 standard vSphere instructions for enabling passthrough devices at the host level and for specifying which devices should be passed into your VM. The VM should now boot correctly with your device in passthrough mode.
Enabling High-end Devices in UI
In the vSphere Client again, choose the virtual machine and use the options: Edit Settings > VM Options > Advanced > Configuration Parameters > Edit Configuration to get to the list of PCI-related options shown below.

We calculate the value of the "64bitMMIOSizeGB" parameter using a straightforward approach. Count the number of high-end PCI GPU devices that you intend to pass into this VM. This can be one or more GPUs. Multiply that number by 16 and round it up to the next power of two.
For example, to use passthrough mode with two GPU devices in one VM, the value would be: 4 * 16 = 64, rounded up to the next power of two to give 128.
Assigning a GPU Device to a Virtual Machine
This section describes the assignment of the GPU device to the VM. Power off the virtual machine before assigning the GPU device to it.
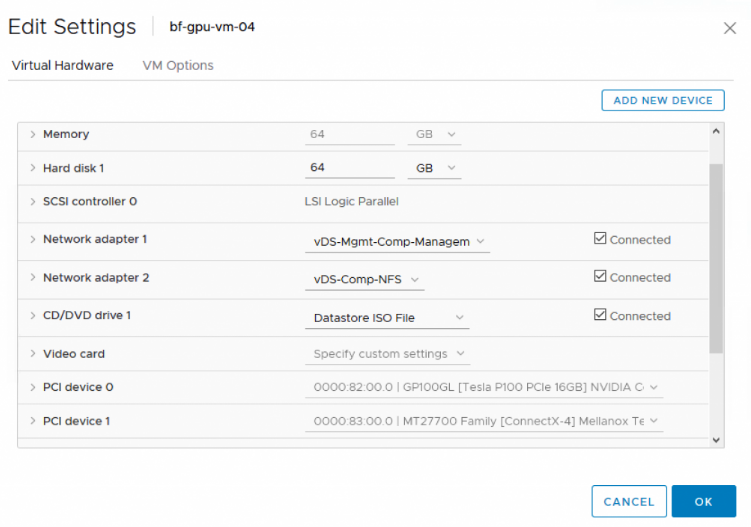
To enable a virtual machine access to a PCI device, in the vSphere Client, select the virtual machine, use the Edit Settings option, and scroll down to the PCI Device list. If your device is not already listed there, use the Add New Device button to add it to the list. Once added, your virtual machine settings should look similar to those shown in Figure 7. In this example, the relevant entry is PCI Device 0.
Memory Reservation
When the PCI device is assigned to a VM, the virtual machine must have a memory reservation for the full-configured memory size for the VM. This is done in the vSphere client by choosing the VM, using Edit Settings > Virtual Hardware > Memory to access and change the value in the Reservation area.
Finally, turn on the virtual machine. After turning on the virtual machine, login to the Guest OS and check that the GPU card is present using the commands:
- On a Linux virtual machine, use the command:
"lspci | grep nvidia"
- On a Windows operating system, use the Device Manager from the Control Panel to check the available GPU devices
The GPU is now ready for application use in passthrough mode.
Additional Information
Troubleshooting
If you have followed the above instructions and your VM still does not boot correctly with the devices enabled, the material in this section may be helpful. If you have tried the suggestions below and are still having issues, contact us and we can help you.
Mapping Issue:
If you see an error similar to the following in the VM’s vmware.log file:
1 I120: PCIPassthru: 0000:82:00.0 : Device BAR 0 requested 64-bit memory address that exceeded MPN type (62105227100160)
Your BIOS settings do not meet ESXi requirements for enabling this type of passthrough device. ESXi 6.0 p4 through ESXi 6.5 requires that memory that is mapped for PCI devices all be below 16 TB. It may be possible to work around this issue if your BIOS supports the ability to control how high in the host’s memory address space PCI memory regions are mapped. Some manufacturers-SuperMicro, for example-have BIOS options to change how high this memory is mapped. On SuperMicro systems, the MMIOHBase parameter can be changed to a lower value from its default of 56 TB. Sugon systems also have a similar (hidden) BIOS setting. Check with your system vendor to learn whether your BIOS supports this remapping feature. Another solution is to update your ESXi version to 6.5 u1 or above, which has removed the 16TB limitation.
Incorrect Configuration:
An error in the vmware.log file of the following form:
1 2016-07-07T09:18:37.624Z| vmx| I120: PCIPassthru: total number of pages needed (2097186) exceeds limit (917504), failing
Indicates that you have not correctly enabled above 4 GB mappings in your host BIOS as described in the Host BIOS section above, or not correctly specified the VMX entries.
Cannot Use Device:
If you have followed all the above instructions and your VM has booted correctly, but you see a message similar to the following when running the nvidia-smi utility in your Guest OS:
1 Unable to determine the device handle for GPU 0000:13:00.0: Unknown Error
We suggest contacting NVIDIA directly or performing a web search using this string to find additional information that may be of help.