Procedure for Replacing Self-signed certificate for SMI-S with addition for Embedded instances.
Summary: Procedure for Replacing Self-signed certificate for SMI-S. There is an addition for Embedded instances of SMI-S and the additional restrictions that are part of that.
This article applies to
This article does not apply to
This article is not tied to any specific product.
Not all product versions are identified in this article.
Instructions
- Recreate the self-signed certificate with your details.
- Connect to:
- https://<IP_of_instance>:5989/ECOMConfig
- Login
- Default Credentials:
- Username: Admin
- Password: #1Password
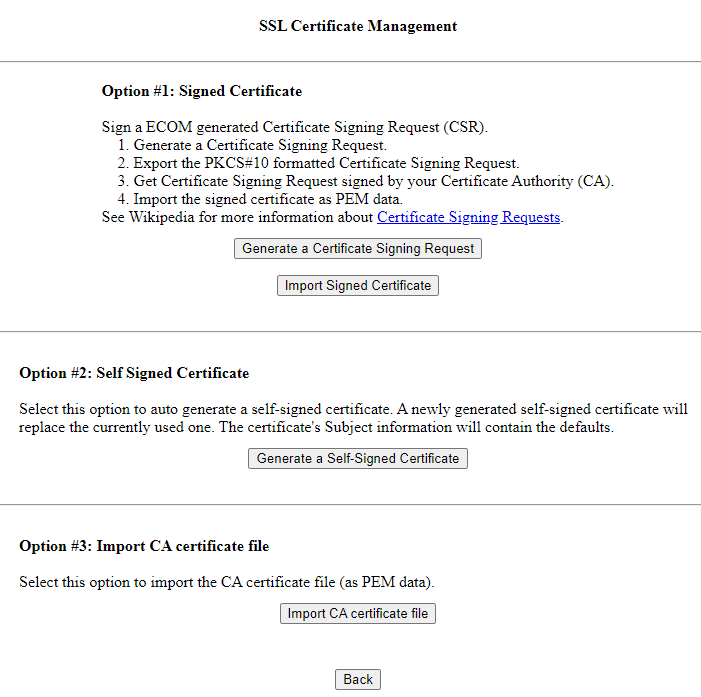
- Go to SSL Certificate Management
- The page will look like
- To rebuild the certificate with your details click the “Generate a certificate signing request” in Option#1
- Enter in the details you need for the certificate and Click Generate
- Copy the CSR details and take it to your CA to get signed.
- Copy the CSR details to your CA and get the certificate signed
- The page will look like
- Connect to:
- Once signed, download the certificate chain and separate the Tomcat( server certificate), Intermediate, and Root into separate files (.cer is the standard file format).
- With files separated the import process can be started.
- Import process
- On the SSL Certificate Management Page
- Import the Root certificate using Option#3.
- Import the Intermediate certificate using Option#3
- Import the Tomcat (server certificate) using Option#1 “Import Signed Certificate”
- After that process is done, please restart the ECOM service.
- In windows, this is done in services.MSC
- In Linux this is done with the
systemctlcommand - In vApp instances, you use the vApp Manager page on 5480.
- For Embedded instances see Addendum 1 at the bottom.
- Once SMI-S is back online confirm that the certificate shared through the browser has the same details that you entered earlier.
- On the SSL Certificate Management Page
- Once SMI-S is online again open a new Tab to check if ECOM shows as secure.

Addendum 1. ECOM certificate process for EMGMT/ Embedded instance.
With embedded instances, there are 2 containers, MGMT-0 and MGMT-1. Each container has its own IP address to connect through, however, the IP and Ports are auto-adjusted using NAT. This means that both IPs addresses will autoroute the connection to the active container. Because of this auto-routing, only one container SMI-S certificate can be updated at a time. Also, when you reboot the container the services failover to the other container which means you will need to perform the steps twice for each step.
The Active container is the side with SMASDB and SMAS running. This can be checked in the vApp Manager page login > Manage > Daemons. Each container vApp Manager page can be accessed by the specific IP and port 5480.
For a quick Diagram on the container use and IP NAT please see below
As shown the IP Address XXX and YYY both go to container MGMT-0 as that is the active container. If a container reboot was performed on MGMT-0 then both XXX and YYY would auto rout to container MGMT-1 as that would then be the active container.
Since both MGMT-0 and MGMT-1 have their own SMI-S install the certificates will need to be rebuilt on both containers, but only one at a time as only the Active container can be accessed.
The process for the SMI-S embedded instance is as follows.
- Create the self-signed certificate with your details and collect the CSR.
- Connect to:
- https://<IP_of_instance>:5989/ECOMConfig
- Login
- Default Credentials:
- Username: Admin
- Password: #1Password
- Go to SSL Certificate Management
- To rebuild the certificate with your details click the “Generate a certificate signing request” in Option#1
- Enter in the details you need for the certificate and Click Generate
- Copy the CSR details and take it to your CA to get signed.
- Copy the CSR details to your CA and get the certificate signed
- To rebuild the certificate with your details click the “Generate a certificate signing request” in Option#1
- Connect to:
- Once signed, download the certificate chain and separate the Tomcat( server certificate), Intermediate, and Root into separate files (.cer is the standard file format).
- With files separated the import process can be started.
- Import process
- On the SSL Certificate Management Page
- Import the Root certificate using Option#3.
- Import the Intermediate certificate using Option#3
- Import the Tomcat (server certificate) using Option#1 “Import Signed Certificate”
- After that process is done, please restart the ECOM service.
- For this, you will need to connect to the Active container. Hover over the arrow going in a circle in the top right-hand corner.
- Click “Restart Appliance”
- On the SSL Certificate Management Page
- When SMI-S comes back online the certificate will NOT show secure at this point and we are now on the other container, that was previously not accessible. Please start at step 1 again.
- When you perform the “Restart Appliance” on the second container the services will fail back to the original container you were working with and you will be able to proceed with the rest of the Steps.
- Once SMI-S is online again open a new Tab to check if ECOM shows as secure.

Affected Products
SMI-S ProviderArticle Properties
Article Number: 000195984
Article Type: How To
Last Modified: 28 Feb 2025
Version: 5
Find answers to your questions from other Dell users
Support Services
Check if your device is covered by Support Services.