Instalar SMBIOS de Dell mediante Dell Command PowerShell Provider en Windows PE
Summary: Cómo descargar, instalar y configurar Dell Command PowerShell Provider (DCPP) y Dell Command Configure (DCC) con archivos binarios de Windows PE y CCTK. Siga las instrucciones para una configuración perfecta. ...
This article applies to
This article does not apply to
This article is not tied to any specific product.
Not all product versions are identified in this article.
Instructions
Productos afectados:
- Dell Command | PowerShell Provider
- Dell Command | Configure
Nota: El Windows PE correcto con los elementos binarios de CCTK se encuentra en el directorio temporal ubicado en ISO\sources\boot.wim.
Para DCC 4.4 y versiones posteriores o DCPP 2.4 y versiones posteriores
- Descargue e instale Microsoft Visual C++ Runtime 2019 Nota: Visual C++ 2015, 2017 y 2019 comparten los mismos archivos redistribuibles.
En el caso de Dell Command | Configure 4.3.1 y versiones anteriores o Dell Command | PowerShell Provider 2.3.1 y versiones anteriores:
- Descargue e instale Microsoft Visual C++ Runtime 2010
- Descargue e instale Microsoft Visual C++ Runtime 2015: actualización 3
- Haga clic en el menú Inicio y busque PowerShell.
- Haga clic con el botón secundario del mouse en PowerShell y, luego, seleccione Ejecutar como administrador.
- En el símbolo del sistema de PowerShell, escriba
Find-Module DellBIOSProvidery, luego, presione Intro. - Presione Y y, a continuación, presione Intro.
- Tipo
Install-Module DellBIOSProvidery, luego, presione Intro. - Presione
Yy, luego, presione Intro. - Tipo
Set-ExecutionPolicy Unrestrictedy, luego, presione Intro. - Presione A y, luego Intro.
- Tipo
Import-Module DellBIOSProvider -Verbosey, luego, presione Intro. - Descargue e instale la versión más reciente del Kit de implementación y evaluación de Windows
(ADK).
- Instale DCC para utilizarlo también en Windows PE (opción recomendada), consulte Dell Command | Configure.
- Haga clic en el menú Inicio y busque Símbolo del sistema de Dell Command Configure.
- Haga clic con el botón secundario del mouse en Símbolo del sistema de Dell Command Configure y, a continuación, seleccione Ejecutar como administrador.
- Cree directorios temporales para contener el CCTK Windows PE:
- Tipo
MD c:\dcshare - Tipo
MD c:\dcshare\temp - Tipo
MD c:\dcshare\temp\mount
- Tipo
- Vaya al directorio de instalación de DCC en el Símbolo del sistema de Dell Command Configure.
- En el caso de 64 bits:
CD C:\Program Files (x86)\Dell\Command Configure\X86_64 - Para 32 bits:
CD C:\Program Files (x86)\Dell\Command Configure\X86
- En el caso de 64 bits:
- Haga que DCC cree un archivo de Windows 10 PE con los elementos binarios de DCC mediante el siguiente comando. En el símbolo de sistema, escriba
cctk_x86_64_winpe_10.bat c:\dcshare\pe344 c:\progra~2\dell\comman~1\y, luego, presione Intro.Nota:- El primer parámetro del archivo .bat representa la ruta al directorio local de la imagen personalizada de Windows PE 10.0 que se creará
- El segundo parámetro representa la ruta al kit de herramientas de Command Configure extraído.
- Monte boot.wim en el símbolo del sistema de herramientas de implementación e imágenes mediante
DISM:Nota: PowerShell en Windows PE requiere características adicionales que se encuentran en el kit de implementación automatizado; este se debe instalar antes que WinPE-PowerShell:WinPE-WMIWinPE-NetFXWinPE-Scripting
DISM /Mount-WIM /wimfile:c:\dcshare\pe344\ISO\sources\boot.wim /index:1 /MountDir:c:\dcshare\temp\mount

Dism /Add-Package /Image:"C:\Dcshare\temp\mount" /PackagePath:"C:\Program Files\Windows Kits\10\Assessment and Deployment Kit\Windows Preinstallation Environment\amd64\WinPE_OCs\WinPE-WMI.cab"

Dism /Add-Package /Image:"C:\Dcshare\temp\mount" /PackagePath:"C:\Program Files\Windows Kits\10\Assessment and Deployment Kit\Windows Preinstallation Environment\amd64\WinPE_OCs\en-us\WinPE-WMI_en-us.cab"

Dism /Add-Package /Image:"C:\Dcshare\temp\mount" /PackagePath:"C:\Program Files\Windows Kits\10\Assessment and Deployment Kit\Windows Preinstallation Environment\amd64\WinPE_OCs\WinPE-NetFX.cab"

Dism /Add-Package /Image:"C:\Dcshare\temp\mount" /PackagePath:"C:\Program Files\Windows Kits\10\Assessment and Deployment Kit\Windows Preinstallation Environment\amd64\WinPE_OCs\en-us\WinPE-NetFX_en-us.cab"

Dism /Add-Package /Image:"C:\Dcshare\temp\mount" /PackagePath:"C:\Program Files\Windows Kits\10\Assessment and Deployment Kit\Windows Preinstallation Environment\amd64\WinPE_OCs\WinPE-Scripting.cab"

Dism /Add-Package /Image:"C:\Dcshare\temp\mount" /PackagePath:"C:\Program Files\Windows Kits\10\Assessment and Deployment Kit\Windows Preinstallation Environment\amd64\WinPE_OCs\en-us\WinPE-Scripting_en-us.cab"

Dism /Add-Package /Image:"C:\Dcshare\temp\mount" /PackagePath:"C:\Program Files\Windows Kits\10\Assessment and Deployment Kit\Windows Preinstallation Environment\amd64\WinPE_OCs\WinPE-PowerShell.cab"

Dism /Add-Package /Image:"C:\Dcshare\temp\mount" /PackagePath:"C:\Program Files\Windows Kits\10\Assessment and Deployment Kit\Windows Preinstallation Environment\amd64\WinPE_OCs\en-us\WinPE-PowerShell_en-us.cab"

Dism /Add-Package /Image:"C:\Dcshare\temp\mount" /PackagePath:"C:\Program Files\Windows Kits\10\Assessment and Deployment Kit\Windows Preinstallation Environment\amd64\WinPE_OCs\WinPE-StorageWMI.cab"

Dism /Add-Package /Image:"C:\Dcshare\temp\mount" /PackagePath:"C:\Program Files\Windows Kits\10\Assessment and Deployment Kit\Windows Preinstallation Environment\amd64\WinPE_OCs\en-us\WinPE-StorageWMI_en-us.cab"

Dism /Add-Package /Image:"C:\Dcshare\temp\mount" /PackagePath:"C:\Program Files\Windows Kits\10\Assessment and Deployment Kit\Windows Preinstallation Environment\amd64\WinPE_OCs\WinPE-DismCmdlets.cab"

Dism /Add-Package /Image:"C:\Dcshare\temp\mount" /PackagePath:"C:\Program Files\Windows Kits\10\Assessment and Deployment Kit\Windows Preinstallation Environment\amd64\WinPE_OCs\en-us\WinPE-DismCmdlets_en-us.cab"
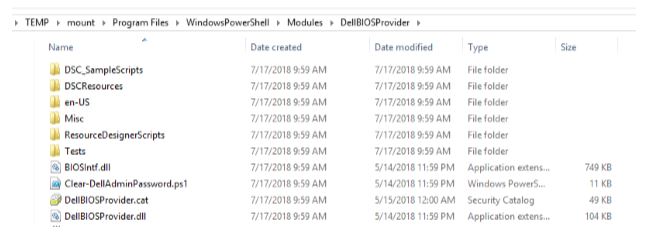
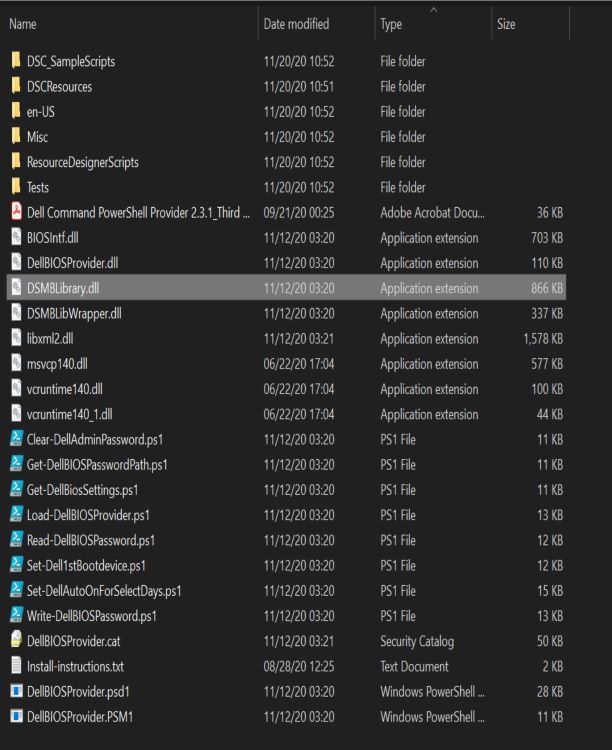
- Copie los archivos de DellBIOSProvider desde el directorio de instalación de DCPP (por ejemplo, copie C:\Program Files\WindowsPowerShell\Modules\DellBIOSProvider\2.4.0 en el directorio mount\Program Files\WindowsPowerShell\Modules).

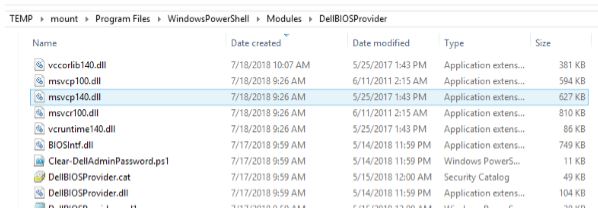
- Copie los siguientes archivos (instalados anteriormente) DLL de Visual C++ de C:\Windows\System32 a mount\Program Files\WindowsPowerShell\Modules.
- En el caso de DCPP 2.4 y versiones posteriores
- msvcp140.dll
- vcruntime140.dll
- vcruntime140_1.dll

- En el caso de DCPP 2.3.1 y versiones anteriores
- msvcp100.dll
- msvcr100.dll
- msvcp140.dll
- vccorlib140.dll
- vcruntime140.dll

- En el caso de DCPP 2.4 y versiones posteriores
- Desmonte el archivo PE CCTK WIM de Windows 10 modificado. Tipo
DISM /unmount-wim /mountdir:c:\dcshare\temp\mount /commity, luego, presione Intro. - Importe el archivo CCTK - Powershell boot.wim modificado a Servicios de implementación de Windows (WDS), Microsoft System Center Configuration Manager (SCCM) o a una unidad USB.
- Una vez arrancado, abra PowerShell
- Tipo
Set-executionpolicy unrestrictedy, luego, presione Intro. - Tipo
Import-Module DellBIOSProvider -Verbosy, luego, presione Intro. - Tipo
CD DellSMBIOS:y, luego, presione Intro.
- Tipo
Affected Products
Dell Command | Configure, Dell Command | Powershell ProviderArticle Properties
Article Number: 000146531
Article Type: How To
Last Modified: 13 Aug 2024
Version: 9
Find answers to your questions from other Dell users
Support Services
Check if your device is covered by Support Services.