Ubuntuシステム向けKiller N1535 Wirelessファームウェアの手動アップデート ガイド
Summary: UbuntuでKiller N1535 Wirelessのファームウェアを手動アップデートする方法について説明します。
Symptoms
この記事では、Ubuntu用のN1535ワイヤレス ファームウェアの手動アップデートに関する情報が記載されています。
目次:
Linuxファームウェア パッケージ
Linuxファームウェア(Killer N1535)アップデート プロセス。
次のコマンドを使用して、システムをアップデートします。sudo apt-get updatesudo apt-get upgrade
 メモ:現在のLinuxファームウェア パッケージを確認するには、http://mirrors.kernel.org/ubuntu/pool/main/l/linux-firmware
 を参照してください。
トップに戻る
Ubuntu:Killer N1535 Wireless
Killer N1535ファームウェアの手動アップデート プロセス
- ターミナルで、
sudo lspci | grep –i qca6174コマンドを使用してQCA6174を確認します(図1)。
図1
- 最新のファームウェアをダウンロードして内容を解凍します:https://codeload.github.com/kvalo/ath10k-firmware/zip/master
 。
。 - または、次のようにブラウザーでこのURL(https://github.com/kvalo/ath10k-firmware)を開き、ZIPファイルをダウンロードして保存します(図2)。
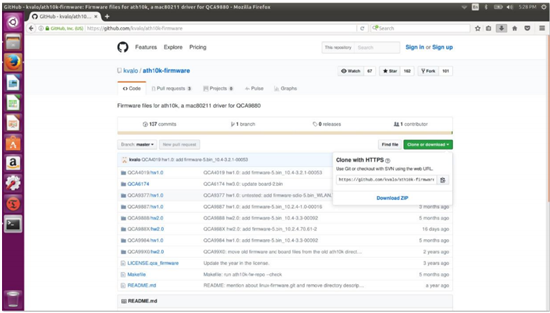
図2
- [ダウンロード]フォルダーを開き、[ath10k-firmware-master.zip]を右クリックして[すべて展開]を選択します。
- 次のように、展開したフォルダーの内容を確認します。[QCA6174]フォルダーが表示されます(図3)。
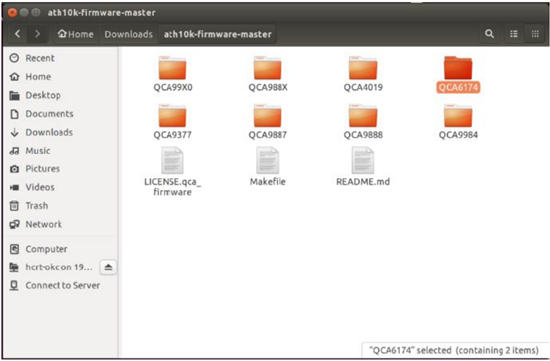
図3
- ターミナルに戻り、「
sudo nautilus」と入力して、ルート権限ファイル マネージャーを開きます(図4)。Sudo nautilus- [computer]をクリックします。
- フォルダー「lib」をクリックします。
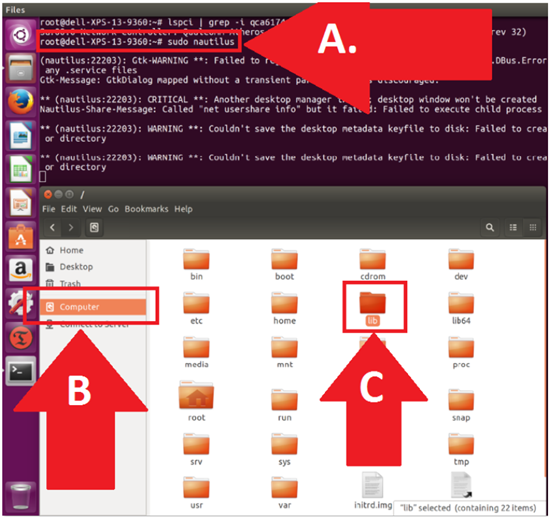
図4
- QCA6174ファームウェア ディレクトリーに移動します(図5)。
- [firmware]をクリックします。
- [ath10k]をクリックして開きます。
- [QCA6174]ディレクトリーを右クリックして削除します(すべて削除)。
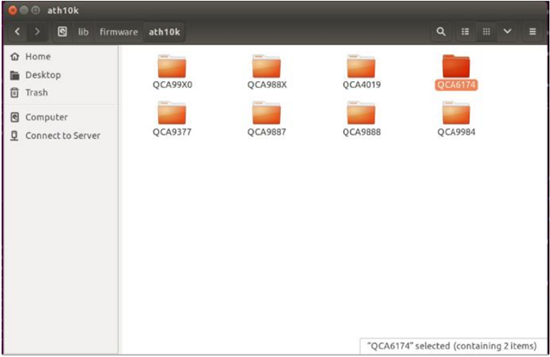
図5
- 展開したダウンロード フォルダーでその他のファイル マネージャー ウィンドウに移動します(図6)。
- Downloads/auth10k-firmwareで新しいソース ファイルの場所を確認します。
- .../firmware/ath10kで新しいファイルの保存先を確認します。
- 次のように、QCA6174ディレクトリーの内容すべてをコピーして、保存先ディレクトリーに貼り付けます。パスは、/lib/firmware/ath10k/となる必要があります。
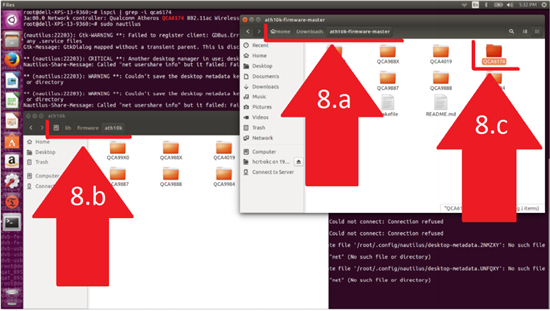
図6
- /lib/firmware/ath10k/QCA6174/HW3.0を開き、ファイル名をfirmware-4.bin_wlan.rm.2.0-00180-qcarmswpz-1からfirmware-4.binに変更します(図7)。
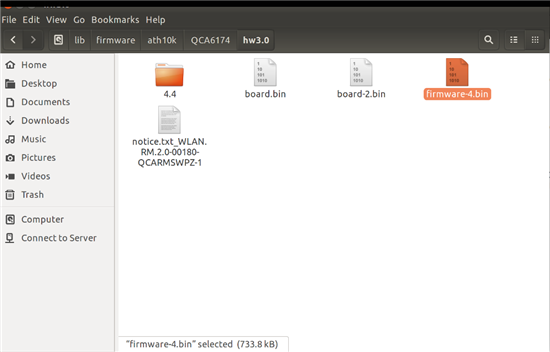
図7
- 次に、新しいKiller Wi-Fiファームウェアを再起動してテストします。
この記事の詳細に関する質問がある場合は、Dellテクニカル サポートまでお問い合わせください。
トップに戻るAffected Products
XPS 13 9360Article Properties
Article Number: 000132269
Article Type: Solution
Last Modified: 30 May 2024
Version: 4
Find answers to your questions from other Dell users
Support Services
Check if your device is covered by Support Services.
Article Properties
Article Number: 000132269
Article Type: Solution
Last Modified: 30 May 2024
Version: 4
Find answers to your questions from other Dell users
Support Services
Check if your device is covered by Support Services.