适用于 Ubuntu 系统的 Killer N1535 Wireless 固件手动更新指南
Summary: 如何在 Ubuntu 中手动更新 Killer N1535 Wireless 上的固件。
This article applies to
This article does not apply to
This article is not tied to any specific product.
Not all product versions are identified in this article.
Symptoms
本文包含有关手动更新 Ubuntu 的 Killer N1535 无线固件的信息。
目录:
Linux 固件软件包
Linux 固件(带 Killer N1535)更新过程。
使用以下命令更新系统:sudo apt-get updatesudo apt-get upgrade
 注意:要确定当前可用的 linux 固件软件包,请访问:http://mirrors.kernel.org/ubuntu/pool/main/l/linux-firmware
返回页首
Ubuntu:Killer N1535 Wireless
Killer N1535 手动固件更新过程
- 在终端中,使用此命令确认 QCA6174(图 1):
sudo lspci | grep –i qca6174
图1
- 下载最新固件并解压内容:https://codeload.github.com/kvalo/ath10k-firmware/zip/master

- 也可以通过此 url 使用浏览器下载 ZIP 并保存,如图所示:https://github.com/kvalo/ath10k-firmware(图 2)
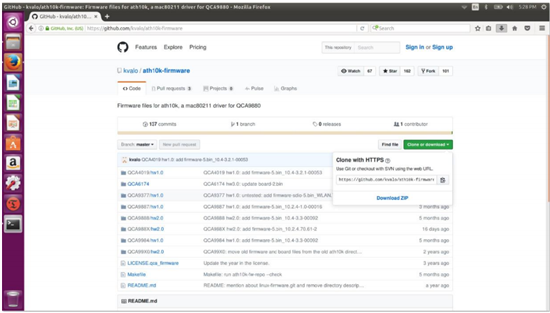
图 2
- 打开“Downloads”文件夹,然后“右键单击”“ath10k-firmware-master.zip”并“在此处解压”。
- 确认解压的文件夹的内容,如图所示。您应看到“QCA6174”文件夹(图 3)。
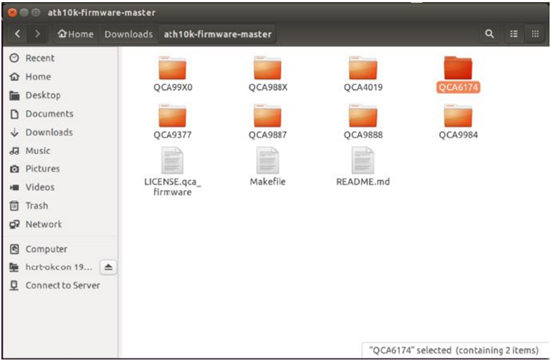
图3
- 返回到终端,键入“
sudo nautilus”以打开 root 权限文件管理器(图 4)。Sudo nautilus- 单击“computer”
- 单击文件夹“lib”

图4
- 导航至 QCA6174 固件目录(图 5)。
- 单击“firmware”
- 单击以打开“ath10k”
- 右键单击并“删除”“QCA6174”目录(我们会删除所有内容)。
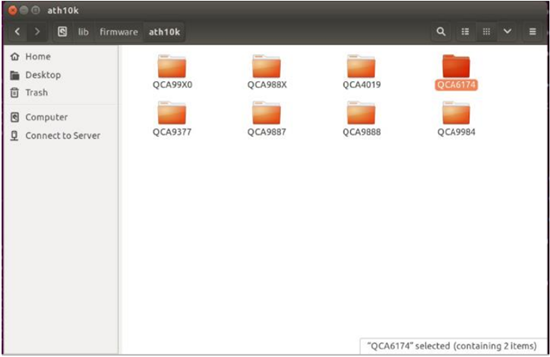
图5
- 导航至压缩的下载文件夹所在的其他文件管理器窗口(图 6):
- 在 Downloads/auth10k-firmware 中确认新的源文件位置
- 在 ../firmware/ath10k 中确认新的目标文件位置
- 将 QCA6174 目录及其所有内容复制并粘贴到目标目录中,如图所示。路径应为:/lib/firmware/ath10k/
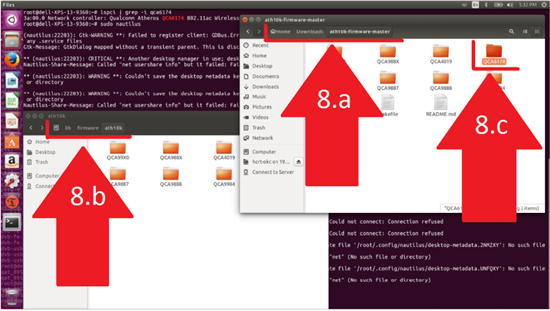
图6
- 打开 /lib/firmware/ath10k/QCA6174/HW3.0 并将文件:firmware-4.bin_wlan.rm.2.0-00180-qcarmswpz-1 重命名为:firmware-4.bin(图 7)
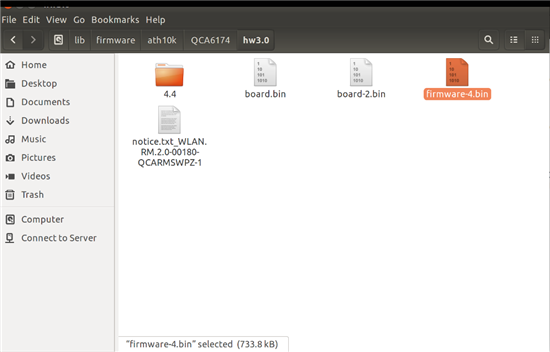
图 7
- 现在重新启动并测试新的 Killer Wi-Fi 固件。
如果您对本文还有其他问题,请联系戴尔技术支持。
返回页首Affected Products
XPS 13 9360Article Properties
Article Number: 000132269
Article Type: Solution
Last Modified: 30 May 2024
Version: 4
Find answers to your questions from other Dell users
Support Services
Check if your device is covered by Support Services.