Activating the Trusted Platform Module Security Feature
Summary: This article provides information about activating Trusted Platform Module (TPM).
This article applies to
This article does not apply to
This article is not tied to any specific product.
Not all product versions are identified in this article.
Instructions
Table of Contents:
- Enable the TPM Security Feature in the System Setup
- Activate the Trusted Platform Module (TPM) Security Feature
- Install the TPM Software and Driver
- Complete the TPM Wizard
Enable the TPM Security Feature in the System Setup
To enable TPM security features in the System Setup (BIOS), perform the following steps:
- Reboot the system.
- When the message "Press <F2> to enter Setup" appears, press the <F2> key.
- When the System Setup appears, navigate to the Security group using the Down arrow key.
- Press the <+> key to expand the group.
- Verify that TPM Security is listed under Security.
- Navigate to the TPM Security section using the Down arrow key.
- Press the <Enter> key.
- Press the Right Arrow key to change the setting to On.
- The TPM is now enabled.
- Press the <Esc> key.
- Using the Down Arrow key, highlight Exit and press <Enter> key.
- The system reboots.
Activate the Trusted Platform Module (TPM) Security Feature
To activate the TPM:
- Boot the system into System Setup by pressing the <F2> key at the Dell splash screen.
- Navigate to the Security group using the <Down Arrow> key.
- Press the <+> key to expand the group.
- Using the Right Arrow key, navigate to TPM Activation.
- In the TPM Activation field, select Activate.
- Press the <Esc> key.
- Using the Down Arrow key, highlight to select Save Changes and Exit, and then press the <Enter> key, which allows the computer to restart and boot into the operating system.
Install the TPM Software and Driver
NOTE: Installation and activation of TPM cause Microsoft® Windows® XP System Restore to remove all existing System Restore Points. Manually create a restore point after the Personal Secure Drive is activated and functional in order to provide future stability to your system.
Click Start, click Run. To install the software and driver:
- Type C:\Dell\TPM\setup.exe in the Open field and click OK to run the Broadcom Secure Foundation™ TPM - InstallShield Wizard.
- When prompted to restart the computer, click Yes. If a custom image was loaded or the operating system was reinstalled, the software needs to be downloaded from Dell Downloads.
NOTE: During the software installation, the software checks for the latest network driver. If the network driver is not the latest revision, the install wizard asks to update the driver. The TPM does not function properly if the latest revision is declined.
Complete the TPM Wizard
The Trusted Platform Module (TPM) Initialization Wizard sets up the owner account for the TPM and creates a backup of the TPM information.
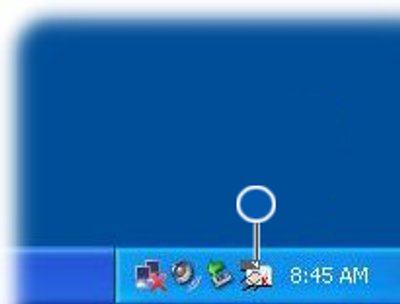
- Double-click the System Tray icon (Figure 1).

Figure 1: TPM System Tray Icon Before Initialization - When the Welcome window appears, click Next.
- Enter a password to become a Basic User of the TPM and click Next. A Basic User account for the TPM secures e-mail, encrypt files, and creates a personal secure drive.
- Select the desired features and click Next.
For further setup and advanced configuration instructions, refer to the Broadcom Security Platform Help files or contact your IT department.
Additional Information
Recommended Articles
Here are some recommended articles related to this topic that might be of interest to you.
- How to Enable the TPM (Trusted Platform Module)
- How to Troubleshoot and Resolve Common Issues with Trusted Platform Module (TPM) and BitLocker
- How to Successfully Update the TPM Firmware on your Dell Computer
- Using scripting or automation for TPM firmware updates from Dell
- Intel Platform Trust Technology(PTT)
Article Properties
Article Number: 000141408
Article Type: How To
Last Modified: 29 Aug 2024
Version: 11
Find answers to your questions from other Dell users
Support Services
Check if your device is covered by Support Services.