How to Enable or Disable Tablet Mode and Autorotation on your Laptop in Windows 10
Summary: How to enable Tablet Mode in Windows 10 when using your 2-in-1 laptop and learn how to disable Tablet Mode if necessary. This guide also covers Autorotation on laptops, including steps for enabling and disabling Autorotation for improved functionality. ...
Instructions
When you open your 2-in-1 laptop screen more than 225 degrees the Keyboard and Touchpad are disabled by default. But there are settings that can override that and may have accidentally been turned on.
- In Tablet mode, the soft-keyboard automatically opens when you touch the screen to input text. In Desktop mode, you have to touch the soft-keyboard icon in the lower right corner for it to open.
- In Tablet mode, programs are in a full-screen by default. In Desktop mode, programs are in Windowed mode by default.
Table of Contents:
Enabling or Disabling Tablet Mode
To ensure that the Keyboard and Touchpad are disabled by default when you use your 2-in-1 in tablet mode, perform the following steps.
- Press and hold the Windows key (
 ), and then press the q key.
- In the Search box, type tablet.
- Touch or click Tablet settings (System settings).
- You are presented with several options.
- When I sign in. Using the drop-down menu gives you three choices on how your device behaves you it is booted.
- Always use tablet mode.
- Never use tablet mode.
- Use the appropriate mode for my hardware.
- When I use this device as a tablet.
- Do not switch to tablet mode.
- Ask me before switching modes.
- Always switch to tablet mode.
- When I sign in. Using the drop-down menu gives you three choices on how your device behaves you it is booted.
- Touch or click Change additional tablet settings to change settings such as hiding the app icons or taskbar when using tablet mode and other desktop mode options.
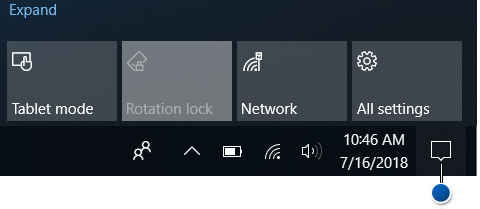
Note: When your Windows 10 computer is using tablet mode, there are no tiles available on the screen to quickly switch back to desktop mode. To switch from tablet mode back to desktop mode, tap or click the Action Center icon in the taskbar to bring up a list of quick settings for your computer (Figure 1). Then tap or click the Tablet mode setting to switch between tablet and desktop mode. On a tablet or a computer with a touch-panel display, you can also access the Action Center settings by performing a quick swipe from the right edge of the screen.

Figure 1: Action Center Icon LocationFor more information about using Tablet mode with your personal computer, see the following Microsoft article: Get Started with Windows 10 - Use your PC like a tablet
 .
. - Restart you computer to engage the settings.
Enabling or Disabling Autorotation (Rotation Lock)
To ensure the autorotation (rotation lock) can be enabled or disabled, perform the following steps.
- Update the computer's BIOS to the latest version.
Note: To learn how to download and update the BIOS on your Dell computer, see the Dell Knowledge Base How to Download or Update the BIOS on a Dell computer?
- For optimum performance, it is recommended that you install the latest drivers on your computer.
Note: Using the SupportAssist application provides automatic computer updates. For more information about SupportAssist, browse to the SupportAssist for PCs and tablets page.
- Be sure that your computer is running with the latest updates for Windows. Go to the Windows Update website to be sure that your computer is fully updated.

- Download the latest version of Intel-Integrated Sensor Hub Driver, by performing the following steps:
- Browse to the Dell Support website.
- You are given three options to identify your computer.
Either:
- Touch or click the listing for your computer under THIS personal computer.
Note: When there is no listing for your computer under THIS personal computer, you can touch or click Download & Install SupportAssist, which automatically identifies your computer for you. Follow the prompts to download and install SupportAssist.
- Enter the Service Tag, Dell EMC Product ID, or Model, and then touch or click the Search button, and select your computer from the list.
- Touch or click Browse all products: You must select the type of device you have, the brand name, and then the product model.
Note: For more information see Dell Knowledge Base article, How to find the product model of your Dell computer.
- Touch or click the listing for your computer under THIS personal computer.
- Touch or click the DRIVERS & DOWNLOADS tab.
- Touch or click Find drivers.
- In the Keyword search box, type Intel-Integrated Sensor Hub Driver, and then press Enter.
Note: When you get no results, go to step 5.
- Touch or click Download to the right of the driver listing.
Note: Depending on your browser, you get different options. The following step is based on using the Chrome browser.
- Once the driver is downloaded, touch or click the file that is listed at the bottom-left side of the screen to start the installation process, and then follow the prompts.
- Before the Autorotate can be enabled or disabled the laptop has to be in Tablet mode, and the screen open more than 225 degrees.
Note: See the Enabling or Disabling Tablet Mode section on how to Enable Tablet mode. See (Figure 1) for the location of the Rotation lock toggle in the Action Center.
Additional Information
 Out of warranty? No problem Browse to the Dell.com/support website and enter your Dell Service Tag and view our offers.