How to Manually Add a Device in Wyse Management Suite
Summary: Wyse Thin OS (WTOS), Windows Embedded Standard (WES), and Teradici thin clients may be added in Wyse Management Suite.
This article applies to
This article does not apply to
Instructions
Wyse Management Suite requires that a device is added before managing the device with Wyse Management Suite. The steps to add a device differ depending on whether Wyse ThinOS (WTOS), Windows Embedded Standard (WES), or Teradici is in use. For more information, click the appropriate operating system.
When using WTOS, the steps to add a device differ depending on whether Zero Launchpad or Classic View is in use. For more information, click the appropriate mode.
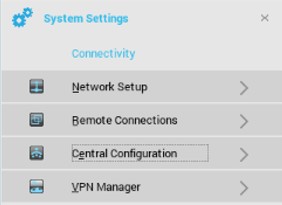
Zero Launchpad
- From the Zero Launchpad, click System Settings.

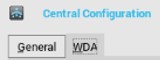
- Click Central Configuration.
- Click the WDA tab.

- From the WDA menu:
- From Protocol Priority, select WMS.
- Select Enable Wyse Management Suite (WMS).
- Select DNS SRV record.
- Populate a Group Registration Key.
- Optionally, select Enable WMS Advanced Settings.
- Populate a WMS Server.
- Optionally, check Enable CA Validation.
 Note:
Note:- An MQTT server will be automatically populated after populating a WMS Server.
- Leaving the Tenant and Group unpopulated results in registering the device to the unmanaged group.
Classic View
- Click Desktop, select System Setup, and then click Central Configuration.

- Click the WDA tab.
- From the WDA menu:
- From Protocol Priority, select WMS.
- Select Enable Wyse Management Suite (WMS).
- Select DNS SRV record.
- Populate a Group Registration Key.
- Optionally, select Enable WMS Advanced Settings.
- Populate WMS Server.
- Optionally, check Enable CA Validation.
 Note:
Note:- An MQTT server will be automatically populated after populating a WMS Server.
- Leaving the Tenant and Group unpopulated results in registering the device to the unmanaged group.
- Log in to WES as an admin.
 Note: For more information about how to log in as an admin, reference How to Log In to a Windows Embedded Standard (WES) or Windows IoT Enterprise (WIE) Wyse Thin Client as Admin.
 - From the system tray, open the WDA Console.

- From the Device Registration menu:
- Select Wyse Management Suite - WMS.
- Populate Management Server.
- Populate Port.
- Optionally, populate Tenant.
- Optionally, populate Group.
- Optionally, select Validate Server Certificate CA.
- Click Register.
 Note: Leaving the Tenant and Group unpopulated results in registering the device to the unmanaged group.
The following is required to add a Teradici device:
- A Teradici device running 5.x or 6.x Threadx
- EMSDK installed in Wyse Management (Private Cloud) Suite v1.3 or later
- Pro license added to Wyse Management Suite (Private Cloud)
Note: For more information about how to install Wyse Management Suite with the EMSDK and input the license, reference How to Install Wyse Management Suite (Private Cloud).
- Go to the Teradici device in your browser by going to https://[TeradiciIP].
 Note: The IP of the Teradici device will differ in your environment.
 - Enter the administrator password.

- Go to Upload, then Certificate.

- From the Certificate menu:
- Click Choose File.
- Go to
C:\Program Files\Dell\WMS\Teradici\EMSDK\cert.pem. - Click OK.
- Click Upload.
 Note: If Wyse Management Suite has been installed to a non-default location, go to that location instead for the
cert.pemfile. - Go to Configuration, then Management.

- From the Management menu:
- Click Clear Management State.
- Set the Manager Discovery Mode to Manual.
- Enter the Endpoint Bootstrap Manager URL as
wss://[IP of Wyse Management Suite Server]. - Click Apply.

- Click Continue.

Affected Products
Wyse Management SuiteArticle Properties
Article Number: 000126850
Article Type: How To
Last Modified: 20 June 2024
Version: 6
Find answers to your questions from other Dell users
Support Services
Check if your device is covered by Support Services.