How to Fix No Sound on PC and Troubleshoot Audio Problems in Windows 11
Summary: Solve audio issues in Windows 11 with this guide. Learn to use troubleshooters, update drivers, manage audio services, and adjust settings to restore sound quickly.
Instructions
Troubleshooting Audio Problems in Windows 11
This article it shows you various methods to troubleshoot, in case if audio is not working properly on your system. The common audio problems that you might see are:
- Audio not working after installing some update
- The audio loss all sudden
- Audio loss intermittently
- No audio output device is installed
- Audio services are not running
- Anything else that prevents audio from working as expected
Solutions you can try to fix audio problems on your system:
Run Playing Audio troubleshooter
You can treat this tool as a first-aid solution for fixing audio problems. This in-built tool can find and fix audio problems automatically.
- Open the Settings app and go to System.
- Under System, go to Troubleshoot > Other troubleshooters.
- Click Run next to Playing Audio troubleshooter.
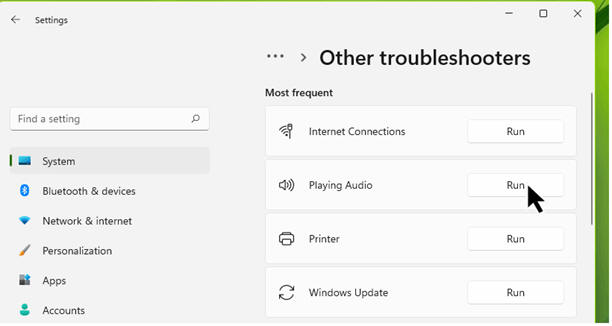
Figure.1 Playing Audio troubleshooter
In a few moments, you see that the Playing Audio troubleshooter has found some problems and fixed them. If the troubleshooter found some issues but cannot fix them, continue following other methods mentioned next in this guide.
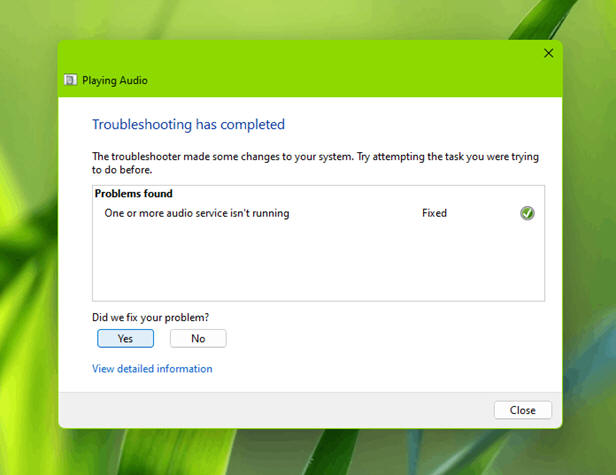
Figure.2 Troubleshooting completed
Fix by updating the audio driver
In most of cases involving audio problems, audio drivers can be the main root cause. You can try the following suggestions if the audio driver is causing an audio problem on your system:
- Right-click the Start button or press Windows + X and select Device Manager.
- Under Device Manager, expand Sound, video, and game controllers or the section where audio devices are listed.
- Locate your audio device/driver and double-click it.
- Verify if the device status is This device is working properly.
If there is some error code with the device/driver, see this support article to troubleshoot it.

Figure.3 Device Manager
Update or roll back your audio driver.
If the audio driver is listed and working properly, but you still do not get your audio issue fixed, next you can try updating your audio driver. Double-click the audio driver, go to Driver tab and click Update driver. Follow the on-screen instructions to complete the update.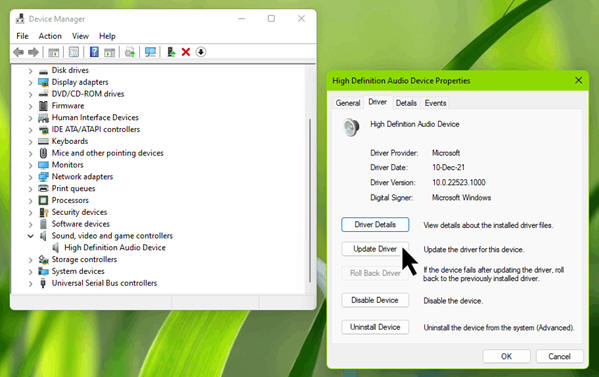
Figure.4 Update Driver
If the audio problem you are facing appeared after updating your driver, you can instead use. Roll back Driver button to restore audio driver to the previous version when it was working fine.
Fix the audio services.
If running a troubleshooter and changing the audio driver was of no help, you can next check for audio background services.
- Press Windows + R, type services.msc and click OK.
- In the Services window, make sure these services are Running and have their Startup type set to Automatic:
- Windows Audio
- Windows Audio Endpoint Builder
- Remote Procedure Call
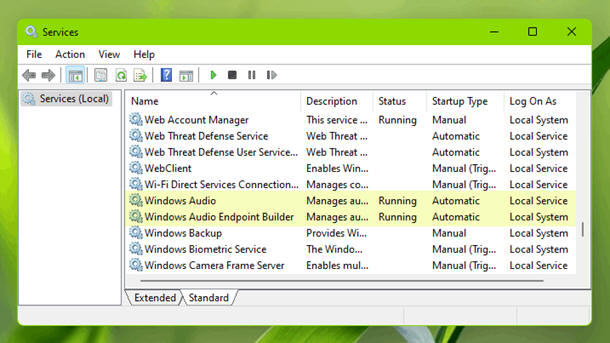
Figure.5 Audio services
Disable audio enhancements:
If previous methods were not helpful, then you can try disabling audio enhancements and see if it helps:
- Go to Settings > System > Sound.
- Click More sound settings.
- On the Sound tab, select your primary audio device and click Properties.
- On the property sheet, go to the Enhancements tab.5.
- Check Disable all enhancements.
- Click Apply, OK.
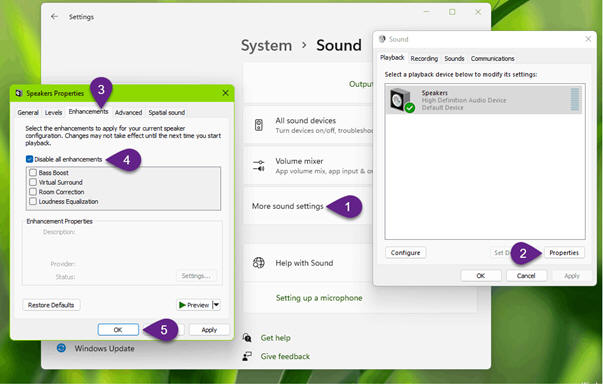
Figure.6 Disable audio enhancements.
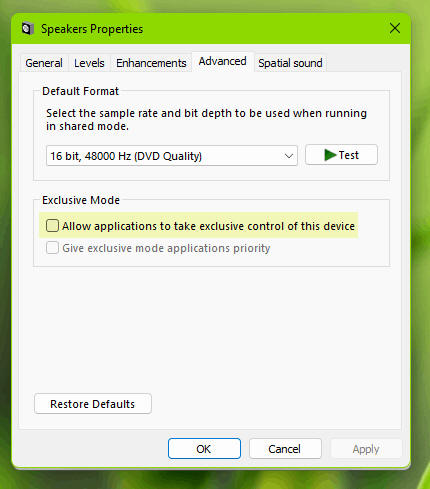
Figure.7 Speaker properties