Willkommen
Dell Standorte
Dell Standorte
Willkommen bei Dell
Mein Konto
- Bestellungen schnell und einfach aufgeben
- Bestellungen anzeigen und den Versandstatus verfolgen
- Profitieren Sie von exklusiven Prämien und Rabatten für Mitglieder
- Erstellen Sie eine Liste Ihrer Produkte, auf die Sie jederzeit zugreifen können.
- Verwalten Sie mit der Unternehmensverwaltung Ihre Dell EMC Seiten, Produkte und produktspezifischen Kontakte.
Artikelnummer: 000124010
How to configure the IP address of the iDRAC using LCD Panel
Zusammenfassung: Learn how to configure the IP address of the iDRAC quickly via the LCD Panel.
Artikelinhalt
Symptome
-
Ursache
-
Lösung
This article explains how to configure the IP address of the iDRAC (Integrated Dell Remote Access Controller) via the LCD Panel.
 Note: In order to complete this procedure, the server must be equipped with an LCD panel. If the server does not have an LCD panel, please consult this article for alternate methods to configure the iDRAC IP address.
 Note: If performing a peer-to-peer with a laptop, set an IP address in the same range on the LAN port of the laptop with the same subnet and then use the iDRAC IP address to access it in the browser.
Default username and password for iDRAC is explained in the article "What is the default password for iDRAC?"
Note: In order to complete this procedure, the server must be equipped with an LCD panel. If the server does not have an LCD panel, please consult this article for alternate methods to configure the iDRAC IP address.
- On the server's LCD Panel, use directional buttons for navigation and the center button, ✔, to select the option or to enter a value.
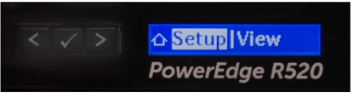
Figure 1: PowerEdge R520 LCD panel showing Setup
- To configure a static IP address:
a) On the server's LCD panel, navigate to "iDRAC" and select "Static IP".
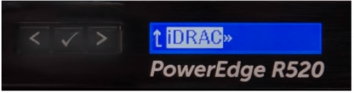
Figure 2: PowerEdge R520 LCD panel showing iDRAC option
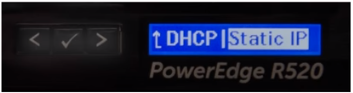
Figure 3: PowerEdge R520 LCD panel showing Static IP
b) Provide an IP address, Subnet and Gateway.

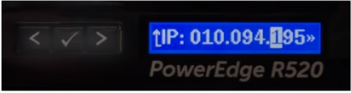
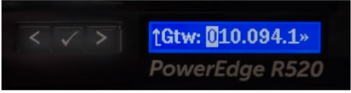
Figure 4: PowerEdge R520 LCD panel showing IP address modification
c) Select "No" for Setup DNS.
d) Select "Yes" to save the settings. - After setting a valid IP address on your network, use your browser (e.g. Chrome, IE, Firefox) to access iDRAC via the IP address.
Note: If performing a peer-to-peer with a laptop, set an IP address in the same range on the LAN port of the laptop with the same subnet and then use the iDRAC IP address to access it in the browser.
Default username and password for iDRAC is explained in the article "What is the default password for iDRAC?"
Artikeleigenschaften
Betroffenes Produkt
PowerEdge M420, PowerEdge M520 (for PE VRTX), PowerEdge M620, PowerEdge M620 (for PE VRTX), PowerEdge M630, PowerEdge M630 (for PE VRTX), PowerEdge M820 (for PE VRTX), PowerEdge R230, PowerEdge R320, PowerEdge R330, PowerEdge R420, PowerEdge R430
, PowerEdge R520, PowerEdge R530, PowerEdge R530xd, PowerEdge R620, PowerEdge R630, PowerEdge R720, PowerEdge R720XD, PowerEdge R730, PowerEdge R730xd, PowerEdge R820, PowerEdge R920, PowerEdge R930, PowerEdge T320, PowerEdge T420, PowerEdge T430, PowerEdge T620, PowerEdge T630
...
Letztes Veröffentlichungsdatum
17 Sept. 2021
Version
4
Artikeltyp
Solution