如何在 Dell Encryption Personal 中手动备份加密密钥
Zusammenfassung: 可以按照这些说明手动备份 Dell Encryption Personal 和 Dell Data Protection Personal Edition 的加密密钥。
Dieser Artikel gilt für
Dieser Artikel gilt nicht für
Dieser Artikel ist nicht an ein bestimmtes Produkt gebunden.
In diesem Artikel werden nicht alle Produktversionen aufgeführt.
Symptome
本文提供有关如何在 Dell Encryption Personal(以前称为 Dell Data Protection | Personal Edition)中手动备份加密密钥(也称为托管密钥)的信息。
受影响的产品:
- Dell Encryption Personal
- Dell Data Protection | Personal Edition
受影响的操作系统:
- Windows
Ursache
不适用
Lösung
单击相应的客户端版本,了解备份加密密钥的特定步骤。有关版本的详细信息,请参阅如何确定 Dell Encryption Enterprise 或 Dell Encryption Personal 版本。
提醒:
- 要成功备份密钥,Dell Encryption Personal 需要存储设备(在安装了 Dell Encryption Personal 的端点之外)。
- 备份密钥需要加密管理员密码。
- 登录 Windows 计算机。
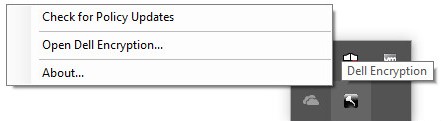
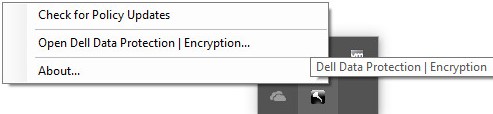
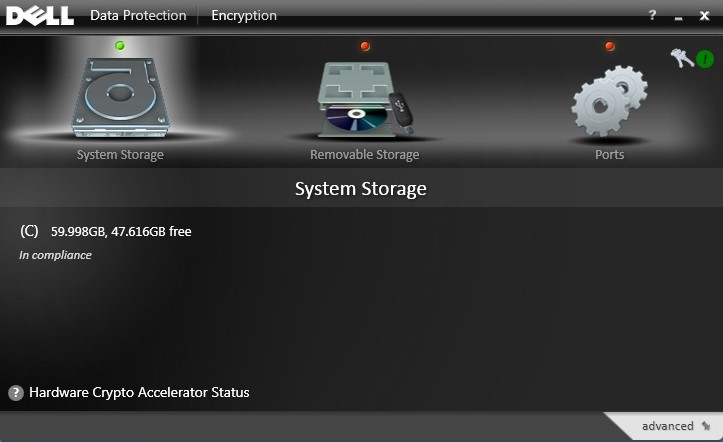
- 在 Windows 系统托盘中,右键单击 Dell Encryption 图标,然后选择 Open Dell Encryption。
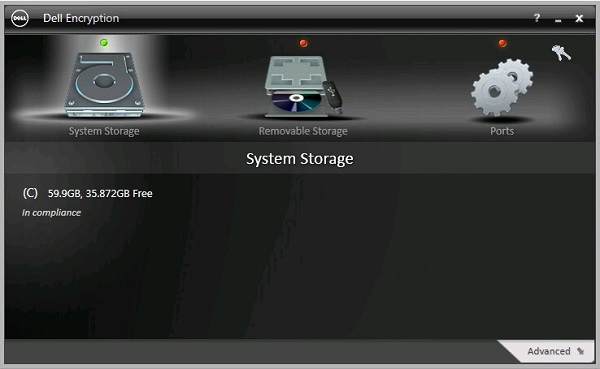
- 单击右上角的密钥图标。
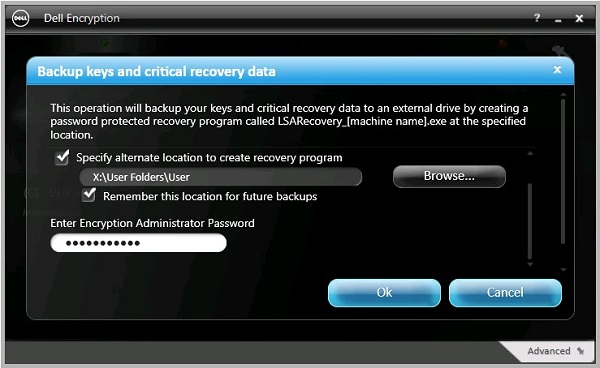
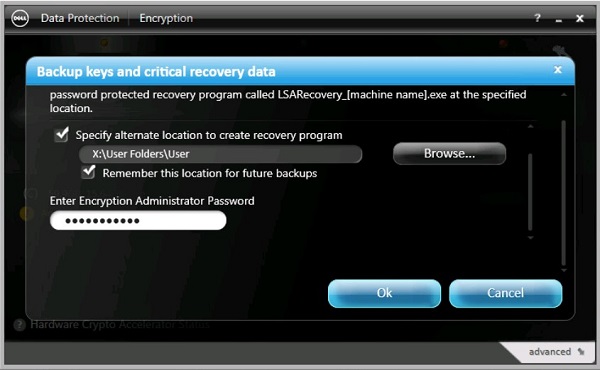
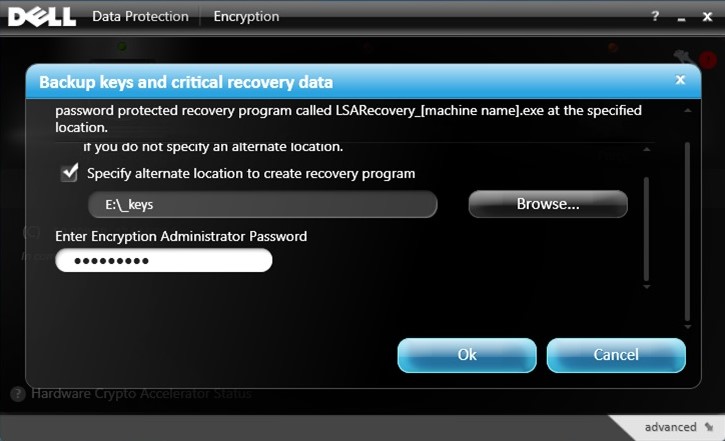
- 从“Backup keys and critical recovery data”菜单中:
- 选中 Specify alternate location to create recovery program。
- 单击 Browse 以浏览到辅助存储设备。
- (可选)选中 Remember this location for future backups。
- 填充加密管理员密码。
- 单击确定。
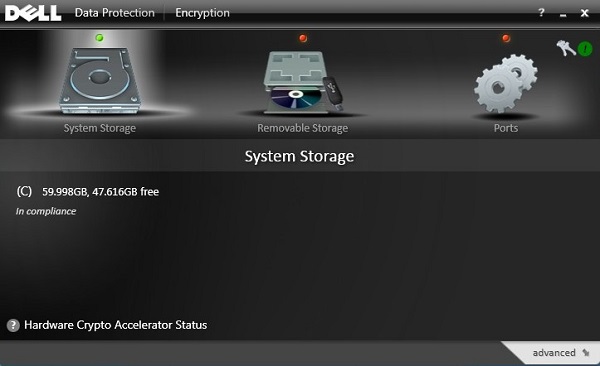
- 备份完成后,密钥图标(步骤 2)在其旁边显示绿色的 ! 图标。
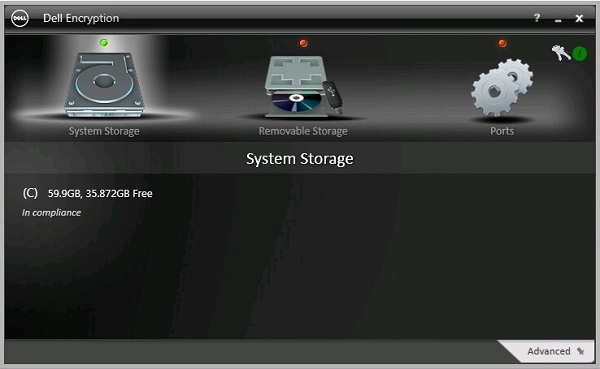
LSARecovery_[NAME]出现在所选位置(步骤 4)。

提醒:
[NAME] = 端点的名称
- 登录 Windows 计算机。
- 在 Windows 系统托盘中,右键单击 Dell Data Protection | Encryption 图标,然后选择 Open Dell Data Protection | Encryption。

- 单击右上角的密钥图标。

- 从“Backup keys and critical recovery data”菜单中:
- 选中 Specify alternate location to create recovery program。
- 单击 Browse 以浏览到辅助存储设备。
- (可选)选中 Remember this location for future backups。
- 填充加密管理员密码。
- 单击确定。
- 备份完成后,密钥图标(步骤 2)在其旁边显示绿色的 ! 图标。
LSARecovery_[NAME]出现在所选位置(步骤 4)。

提醒:
[NAME] = 端点的名称
- 登录 Windows 计算机。
- 在 Windows 系统托盘中,右键单击 Dell Data Protection | Encryption 图标,然后选择 Open Dell Data Protection | Encryption。
- 单击右上角的密钥图标。
- 从“Backup keys and critical recovery data”菜单中:
- 选中 Specify alternate location to create recovery program。
- 单击 Browse 以浏览到辅助存储设备。
- 填充加密管理员密码。
- 单击确定。
- 备份完成后,密钥图标(步骤 2)在其旁边显示绿色的 ! 图标。
LSARecovery_[NAME]出现在所选位置(步骤 4)。

提醒:
[NAME] = 端点的名称
要联系支持部门,请参阅 Dell Data Security 国际支持电话号码。
转至 TechDirect,在线生成技术支持请求。
要获得更多见解和资源,请加入戴尔安全社区论坛。
Weitere Informationen
Videos
Betroffene Produkte
Dell EncryptionArtikeleigenschaften
Artikelnummer: 000126842
Artikeltyp: Solution
Zuletzt geändert: 24 Okt. 2023
Version: 9
Antworten auf Ihre Fragen erhalten Sie von anderen Dell NutzerInnen
Support Services
Prüfen Sie, ob Ihr Gerät durch Support Services abgedeckt ist.