如何从 Dell Data Security 主安装程序中解压子安装程序
Zusammenfassung: 可以按照以下说明从 Dell Data Security 主安装程序中解压子安装程序。
Dieser Artikel gilt für
Dieser Artikel gilt nicht für
Dieser Artikel ist nicht an ein bestimmtes Produkt gebunden.
In diesem Artikel werden nicht alle Produktversionen aufgeführt.
Symptome
提醒:
- 从 2022 年 5 月起,Dell Endpoint Security Suite Enterprise 停止维护。戴尔不再更新本产品及其文章。
- 从 2019 年 1 月起,Dell Endpoint Security Suite Pro 停止维护。戴尔不再更新本产品及其文章。
- 有关详细信息,请参阅 戴尔数据安全产品生命周期(支持终止和停售)政策。如果您对其他文章有任何疑问,请联系您的销售团队或联系 endpointsecurity@dell.com。
- 请参阅端点安全性,了解有关当前产品的其他信息。
本文讨论如何从 Dell Data Security(原 Dell Data Protection)主安装程序中解压子安装程序。
受影响的产品:
- Dell Encryption Enterprise
- Dell Data Protection | Enterprise Edition
- Dell Encryption Personal
- Dell Data Protection | Personal Edition
- Dell Endpoint Security Suite Enterprise
- Dell Endpoint Security Suite Pro
Ursache
不适用
Lösung
Dell Data Security 使用包含软件的各个子安装程序的主安装程序。主安装程序称为 DDSSetup.exe(以前称为 DDPSetup.exe)或 DDSSuite.exe(以前称为 DDPSuite.exe)。
Dell Data Security 产品的主安装程序:
- DDSSetup.exe (Dell Encryption Enterprise)
- DDSSetup.exe (Dell Encryption Personal)
- DDSSuite.exe (Dell Endpoint Security Suite Enterprise)
- DDSSuite.exe (Dell Endpoint Security Suite Pro)
传统 Dell Data Protection 产品的主安装程序:
- DDPSetup.exe (Dell Data Protection | Enterprise Edition)
- DDPSetup.exe (Dell Data Protection | Personal Edition)
- DDPSuite.exe (Dell Data Protection | Endpoint Security Suite)
- DDPSuite.exe (Dell Data Protection | Endpoint Security Suite Enterprise)
单击相应的主安装程序,了解有关解压子安装程序的步骤。
提醒:有关获取 DDPSetup.exe 的信息,请参阅如何下载 Dell Encryption Enterprise 或 Dell Encryption Personal。
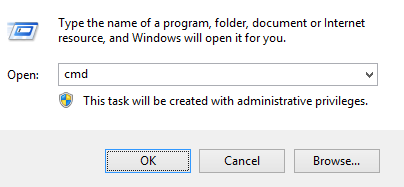
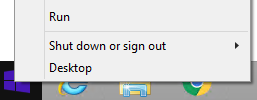
- 右键单击 Windows 的“开始”菜单,然后单击运行。

- 在“运行”UI 中,键入
cmd,然后按确定。这将打开命令提示符。

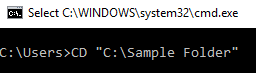
- 在命令提示符中,通过键入
CD "[LOCATION of DDSSetup.EXE]"并按 Enter 键,转至 DDSSuite.exe 的位置。

提醒:屏幕截图中的位置是一个示例,在您的环境中可能有所不同。
- 键入
DDSSetup.exe /z"\"EXTRACT_INSTALLERS=C:\extracted\"",然后按 Enter 键。这会将子安装程序解压到C:\Extracted。

提醒:
- Windows 要求指定的路径
EXTRACT_INSTALLER小于 256 个字符。 - 如果字符限制在解压过程中导致问题,请重试解压到桌面上的文件夹,以减少路径中使用的字符数。
- 在示例中,
C:\extracted是指定的EXTRACT_INSTALLER路径。
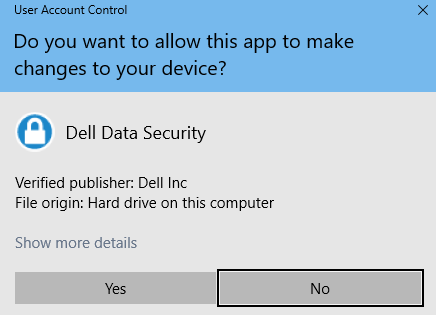
- 如果启用了用户帐户控制 (UAC),请单击 Yes 以打开 DDSSetup.exe。如果禁用了 UAC,请转至步骤 6。
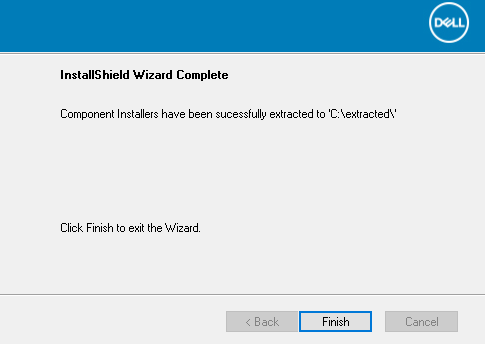
- 主安装程序解压子安装程序。完成后,单击 Finish 关闭 InstallShield 向导。

- 子安装程序位于步骤 4 的目录中。
提醒:有关获取 DDPSetup.exe 的信息,请参阅如何下载 Dell Encryption Enterprise 或 Dell Encryption Personal。
- 右键单击 Windows 的“开始”菜单,然后单击运行。

- 在“运行”UI 中,键入
cmd,然后按确定。这将打开命令提示符。

- 在命令提示符中,通过键入
CD "[LOCATION of DDSSUITE.EXE]"并按 Enter 键,转至 DDSSuite.exe 的位置。
提醒:屏幕截图中的位置是一个示例,在您的环境中可能有所不同。
- 键入
DDSSuite.exe /z"\"EXTRACT_INSTALLERS=C:\extracted\"",然后按 Enter 键。这会将子安装程序解压到C:\Extracted。

提醒:
- Windows 要求指定的路径
EXTRACT_INSTALLER小于 256 个字符。 - 如果字符限制在解压过程中导致问题,请重试解压到桌面上的文件夹,以减少路径中使用的字符数。
- 在示例中,
C:\extracted是指定的EXTRACT_INSTALLER路径。
- 如果启用了用户帐户控制 (UAC),请单击 Yes 以打开 DDSSuite.exe。如果禁用了 UAC,请转至步骤 6。

- 主安装程序解压子安装程序。完成后,单击 Finish 关闭 InstallShield 向导。

- 子安装程序位于步骤 4 的目录中。
提醒:有关获取 DDPSetup.exe 的信息,请参阅如何下载 Dell Encryption Enterprise 或 Dell Encryption Personal。
- 右键单击 Windows 的“开始”菜单,然后单击运行。

- 在“运行”UI 中,键入
cmd,然后按确定。这将打开命令提示符。
- 在命令提示符中,通过键入
CD "[LOCATION of DDPSETUP.EXE]"并按 Enter 键,转至 DDSSuite.exe 的位置。

提醒:屏幕截图中的位置是一个示例,在您的环境中可能有所不同。
- 键入
DDPSetup.exe /z"\"EXTRACT_INSTALLERS=C:\extracted\"",然后按 Enter 键。这会将子安装程序解压到C:\Extracted。

提醒:
- Windows 要求指定的路径
EXTRACT_INSTALLER小于 256 个字符。 - 如果字符限制在解压过程中导致问题,请重试解压到桌面上的文件夹,以减少路径中使用的字符数。
- 在示例中,
C:\extracted是指定的EXTRACT_INSTALLER路径。
- 如果启用了用户帐户控制 (UAC),请单击 Yes 以打开 DDPSetup.exe。如果禁用了 UAC,请转至步骤 6。

- 安装程序包解压子安装程序。完成后,单击 Finish 关闭 InstallShield 向导。
- 子安装程序位于步骤 4 的目录中。
提醒:有关获取 DDPSetup.exe 的信息,请参阅如何下载 Dell Encryption Enterprise 或 Dell Encryption Personal。
- 右键单击 Windows 的“开始”菜单,然后单击运行。
- 在“运行”UI 中,键入
cmd,然后按确定。这将打开命令提示符。

- 在命令提示符中,通过键入
CD "[LOCATION of DDPSUITE.EXE]"并按 Enter 键,转至 DDSSuite.exe 的位置。

提醒:屏幕截图中的位置是一个示例,在您的环境中可能有所不同。
- 键入
DDPSuite.exe /z"\"EXTRACT_INSTALLERS=C:\extracted\"",然后按 Enter 键。这会将子安装程序解压到C:\Extracted。

提醒:
- Windows 要求指定的路径
EXTRACT_INSTALLER小于 256 个字符。 - 如果字符限制在解压过程中导致问题,请重试解压到桌面上的文件夹,以减少路径中使用的字符数。
- 在示例中,
C:\extracted是指定的EXTRACT_INSTALLER路径。
- 如果启用了用户帐户控制 (UAC),请单击 Yes 以打开 DDPSuite.exe。如果禁用了 UAC,请转至步骤 6。

- 主安装程序解压子安装程序。完成后,单击 Finish 关闭 InstallShield 向导。

- 子安装程序位于步骤 4 的目录中。
要联系支持部门,请参阅 Dell Data Security 国际支持电话号码。
转至 TechDirect,在线生成技术支持请求。
要获得更多见解和资源,请加入戴尔安全社区论坛。
Weitere Informationen
Videos
Betroffene Produkte
Dell Encryption, Dell Endpoint Security Suite Pro, Dell Endpoint Security Suite EnterpriseArtikeleigenschaften
Artikelnummer: 000124409
Artikeltyp: Solution
Zuletzt geändert: 01 Nov. 2023
Version: 9
Antworten auf Ihre Fragen erhalten Sie von anderen Dell NutzerInnen
Support Services
Prüfen Sie, ob Ihr Gerät durch Support Services abgedeckt ist.