Dell Data Securityのポリシー アップデートを確認する方法
Shrnutí: 次の手順に従って、Dell Data SecurityまたはDell Data Protectionソフトウェアのポリシー アップデートを確認する方法について説明します。
Tento článek se vztahuje na
Tento článek se nevztahuje na
Tento článek není vázán na žádný konkrétní produkt.
V tomto článku nejsou uvedeny všechny verze produktu.
Příznaky
注:
- 2021年2月で、Dell Encryption Enterprise for Macのメンテナンスが終了しました。この製品およびこの製品に関する記事は、Dellでは今後アップデートされません。
- 2022年5月をもって、Dell Endpoint Security Suite Enterpriseはメンテナンス終了となりました。この製品およびこの製品に関する記事は、Dellでは今後アップデートされません。
- 2019年1月をもって、Dell Endpoint Security Suite Proはメンテナンス終了となりました。この製品およびこの製品に関する記事は、Dellでは今後アップデートされません。
- 詳細については、「 Dell Data Securityの製品ライフサイクル(サポート終了およびサポート終了)ポリシー 」を参照してください。その他の記事に関する質問がある場合は、担当のセールス チームに連絡するか、またはendpointsecurity@dell.comにお問い合わせください。
- 現在の製品に関する追加情報については、エンドポイント セキュリティページを参照してください。
この記事では、Dell Data Security(旧Dell Data Protection)を使用してポリシー アップデートを確認する方法について説明します。
対象製品:
- Dell Encryption Enterprise
- Dell Data Protection | Enterprise Edition
- Dell Encryption Enterprise for Mac
- Dell Data Protection | Enterprise Edition for Mac
- Dell Encryption Enterprise Self-Encrypting Drive Manager
- Dell Data Protection | Self-Encrypting Drive Manager
- Dell Encryption External Media
- Dell Data Protection | External Media Edition
- Dell BitLocker Manager
- Dell Data Protection | BitLocker Manager
- Dell Endpoint Security Suite Pro
- Dell Data Protection | Endpoint Security Suite
- Dell Endpoint Security Suite Enterprise
- Dell Data Protection | Endpoint Security Suite Enterprise
- デルのフル ディスク暗号化
対象オペレーティング システム:
- Windows
- Mac
Příčina
該当なし
Řešení
ポリシーアップデートの確認は、使用中の製品のオペレーティングシステムによって異なります。詳細については、 Windows または Mac をクリックしてください。
Windows
ポリシーのアップデートは、次の点で異なります。
シールド
- Dell Encryption Enterprise
- Dell Data Protection | Enterprise Edition
- Dell Encryption External Media
- Dell Data Protection | External Media Edition
Encryption Management Agent (EMAgent)
- Dell Encryption Enterprise Self-Encrypting Drive Manager
- Dell Data Protection | Self-Encrypting Drive Manager
- Dell BitLocker Manager
- Dell Data Protection | BitLocker Manager
- Dell Endpoint Security Suite Pro
- Dell Data Protection | Endpoint Security Suite
- Dell Endpoint Security Suite Enterprise
- Dell Data Protection | Endpoint Security Suite Enterprise
- デルのフル ディスク暗号化
詳細については、 Shield または EMAgent をクリックしてください。
シールド
ポリシーのアップデートは、UI またはレジストリーを使用して確認できます。詳細については、該当するオプションを選択してください。
注:このオプションは、エンドポイント ポリシーでDisplay Local Encryption Processing ControlがTrueに設定されている場合にのみ使用できます。
- Windowsコンピューターにログインします。
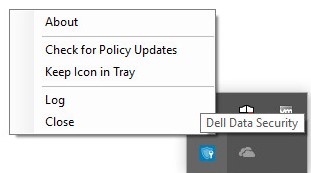
- Windowsのシステム トレイで、Dell Encryption(旧Dell Data Protection | Encryption)アイコンをクリックし、[Check for Policy Updates]を選択します。
| v8.0.0~8.13.0 | v8.15.0以降 |
|---|---|
|
|
|
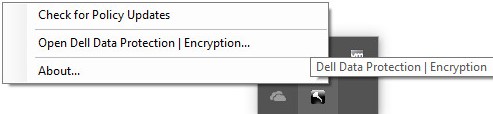
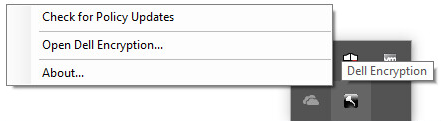
注:パフォーマンスの問題を防ぐために、[Check for Policy Updates]通信は1分に制限されています。
- Windowsの[スタート]メニューを右クリックして、[ファイル名を指定して実行]をクリックします。
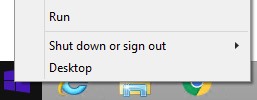
- [ファイル名を指定して実行]ユーザー インターフェイス(UI)で「
regedit」と入力し、次に[OK]を押します。これにより、レジストリー エディターが開きます。
![[ファイル名を指定して実行]UI](https://supportkb.dell.com/img/ka06P000000smFEQAY/ka06P000000smFEQAY_ja_4.jpeg)
- レジストリー エディターで、
HKEY_LOCAL_MACHINE\Software\Credant\CMGShield\Notifyに移動します。 - [Notify]フォルダーを右クリックし、[新規]を選択してから[DWORD (32 ビット)値]をクリックします。
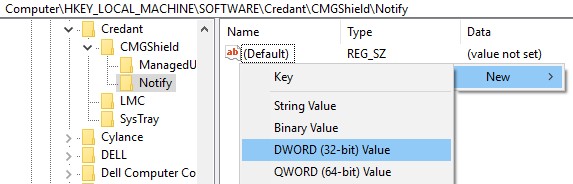
- このDWORDに「
PingProxy」という名前を付けます

- [
PingProxy]をダブルクリックします。
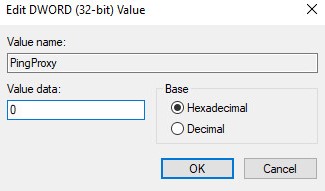
- [値のデータ]に「
1」と入力してから、[OK]をクリックします。
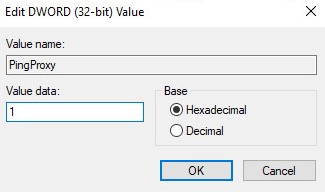
注:エンドポイントがサーバーにクエリーを実行すると、
PingProxyの値データは0に戻ります。
EMAgent
- Windowsコンピューターにログインします。
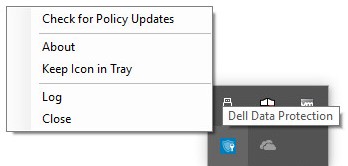
- Windowsのシステム トレイで、Dell Data Security(旧Dell Data Protection)アイコンを右クリックし、[Check for Policy Updates]を選択します。
| v8.0.1~8.13.0 | v8.15.0以降 |
|---|---|
|
|
|
Mac
- Macコンピューターにログインします。
- [System Preferences]をクリックします。
![[System Preferences]](https://supportkb.dell.com/img/ka06P000000smFEQAY/ka06P000000smFEQAY_ja_11.jpeg)
- Dell Encryption Enterprise(旧Dell Data Protection)をダブルクリックします。
| v8.0.0~8.13.2 | v8.15.0以降 |
|---|---|
|
|
|


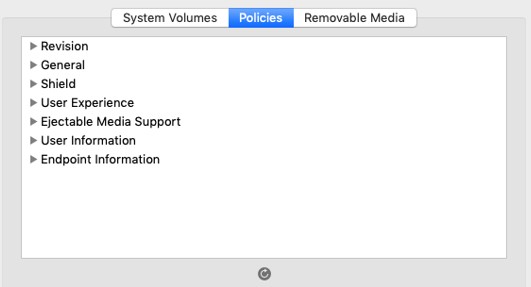
- [Policies]をクリックします。

- ウィンドウの下部付近にある 更新ボタン をクリックします。
注:パフォーマンスの問題を防ぐために、[Check for Policy Updates]通信は1分に制限されています。
サポートに問い合わせるには、「Dell Data Securityのインターナショナル サポート電話番号」を参照してください。
TechDirectにアクセスして、テクニカル サポート リクエストをオンラインで生成します。
さらに詳しい情報やリソースについては、「デル セキュリティ コミュニティー フォーラム」に参加してください。
Další informace
Videa
Dotčené produkty
Dell EncryptionVlastnosti článku
Číslo článku: 000126722
Typ článku: Solution
Poslední úprava: 24 Oct 2023
Verze: 10
Najděte odpovědi na své otázky od ostatních uživatelů společnosti Dell
Služby podpory
Zkontrolujte, zda se na vaše zařízení vztahují služby podpory.