Installieren von Dell SMBIOS unter Verwendung von Dell Command PowerShell Provider in Windows PE
Summary: Anleitung zum Herunterladen, Installieren und Konfigurieren von Dell Command PowerShell Provider (DCPP) und Dell Command Configure (DCC) mit Windows PE- und CCTK-Binärdateien. Befolgen Sie die Anweisungen für ein perfektes Setup. ...
This article applies to
This article does not apply to
This article is not tied to any specific product.
Not all product versions are identified in this article.
Instructions
Betroffene Produkte:
- Dell Command | PowerShell Provider
- Dell Command | Configure
Hinweis: Die richtige Windows PE mit den CCTK-Binärdateien befindet sich im temporären Verzeichnis unter ISO\sources\boot.wim.
Für DCC 4.4 und höher oder DCPP 2.4 und höher
- Herunterladen und Installieren von Microsoft Visual C++ Runtime 2019 Hinweis: Visual C++ 2015, 2017 und 2019 verwenden alle die gleichen Redistributable-Dateien.
Für Dell Command | Configure 4.3.1 und niedriger oder Dell Command | PowerShell Provider 2.3.1 und niedriger:
- Herunterladen und Installieren von Microsoft Visual C++ Runtime 2010
- Herunterladen und Installieren von Microsoft Visual C++ Runtime 2015 – Update 3
- Klicken Sie auf das Startmenü und suchen Sie nach PowerShell.
- Klicken Sie mit der rechten Maustaste auf PowerShell und wählen Sie Als Administrator ausführen aus.
- Geben Sie in der PowerShell-Eingabeaufforderung
Find-Module DellBIOSProviderein, und drücken Sie anschließend die Eingabetaste. - Drücken Sie die Taste Y und anschließend die Eingabetaste.
- Typ
Install-Module DellBIOSProviderein, und drücken Sie anschließend die Eingabetaste. - Drücken Sie die Taste
Yein, und drücken Sie anschließend die Eingabetaste. - Typ
Set-ExecutionPolicy Unrestrictedein, und drücken Sie anschließend die Eingabetaste. - Drücken Sie die Taste A und anschließend die Eingabetaste.
- Typ
Import-Module DellBIOSProvider -Verboseein, und drücken Sie anschließend die Eingabetaste. - Laden Sie das neueste Windows Assessment and Deployment Kit
(ADK) herunter und installieren Sie es.
- Installieren Sie DCC, um es auch in Windows PE zu verwenden (empfohlen), siehe Dell Command | Configure.
- Klicken Sie auf das Startmenü und suchen Sie nach Dell Command Configure Prompt.
- Klicken Sie mit der rechten Maustaste auf Dell Command Configure Prompt und wählen Sie anschließend Als Administrator ausführen.
- Erstellen Sie temporäre Verzeichnisse, die das CCTK Windows PE enthalten:
- Typ
MD c:\dcshare - Typ
MD c:\dcshare\temp - Typ
MD c:\dcshare\temp\mount
- Typ
- Navigieren Sie zum DCC-Installationsverzeichnis in Dell Command Configure Prompt.
- Für 64-Bit:
CD C:\Program Files (x86)\Dell\Command Configure\X86_64 - Für 32-Bit:
CD C:\Program Files (x86)\Dell\Command Configure\X86
- Für 64-Bit:
- Veranlassen Sie DCC, mit dem folgenden Befehl eine Windows 10 PE-Datei mit den DCC-Binärdateien zu erstellen. Geben Sie in der Eingabeaufforderung
cctk_x86_64_winpe_10.bat c:\dcshare\pe344 c:\progra~2\dell\comman~1\ein, und drücken Sie anschließend die Eingabetaste.Hinweis:- Der erste Parameter für die .bat Datei stellt den Pfad zum lokalen Verzeichnis dar, in dem das nutzerdefinierte Windows PE 10.0-Image erstellt werden soll.
- Der zweite Parameter stellt den Pfad zum extrahierten Command Configure-Toolkit dar.
- Hängen Sie boot.wim in Deployment and Imaging Tools Command Prompt ein und verwenden Sie dazu
DISM:Hinweis: PowerShell in Windows PE erfordert zusätzliche Funktionen, die im Automated Deployment Kit enthalten sind. Dieses muss vor der Installation von WinPE-PowerShell installiert werden:WinPE-WMIWinPE-NetFXWinPE-Scripting
DISM /Mount-WIM /wimfile:c:\dcshare\pe344\ISO\sources\boot.wim /index:1 /MountDir:c:\dcshare\temp\mount

Dism /Add-Package /Image:"C:\Dcshare\temp\mount" /PackagePath:"C:\Program Files\Windows Kits\10\Assessment and Deployment Kit\Windows Preinstallation Environment\amd64\WinPE_OCs\WinPE-WMI.cab"

Dism /Add-Package /Image:"C:\Dcshare\temp\mount" /PackagePath:"C:\Program Files\Windows Kits\10\Assessment and Deployment Kit\Windows Preinstallation Environment\amd64\WinPE_OCs\en-us\WinPE-WMI_en-us.cab"

Dism /Add-Package /Image:"C:\Dcshare\temp\mount" /PackagePath:"C:\Program Files\Windows Kits\10\Assessment and Deployment Kit\Windows Preinstallation Environment\amd64\WinPE_OCs\WinPE-NetFX.cab"

Dism /Add-Package /Image:"C:\Dcshare\temp\mount" /PackagePath:"C:\Program Files\Windows Kits\10\Assessment and Deployment Kit\Windows Preinstallation Environment\amd64\WinPE_OCs\en-us\WinPE-NetFX_en-us.cab"

Dism /Add-Package /Image:"C:\Dcshare\temp\mount" /PackagePath:"C:\Program Files\Windows Kits\10\Assessment and Deployment Kit\Windows Preinstallation Environment\amd64\WinPE_OCs\WinPE-Scripting.cab"

Dism /Add-Package /Image:"C:\Dcshare\temp\mount" /PackagePath:"C:\Program Files\Windows Kits\10\Assessment and Deployment Kit\Windows Preinstallation Environment\amd64\WinPE_OCs\en-us\WinPE-Scripting_en-us.cab"

Dism /Add-Package /Image:"C:\Dcshare\temp\mount" /PackagePath:"C:\Program Files\Windows Kits\10\Assessment and Deployment Kit\Windows Preinstallation Environment\amd64\WinPE_OCs\WinPE-PowerShell.cab"

Dism /Add-Package /Image:"C:\Dcshare\temp\mount" /PackagePath:"C:\Program Files\Windows Kits\10\Assessment and Deployment Kit\Windows Preinstallation Environment\amd64\WinPE_OCs\en-us\WinPE-PowerShell_en-us.cab"

Dism /Add-Package /Image:"C:\Dcshare\temp\mount" /PackagePath:"C:\Program Files\Windows Kits\10\Assessment and Deployment Kit\Windows Preinstallation Environment\amd64\WinPE_OCs\WinPE-StorageWMI.cab"

Dism /Add-Package /Image:"C:\Dcshare\temp\mount" /PackagePath:"C:\Program Files\Windows Kits\10\Assessment and Deployment Kit\Windows Preinstallation Environment\amd64\WinPE_OCs\en-us\WinPE-StorageWMI_en-us.cab"

Dism /Add-Package /Image:"C:\Dcshare\temp\mount" /PackagePath:"C:\Program Files\Windows Kits\10\Assessment and Deployment Kit\Windows Preinstallation Environment\amd64\WinPE_OCs\WinPE-DismCmdlets.cab"

Dism /Add-Package /Image:"C:\Dcshare\temp\mount" /PackagePath:"C:\Program Files\Windows Kits\10\Assessment and Deployment Kit\Windows Preinstallation Environment\amd64\WinPE_OCs\en-us\WinPE-DismCmdlets_en-us.cab"
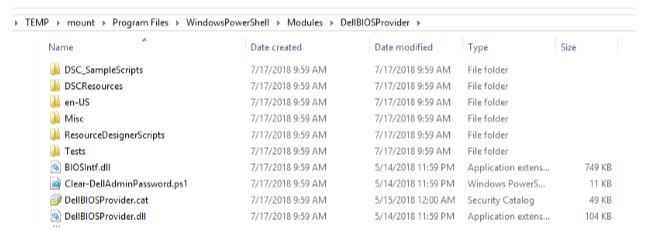
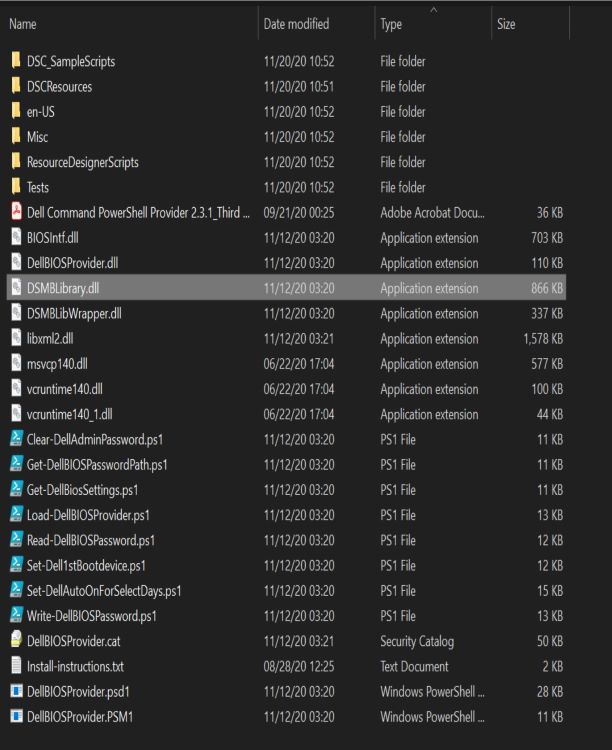
- Kopieren Sie die Dateien von DellBIOSProvider aus dem DCPP-Installationsverzeichnis (kopieren Sie z. B. C:\Program Files\WindowsPowerShell\Modules\DellBIOSProvider\2.4.0 in das Verzeichnis mount\Program Files\WindowsPowerShell\Modules).

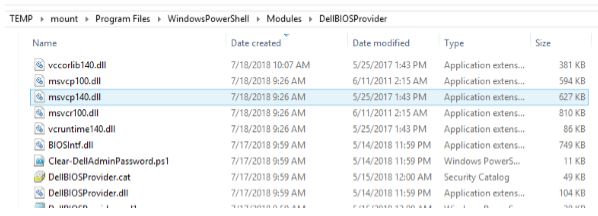
- Kopieren Sie die folgenden (zuvor installierten) Visual C++-DLL-Dateien von C:\Windows\System32 nach mount\Program Files\WindowsPowerShell\Modules.
- Für DCPP 2.4 oder höher
- msvcp140.dll
- vcruntime140.dll
- vcruntime140_1.dll

- Für DCPP 2.3.1 und früher
- msvcp100.dll
- msvcr100.dll
- msvcp140.dll
- vccorlib140.dll
- vcruntime140.dll

- Für DCPP 2.4 oder höher
- Hängen Sie die geänderte Windows 10 PE CCTK WIM-Datei wieder aus. Typ
DISM /unmount-wim /mountdir:c:\dcshare\temp\mount /commitein, und drücken Sie anschließend die Eingabetaste. - Importieren Sie die geänderte Datei CCTK – Powershell boot.wim in Windows Deployment Services (WDS), Microsoft System Center Configuration Manager (SCCM) oder auf ein USB-Laufwerk.
- Öffnen Sie PowerShell nach dem Start.
- Typ
Set-executionpolicy unrestrictedein, und drücken Sie anschließend die Eingabetaste. - Typ
Import-Module DellBIOSProvider -Verbosein und drücken Sie anschließend die Eingabetaste. - Typ
CD DellSMBIOS:ein, und drücken Sie anschließend die Eingabetaste.
- Typ
Affected Products
Dell Command | Configure, Dell Command | Powershell ProviderArticle Properties
Article Number: 000146531
Article Type: How To
Last Modified: 13 أغسطس 2024
Version: 9
Find answers to your questions from other Dell users
Support Services
Check if your device is covered by Support Services.