BIOS Settings to Allow PXE Boot on Dell Latitude Laptops
Summary: This article serves as a guide to configure the BIOS settings to allow for PXE boot on Dell Latitude laptops.
Symptoms
How to access the BIOS or UEFI (also known as System Setup)?
To access the BIOS or UEFI on a Dell computer, press the F2 key several times at the Dell logo screen during startup.
Alternatively, you may press the F12 key several times at the Dell logo screen during startup and select BIOS Setup or System Setup from the menu.
Once you are in BIOS screen, the following BIOS settings should be in place for PXE boot on Latitude laptops. There are different BIOS User Interface found on Latitude laptop depending on the model you use.
- Enable PXE boot in BIOS for Latitude 7x00 and 7x10
- Enable PXE boot in BIOS for Latitude 7x20 and 7x30
Cause
Cause information is not available.
Resolution
Enable PXE boot in BIOS for Latitude 7x10 and 7x00
- Go to General > Boot Sequence, then select to enable Windows Boot Manager (Figure 1).

Figure 1: Enable Windows Boot Manager - Go to General > Advanced Boot Options, then select Enable UEFI Network Stack under (Figure 2):

Figure 2: Enable UEFI Network Stack - Since these newer Latitude laptop models do not have a NIC connection, check to enable Enable USB Boot Support under System Configuration >USB Configuration (Figure 3):

Figure 3: Enable USB Boot Support - Check to enable Thunderbolt, Enable Thunderbolt Boot Support, and Enable TBT (and PCIE behind TBT) Pre-boot Modules under System Configuration->Thunderbolt Adapter Configuration (Figure 4), even if you are not connecting to a Thunderbolt dock:

Figure 4: Enable Thunderbolt boot support - Depending on how your PXE server is configured, it may be necessary to disable Secure Boot Enable under General->Secure Boot->Secure Boot Enable temporarily until after image deployment is complete (Figure 5):

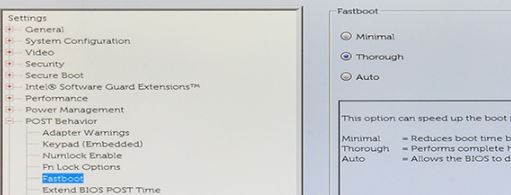
Figure 5: Disable Secure Boot - Under Post Behavior, Fastboot needs to be set to Thorough (Figure 6):

Figure 6: Set Fastboot to Thorough
Enable PXE boot in BIOS for Latitude 7x20 and 7x30
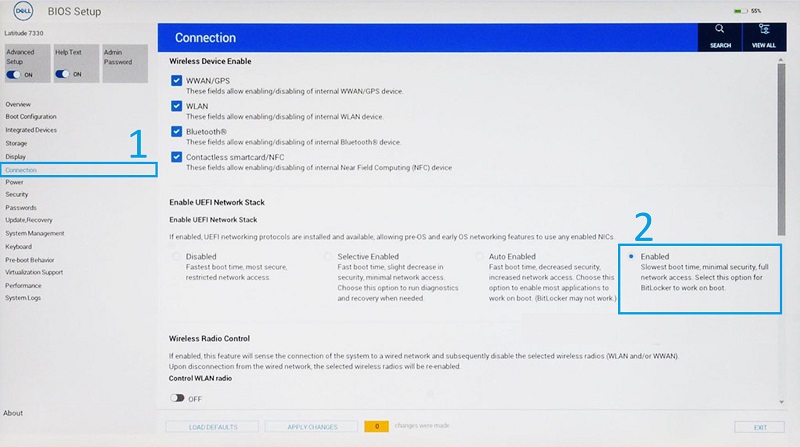
- Select Connection, then ensure Enable UEFI Network Stack is set to Enabled.

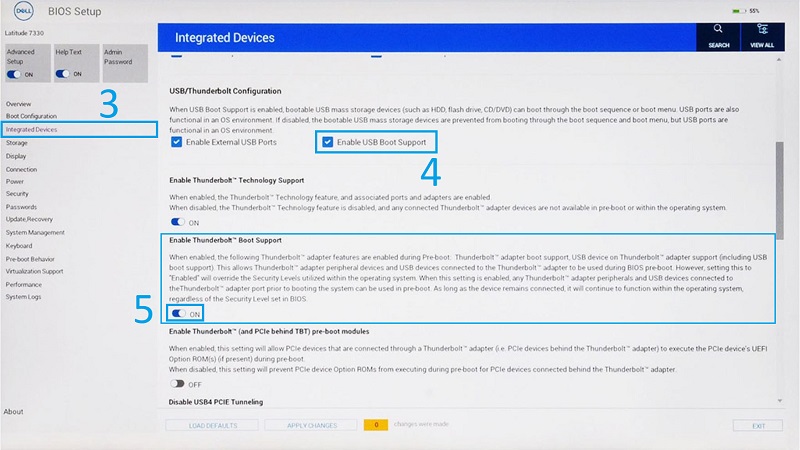
Figure 7: Enable UEFI Network Stack in BIOS - Select Integrated Devices.
- Scroll-down to see USB/Thunderbolt Configuration, then select Enable USB Boot Support.

Figure 8: Enable USB and Thunderbolt Boot Support - Ensure Enable Thunderbolt Boot Support is set to ON.
- Click Apply Changes to save changes.
Additional Information
Recommended Articles
Here are some recommended articles related to this topic that might be of interest to you.
- Why Does My System Fail to Boot to Windows and Display DHCP and PXE Errors?
- How to Implement PXE Booting from USB-C and Thunderbolt Ethernet Adapters
- PXE boot DHCP server requirements for Dell XPS, OptiPlex, Latitude, Precision computers shipping after 2019
- Cannot PXE Boot to a Dell Type-C to Ethernet Dongle