Download and Create Windows Recovery Image
Create a Windows recovery drive to safeguard your computer against potential system failures. The USB recovery key enables you to restore your PC to its original configuration, including the factory-installed operating system, drivers, and applications.
Dell Technologies recommends using SupportAssist OS Recovery for the best experience when restoring Windows on supported computers. Can't use SupportAssist OS Recovery or it this option isn't available on your computer? No problem! Follow these simple steps to create your own bootable Windows USB recovery media.
What is Dell OS Recovery Tool?
Ever had your computer crash and felt completely lost? The Dell OS Recovery Tool is here to save the day! This utility helps you download a recovery image of Windows tailored to your specific computer model. With this tool, you can easily create a USB recovery key to reinstall Windows whenever needed.
Key Benefits of Dell OS Recovery Tool
- Model-Specific Recovery: It downloads the exact version of Windows that your Dell computer was shipped with, ensuring everything works perfectly.
- USB Recovery Key: No need to be a tech wizard! The tool automatically creates a bootable USB recovery key, making the process simple and hassle-free.
- Factory-Installed Apps and Drivers: The recovery image includes all the Dell apps and drivers specific to your computer, so you're ready to go right away.
- Reliable Source: Get authentic version of Windows directly from Dell, ensuring you're using tested and supported software.
What You Need
Before you get started with the Dell OS Recovery Tool, make sure you have the following:
- A Compatible Computer: You'll need a working Windows 10 or Windows 11 computer with .NET Framework 4.8 or newer installed.
- USB Drive: A USB drive with at least 16 GB of free space.
- Internet Connection: Ensure you have a stable internet connection to download the recovery image.
- Dell OS Recovery Tool: Depending on your working computer's architecture, download the specific version of the tool—either x64 or ARM64.
Note: The Dell OS Recovery Tool only works on Windows. If you're using Ubuntu and need to reinstall it, check out our guide to create an Ubuntu recovery key.
Why It’s Important
Creating a Windows recovery image or recovery drive is crucial because it helps you:
- Restore your computer if it crashes or has serious issues.
- Save time by avoiding the need to reinstall everything from scratch.
- Protect your data by having a backup plan.
How to Create a Windows USB Recovery Key
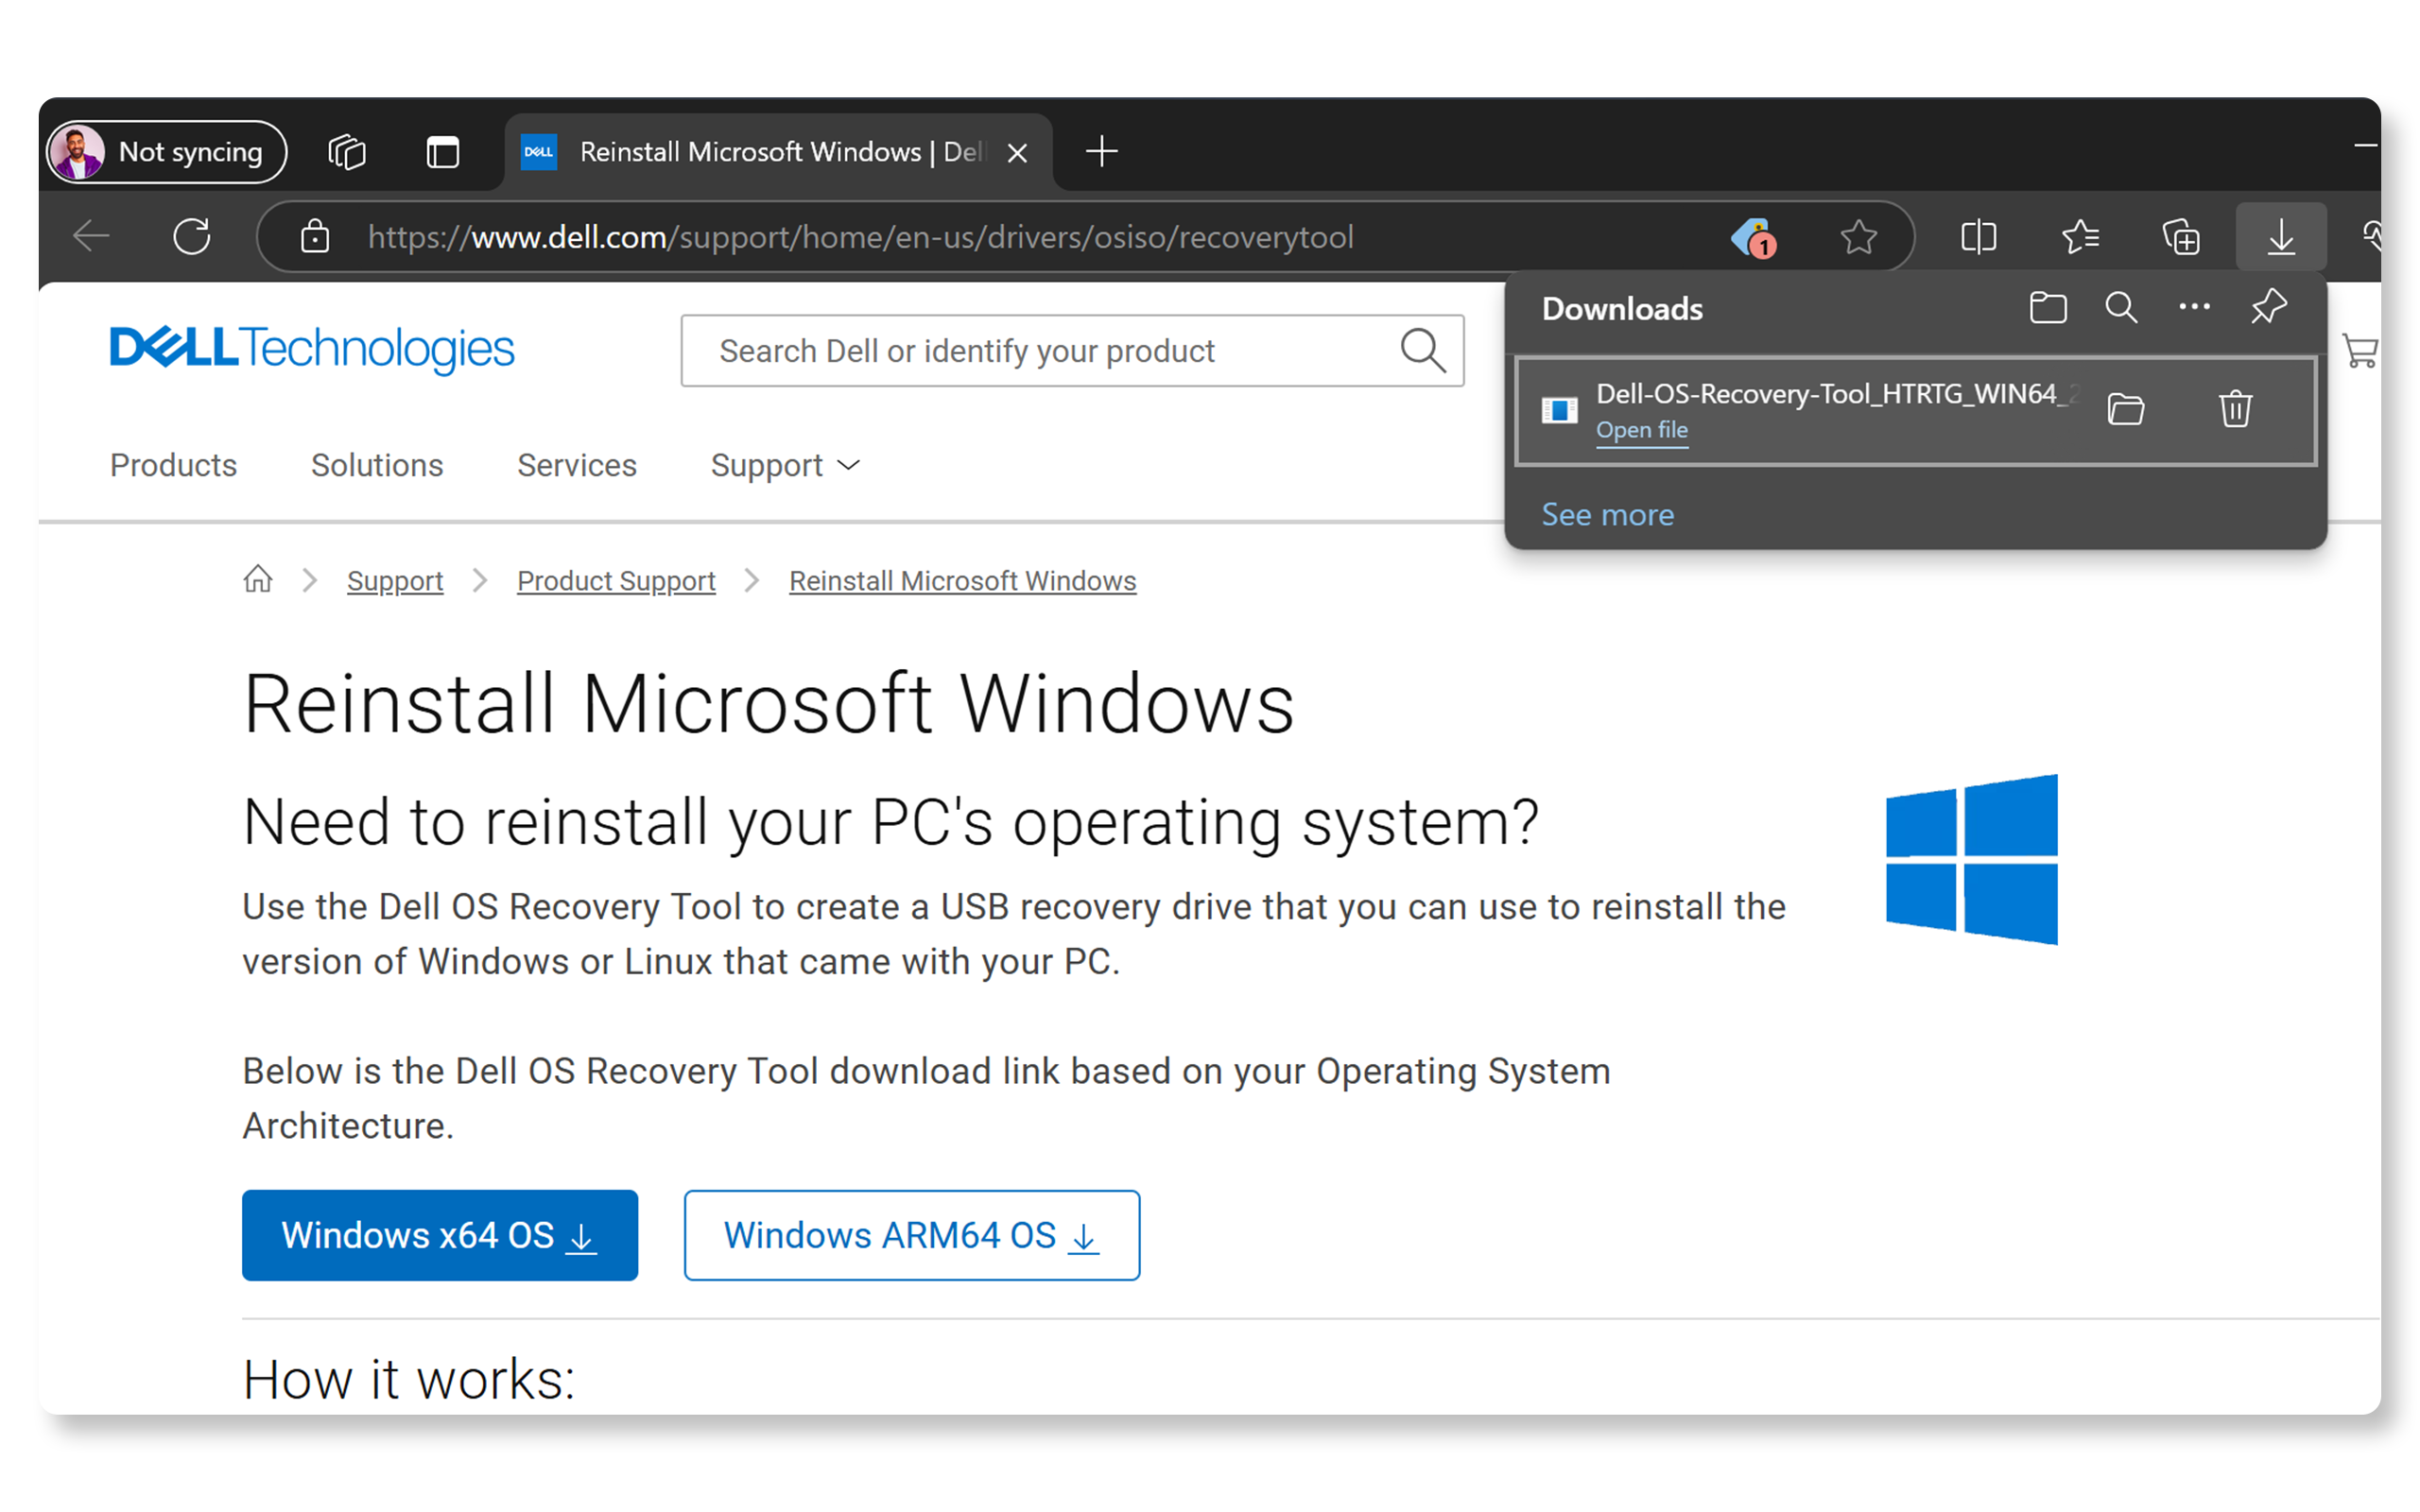
Step 1: Downloading and Install Dell OS Recovery Tool
The Dell OS Recovery Tool is compatible with Windows 10 and Windows 11, and requires .NET Framework 4.8 or newer. It's important to download the correct version for your working computer's architecture—either x64 or ARM64.
- Go to the Dell OS Recovery Tool page.
- Choose the X64 or ARM64 version based on the architecture of your working computer and save the file to the Downloads folder.
- Double-click the installer and follow the on-screen instructions to install the tool.
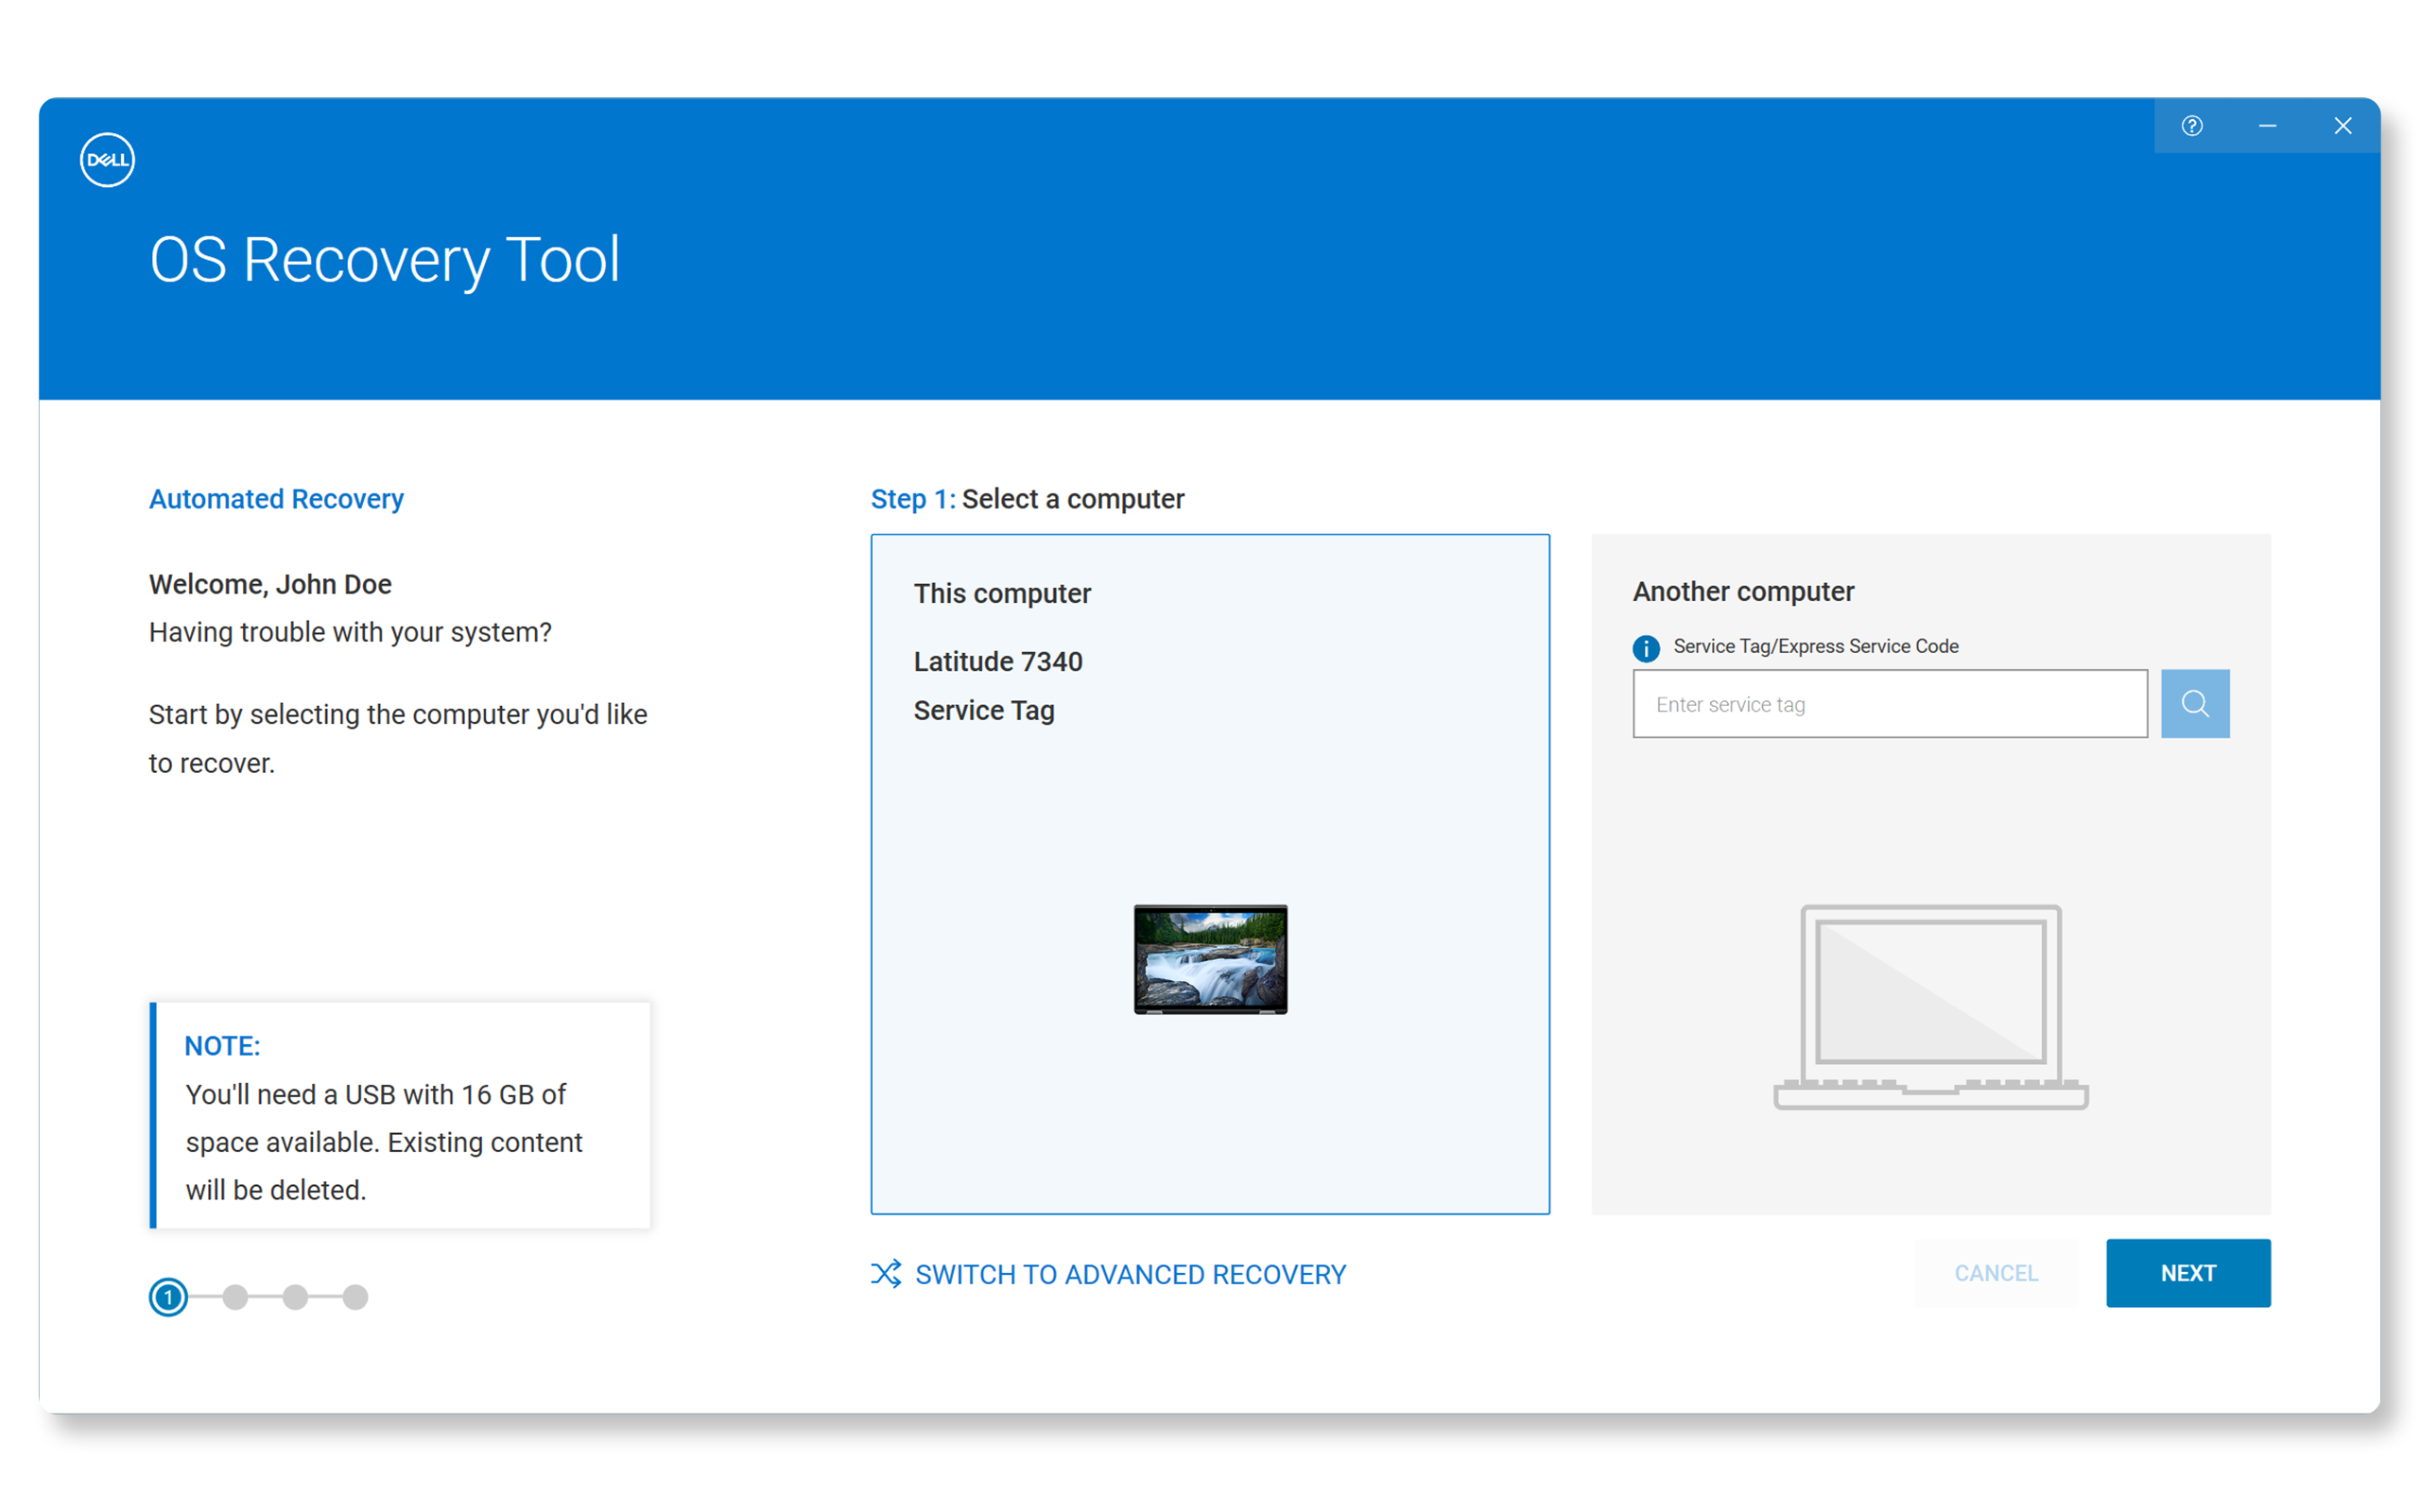
Step 2: Identifying your Dell Computer
- Open the Dell OS Recovery Tool.
- Enter your computer’s Service Tag or Express Service Code. If you're using the same Dell computer, the tool will auto-detect it. If not, manually enter the Service Tag or Express Service Code found on a sticker on your computer. If the Service Tag isn't recognized, check FAQ #19 for help.
Step 3: Preparing Your USB Drive
- Plug in the USB drive into your computer.
- Choose the USB drive you connected.
- Check the box to confirm that the USB drive will be erased, and all data will be deleted.
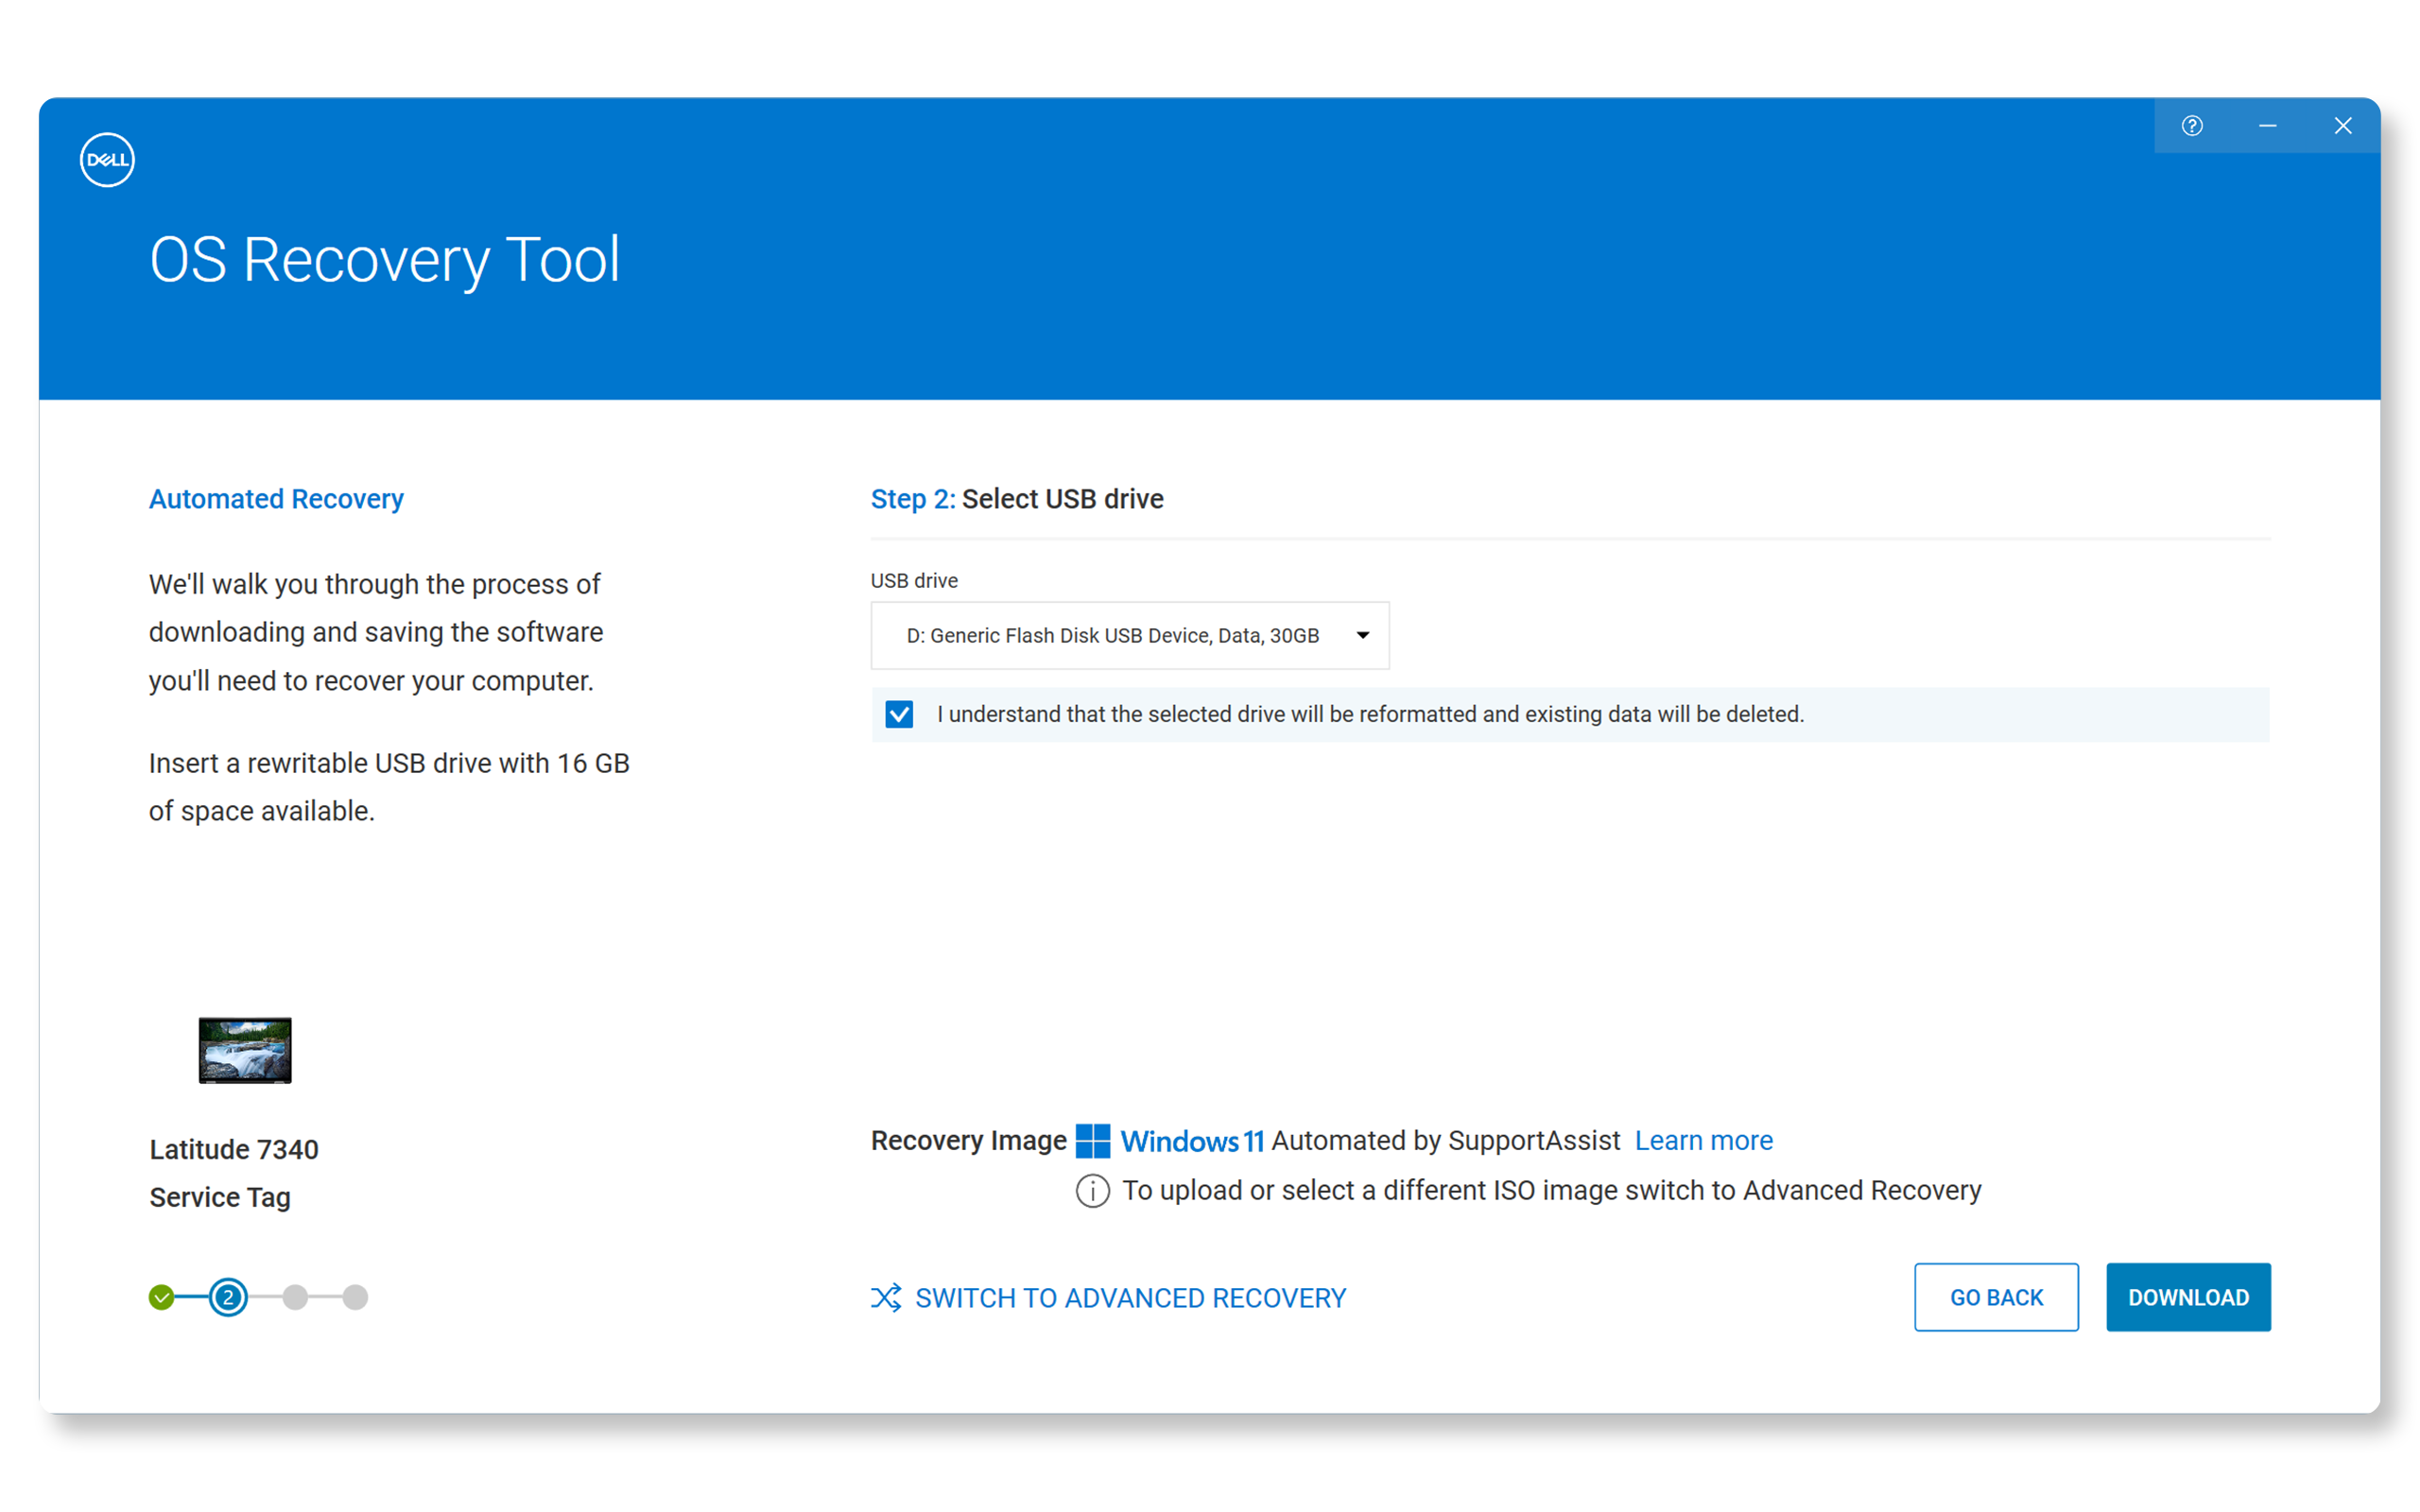
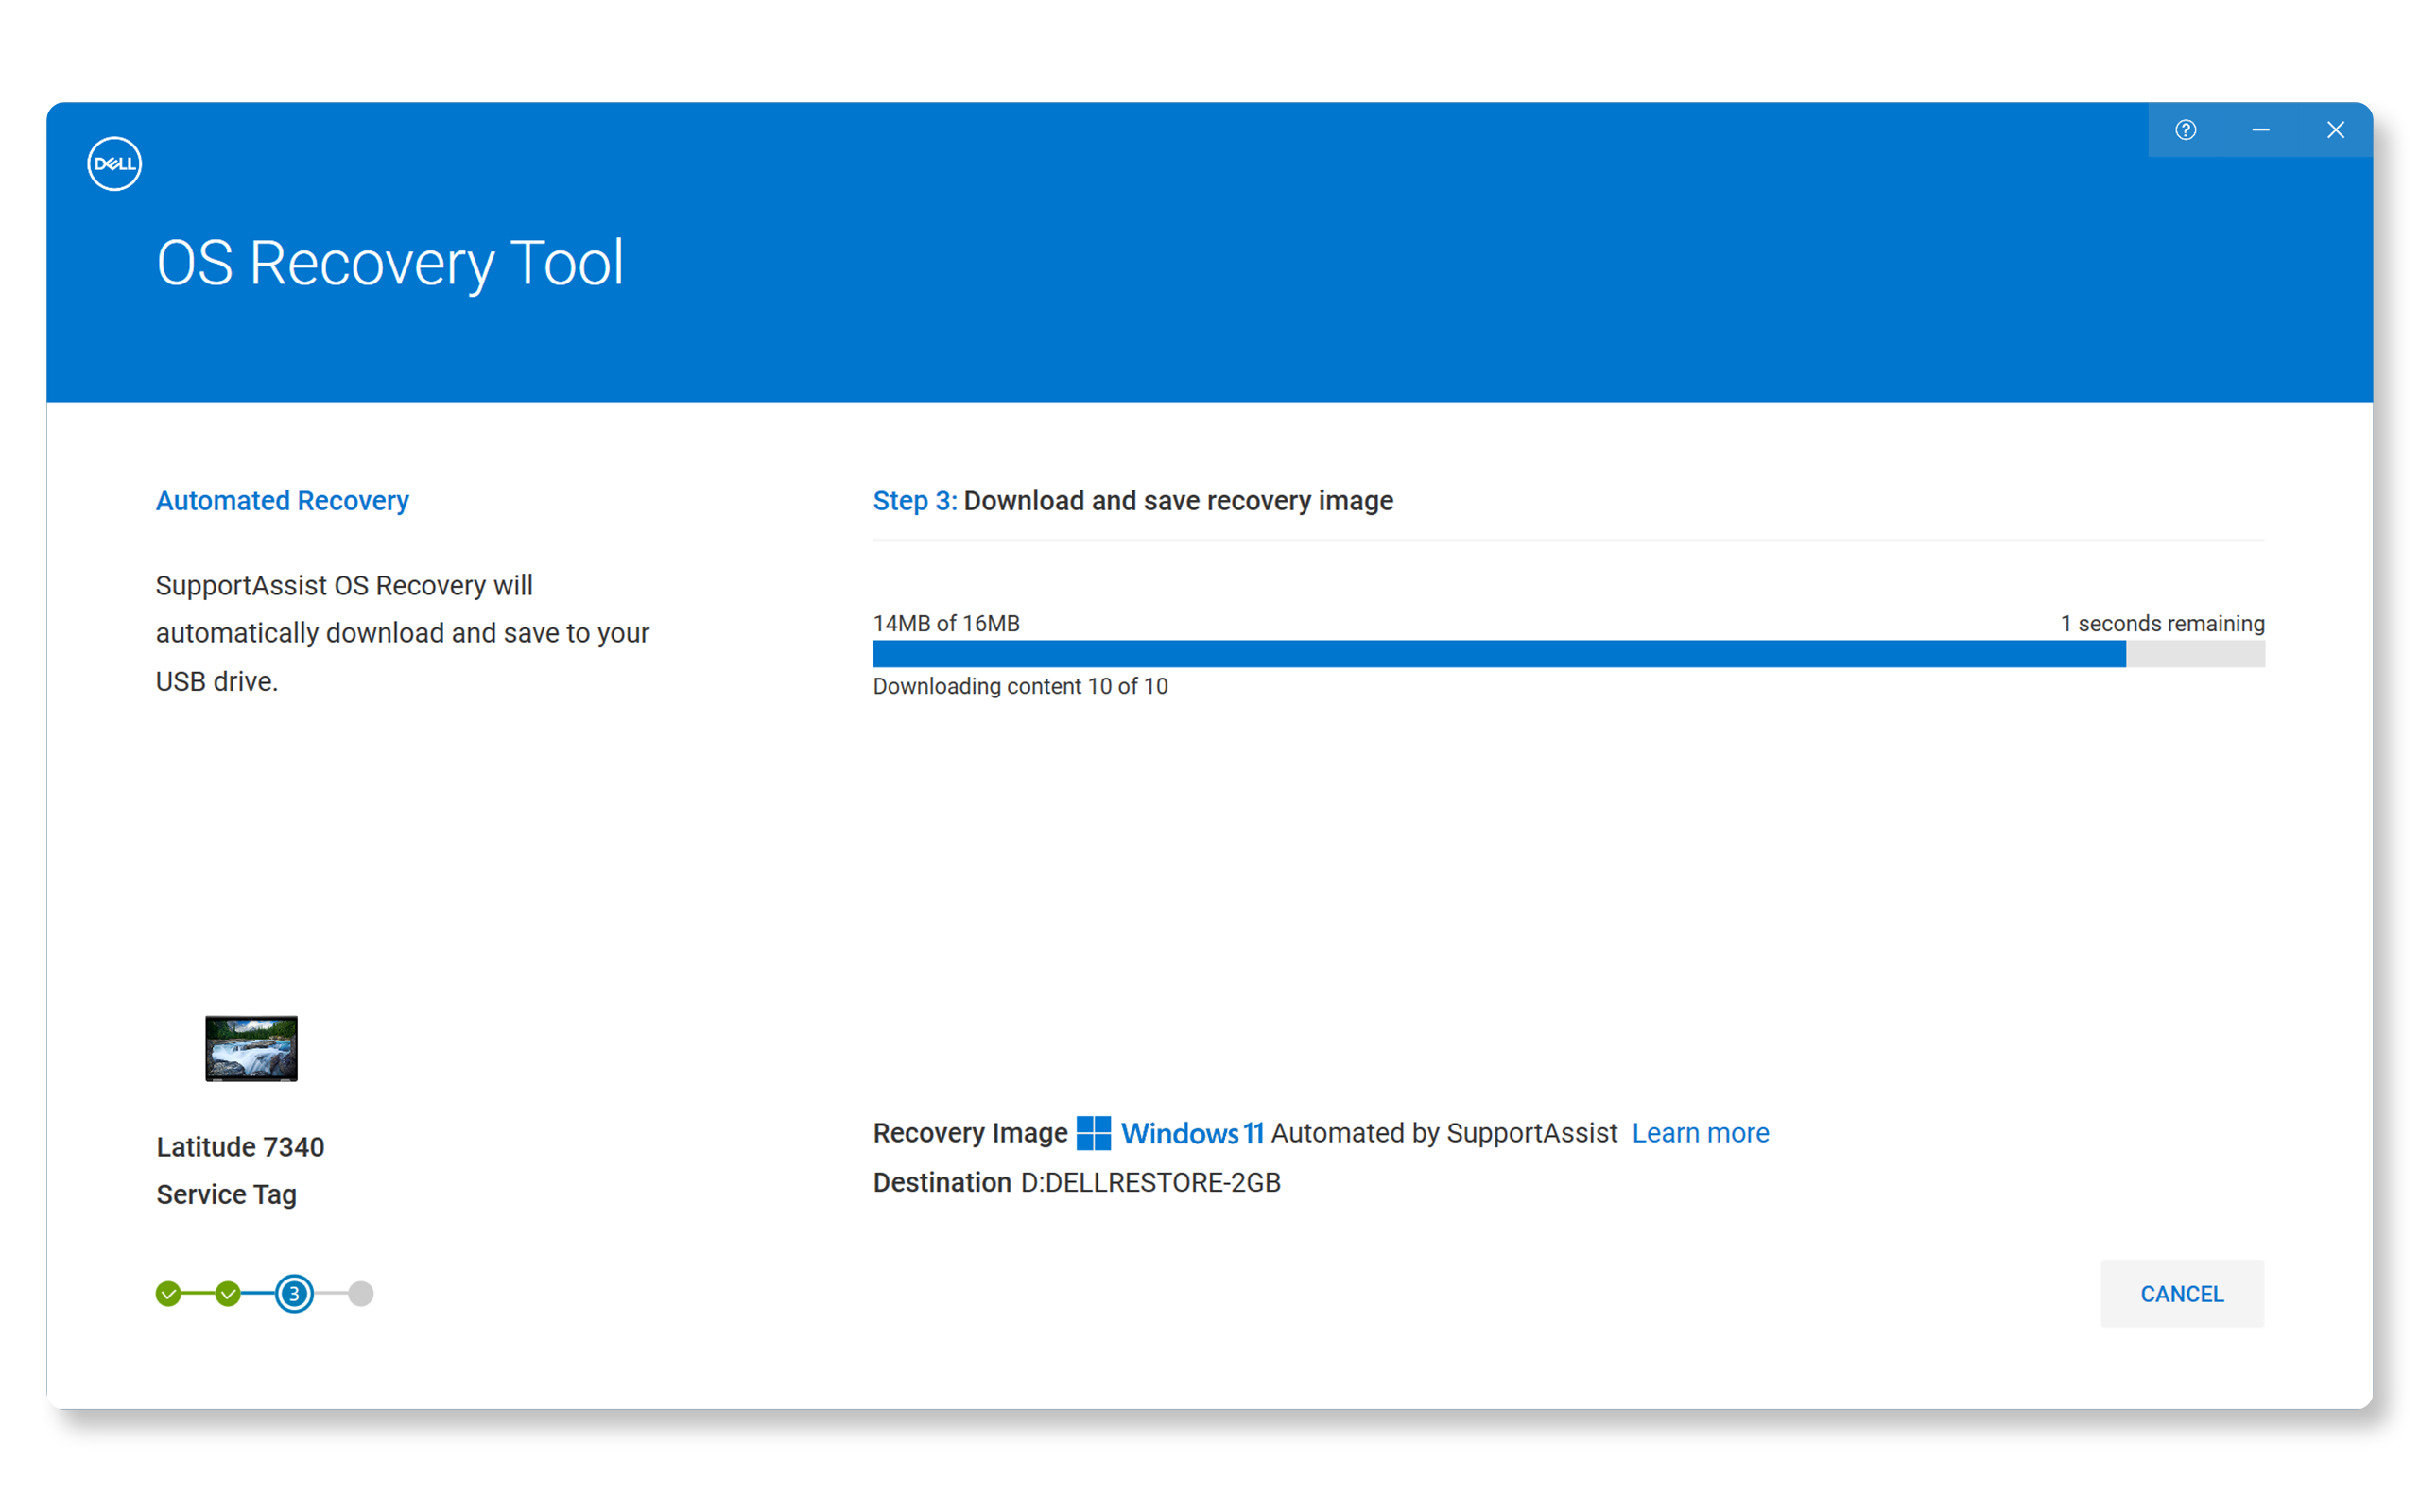
Step 4: Creating the Recovery Image
- Click Download to begin downloading the recovery image.
- Wait for the download to complete. This might take some time depending on your internet speed.
- Once the download is complete, the tool will automatically create the USB recovery key.
Step 5: Using the Recovery Image
- Restart your computer.
- Press F12 when you see the Dell logo to enter the boot menu.
- Choose the USB drive from the boot menu.
- Follow the on-screen instructions to repair or reinstall Windows.
Tips for Using Dell OS Recovery Tool
- The process will erase all data on your USB drive. Back up any important files before starting.
- Keep your computer plugged in to avoid interruptions during the download and creation process.
- Use a wired internet connection for a more stable download.
Frequently Asked Questions (FAQs)
Here are some common questions about the Dell OS Recovery Tool with detailed answers.
1. What do I need to create a Windows recovery key using the Dell OS Recovery Tool?
- You will need a working Windows computer, a USB drive with at least 16 GB of free space, an internet connection, and the Dell OS Recovery Tool installed.
2. Will using Dell OS Recovery Tool erase all my data on the USB drive?
- Yes, creating a recovery drive will erase all data on your USB drive. Be sure to back up your files before you start.
3. Can I use Dell OS Recovery Tool on a non-Dell computer?
- Yes, you can use it on another Windows computer to create a recovery image. It works on x64 or ARM64 versions of Windows.
4. How long does it take to create a Windows recovery drive?
- The time varies based on your internet speed and the size of the Windows recovery image. It can take from a few minutes to several hours.
5. What should I do if the Dell OS Recovery Tool fails to create a recovery image?
- Ensure your USB drive is properly inserted and has enough free space. Check your internet connection and try restarting the tool. If the problem persists, contact Dell Technical Support.
6. Can I use the USB recovery key to install Windows on a new hard drive or SSD?
- Yes, you can use the USB recovery key to install Windows on a new hard drive or SSD. Just boot from the USB recovery key and follow the on-screen instructions.
7. What operating systems are supported by the Dell OS Recovery Tool?
- It works on Windows 10 and Windows 11 with .NET Framework 4.8. You can install it on x64 or ARM64 versions of Windows. It can't be installed on macOS or Linux.
8. Can I create a recovery drive for Windows and Linux using Dell OS Recovery Tool?
- No, it only supports creating a recovery drive for Windows that was preinstalled on your Dell computer. If you need help to reinstall Ubuntu or Linux, follow our guide to create an Ubuntu recovery drive.
9. How do I use the recovery image to restore my computer?
- Restart your computer and press F12 repeatedly when you see the Dell logo to enter the boot menu. Select the USB drive, press Enter, and follow the on-screen instructions. Remember, restoring your computer will erase all your data, so back up your files first.
10. Can I use the Dell OS Recovery Tool on a mac or Linux computer?
- No, Dell OS Recovery Tool can't be installed on Linux or macOS.
11. Can I create a Windows recovery media without a USB drive?
- No, you need a USB drive with at least 16 GB of free space to create a Windows recovery media using Dell OS Recovery Tool.
12. What should I do if my USB drive is not recognized by the Dell OS Recovery Tool?
- Ensure the USB drive is properly connected, try a different USB port, format the drive to FAT32 or NTFS, or use a different USB drive.
13. Can I use the Dell OS Recovery Tool to upgrade Windows?
- No, it's designed to create a Windows recovery media for restoring your computer to its original factory state, not for upgrading Windows.
14. What happens if my internet connection is interrupted during the download process?
- The download will pause and resume automatically once the internet connection is restored. If it doesn't, restart the tool and begin the download again.
15. Can I create multiple recovery images for different Dell computers using the same USB drive?
- No, each recovery image is specific to the Dell computer for which it was created. You'll need a separate USB drive for each recovery image.
16. Can I use the Dell OS Recovery Tool to back up my personal files?
- No, it's designed to create a recovery media for restoring Windows. Use a separate backup solution for your personal data.
17. Can I use the Dell OS Recovery Tool to download Linux or Ubuntu recovery image?
- No, it only supports creating recovery media for Windows operating systems that was factory-installed on your Dell computer.
18. Can I use the Dell OS Recovery Tool to create a recovery image on a DVD?
- No, it's designed to create a recovery image on a USB drive, which is more reliable and faster than DVDs.
19. Why is my Service Tag or Express Service Code not recognized by the Dell OS Recovery Tool?
- Double-check the Service Tag for typos, ensure your system is supported (Windows 7 or newer), and check your internet connection. Try using the Express Service Code instead of the Service Tag. If the issue persists, contact Dell Technical Support.
20. Can I use the Dell OS Recovery Tool without a valid Service Tag or Express Service Code?
- No, a valid Service Tag or Express Service Code is required to verify your device and provide the correct recovery image.
21. Can I create a recovery image for my Dell computer with Snapdragon?
- No, you cannot create a recovery image for your Dell computer with a Qualcomm Snapdragon processor using the Dell OS Recovery Tool. Use the Windows Push Button Reset on Qualcomm Snapdragon devices.