How to Update BIOS: Install and Upgrade BIOS on Windows
What is BIOS and UEFI?
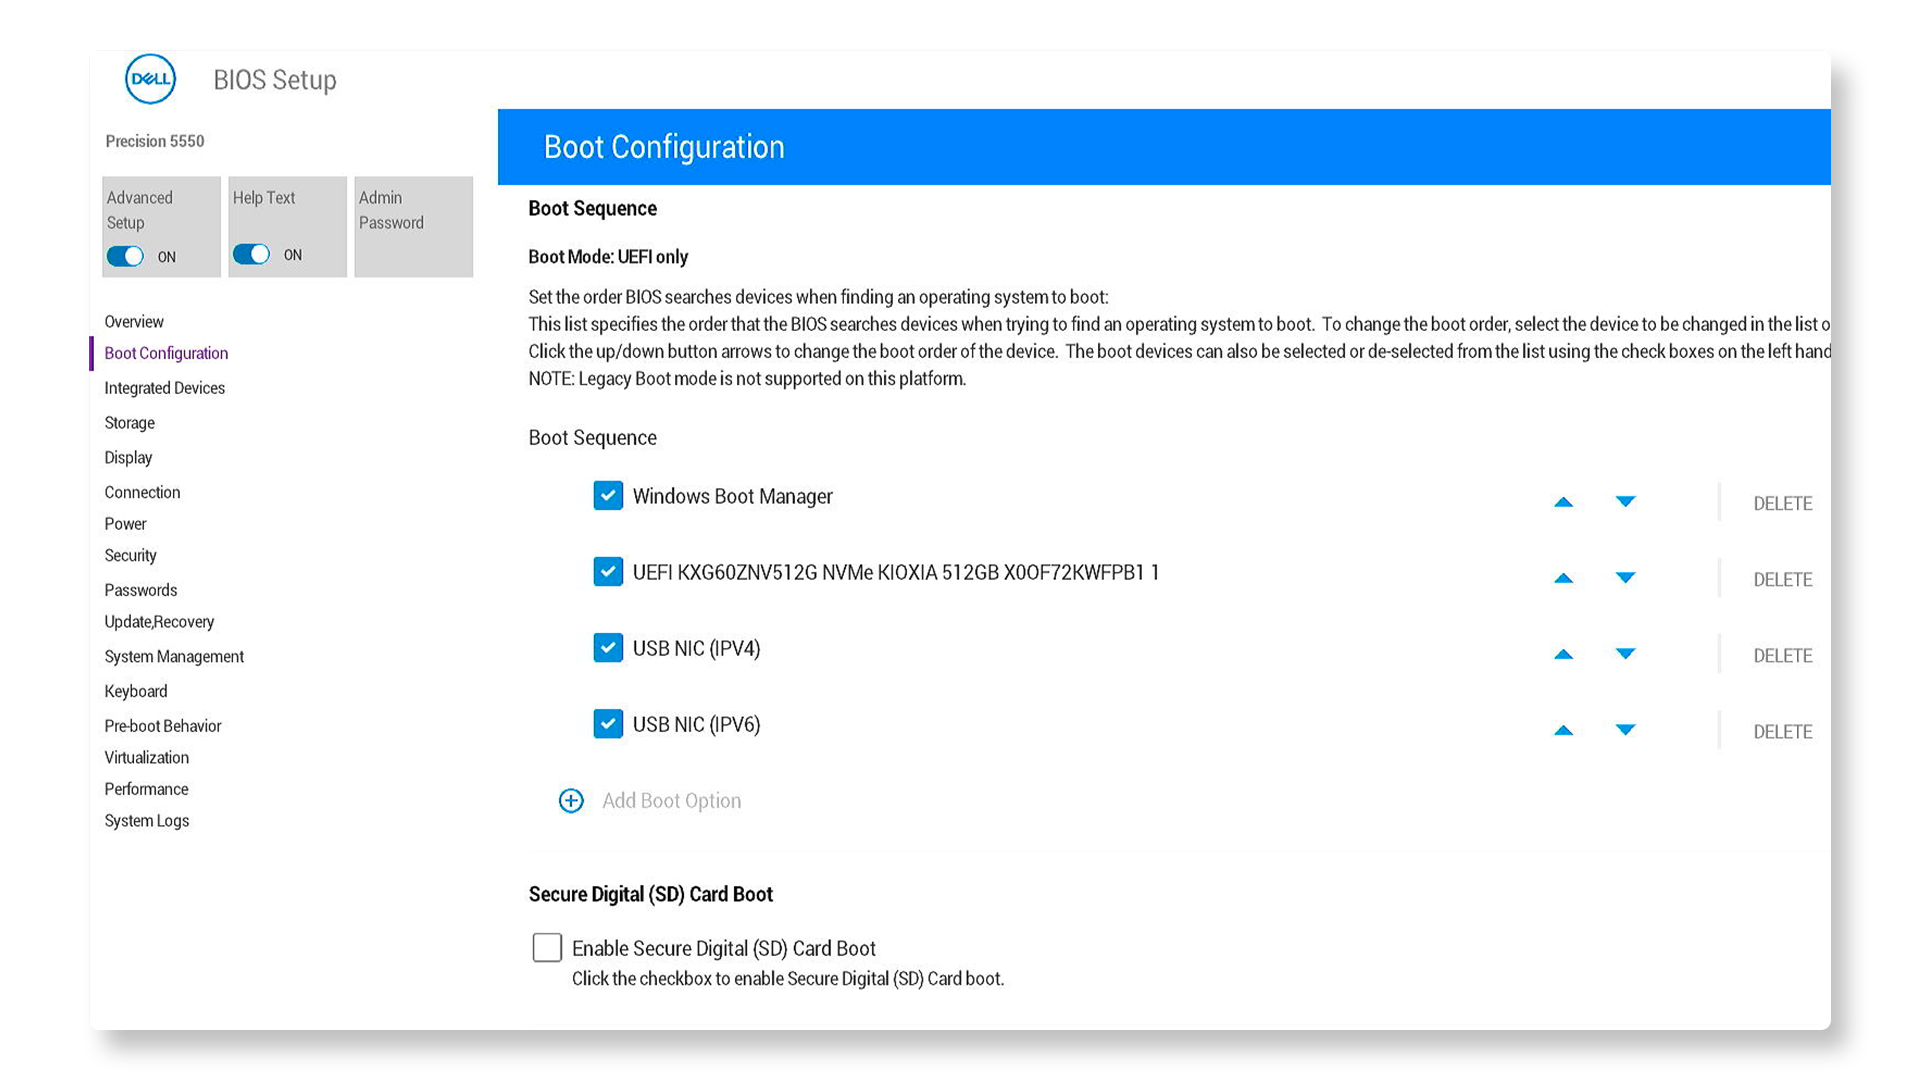
BIOS (Basic Input/Output System) and UEFI (Unified Extensible Firmware Interface) are firmware interfaces between your computer's hardware and the operating system. UEFI is the modern successor to BIOS and provides a faster, more secure booting process, along with additional features. All newer Dell computers come with UEFI.
Note: The BIOS/UEFI interface on your computer might be different from the one shown here.
Why Update Your BIOS or UEFI?
Updating the BIOS or UEFI can:
- Improve system performance.
- Fix security vulnerabilities.
- Add support for new hardware.
- Resolve hardware compatibility issues.
Precautions to Take Before Updating
- Backup Important Data: A failed BIOS update can potentially corrupt your system's motherboard.
- Ensure Stable Power: Make sure your laptop is plugged in or that your desktop has an uninterrupted power source.
- Close Background Programs: This minimizes the chances of interference during the update.
Checking your Current BIOS/UEFI Version
Using the BIOS/UEFI Settings
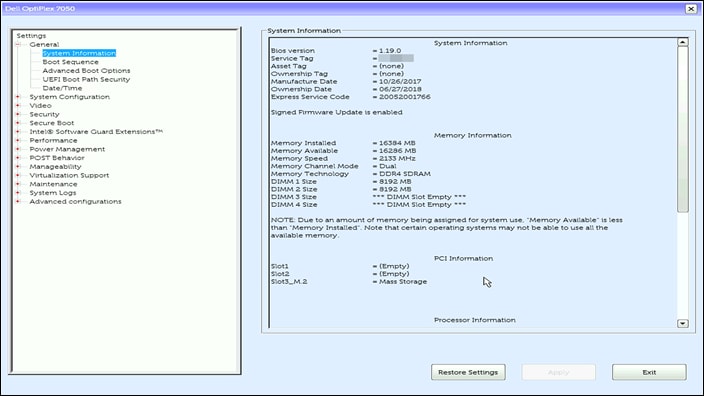
- Turn on or restart your computer.
- Press F2 key repeatedly to access the BIOS/UEFI settings.
- Locate the BIOS version under Overview or General > System Information.
Using System Information Tool in Windows
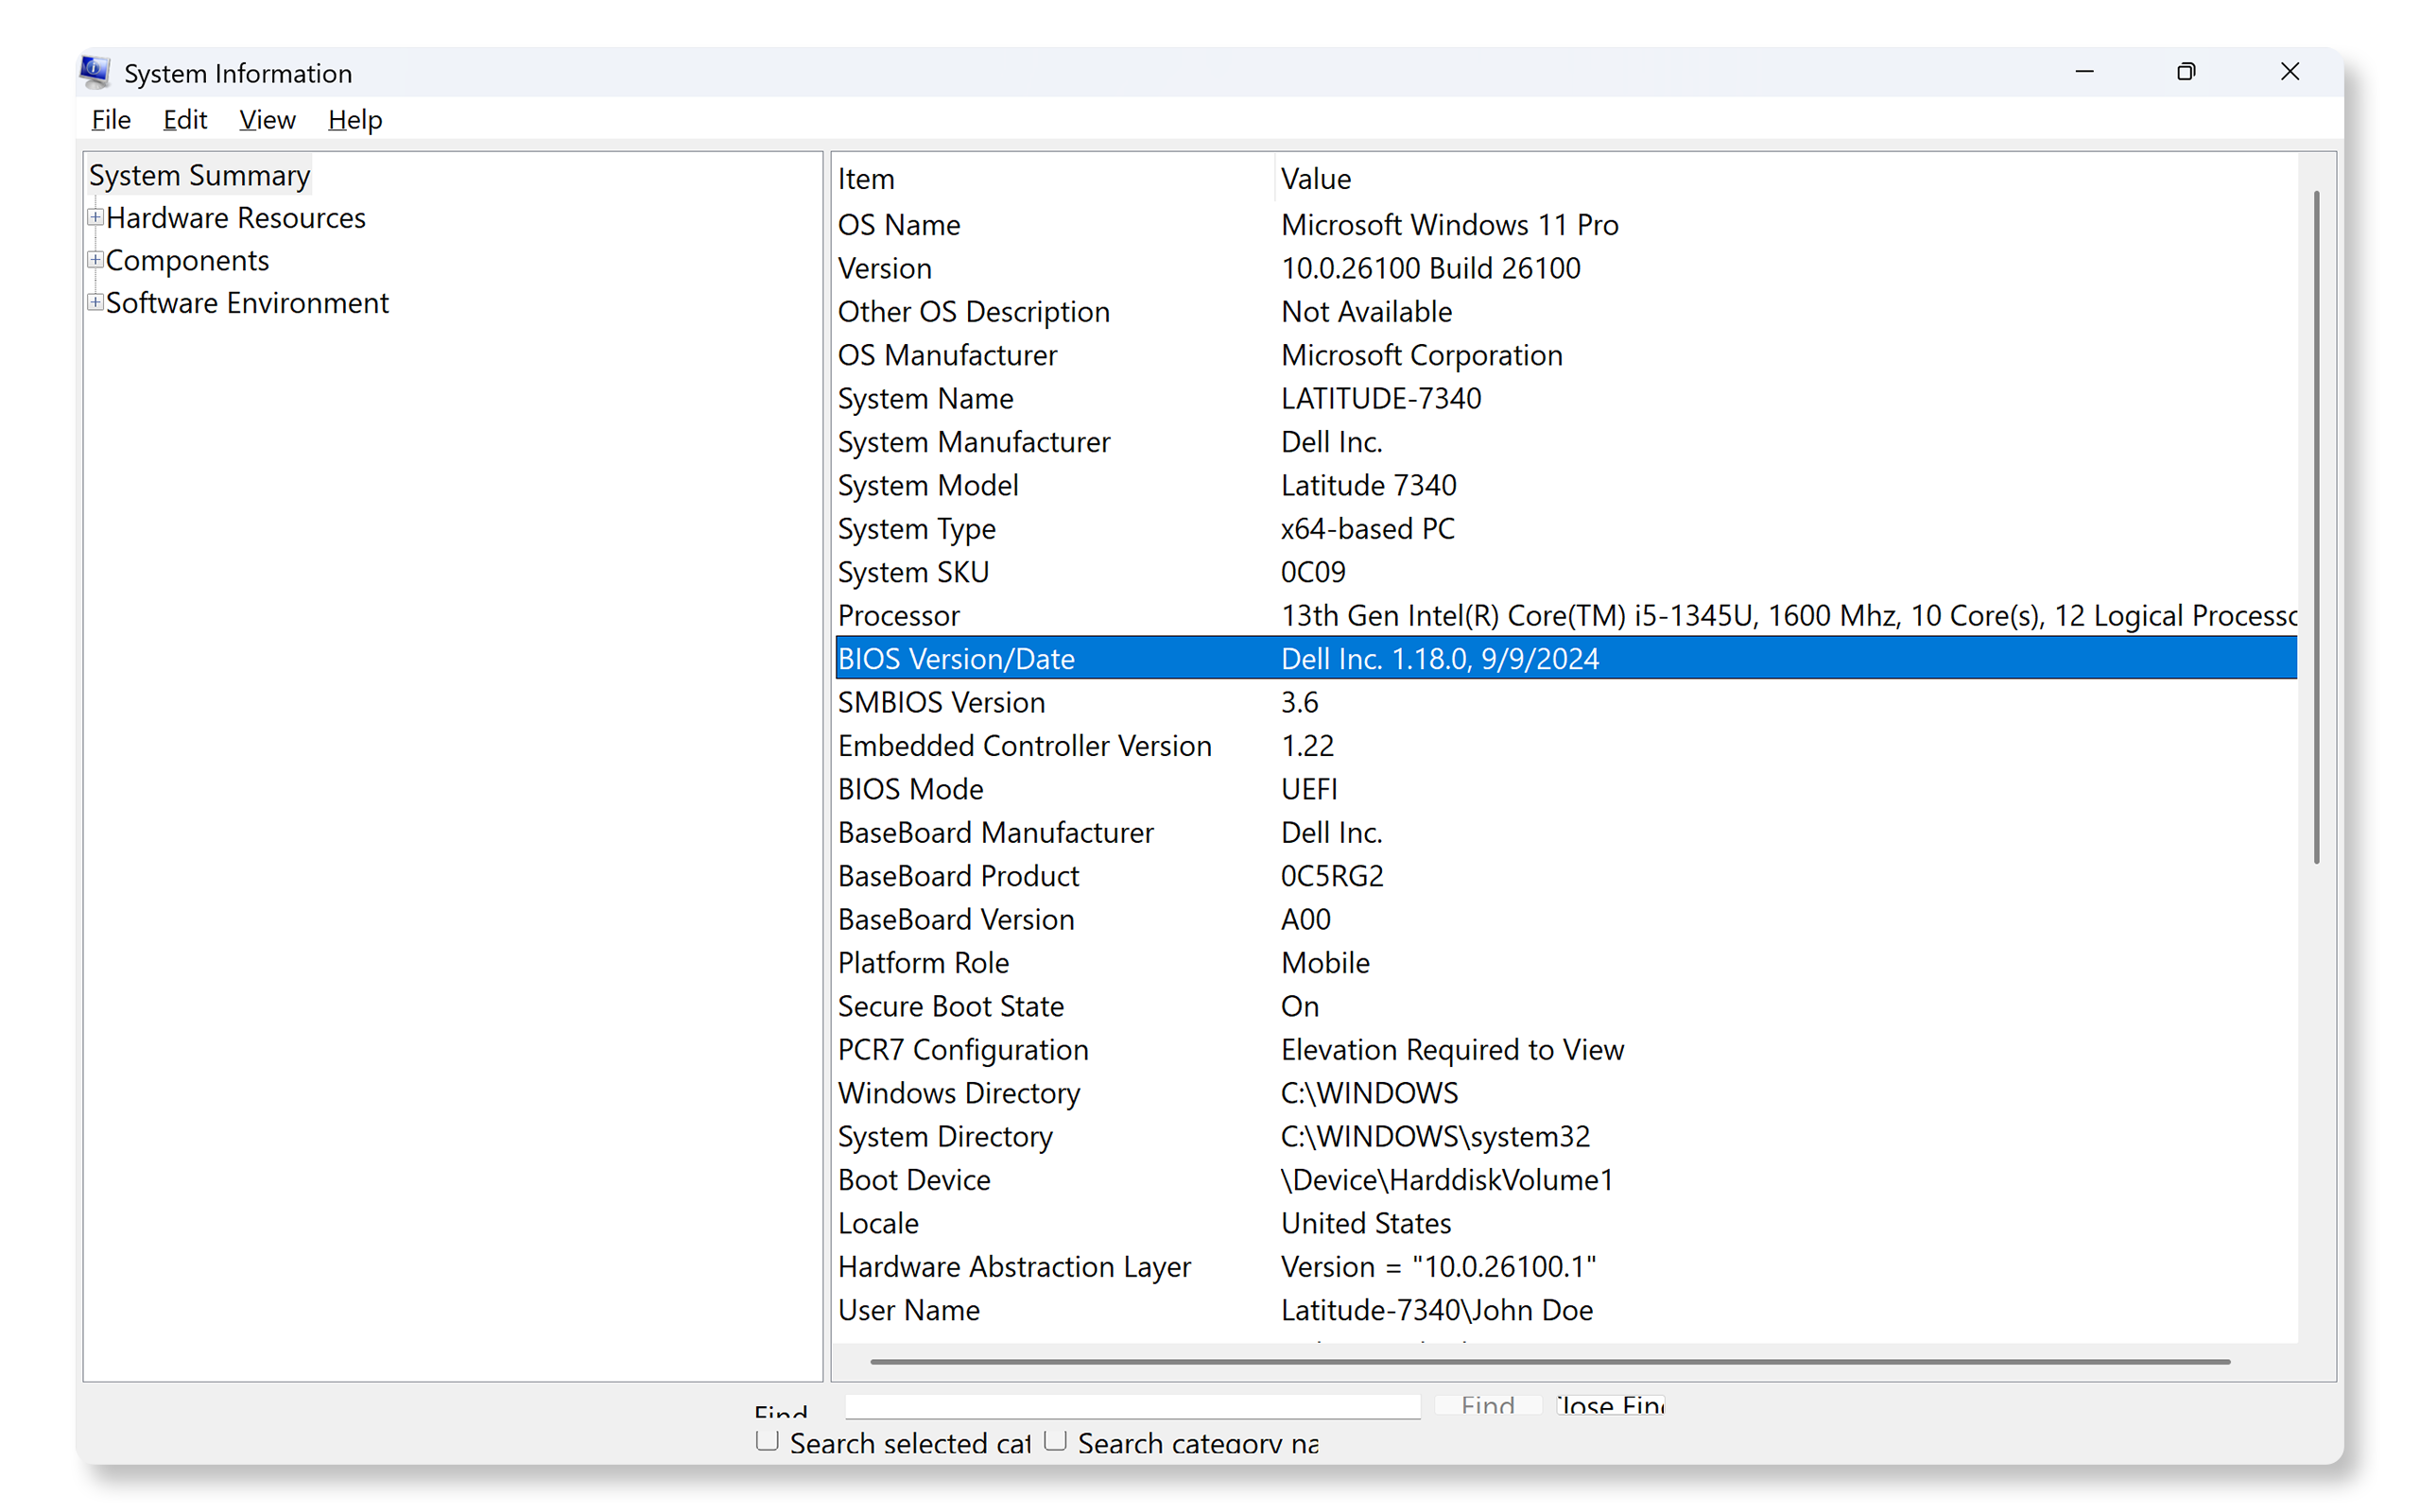
- Press Windows key + R to open the Run dialog box.
- Type msinfo32 and press Enter.
- Locate BIOS Version/Date to find your current BIOS version.
Using Command Prompt in Windows
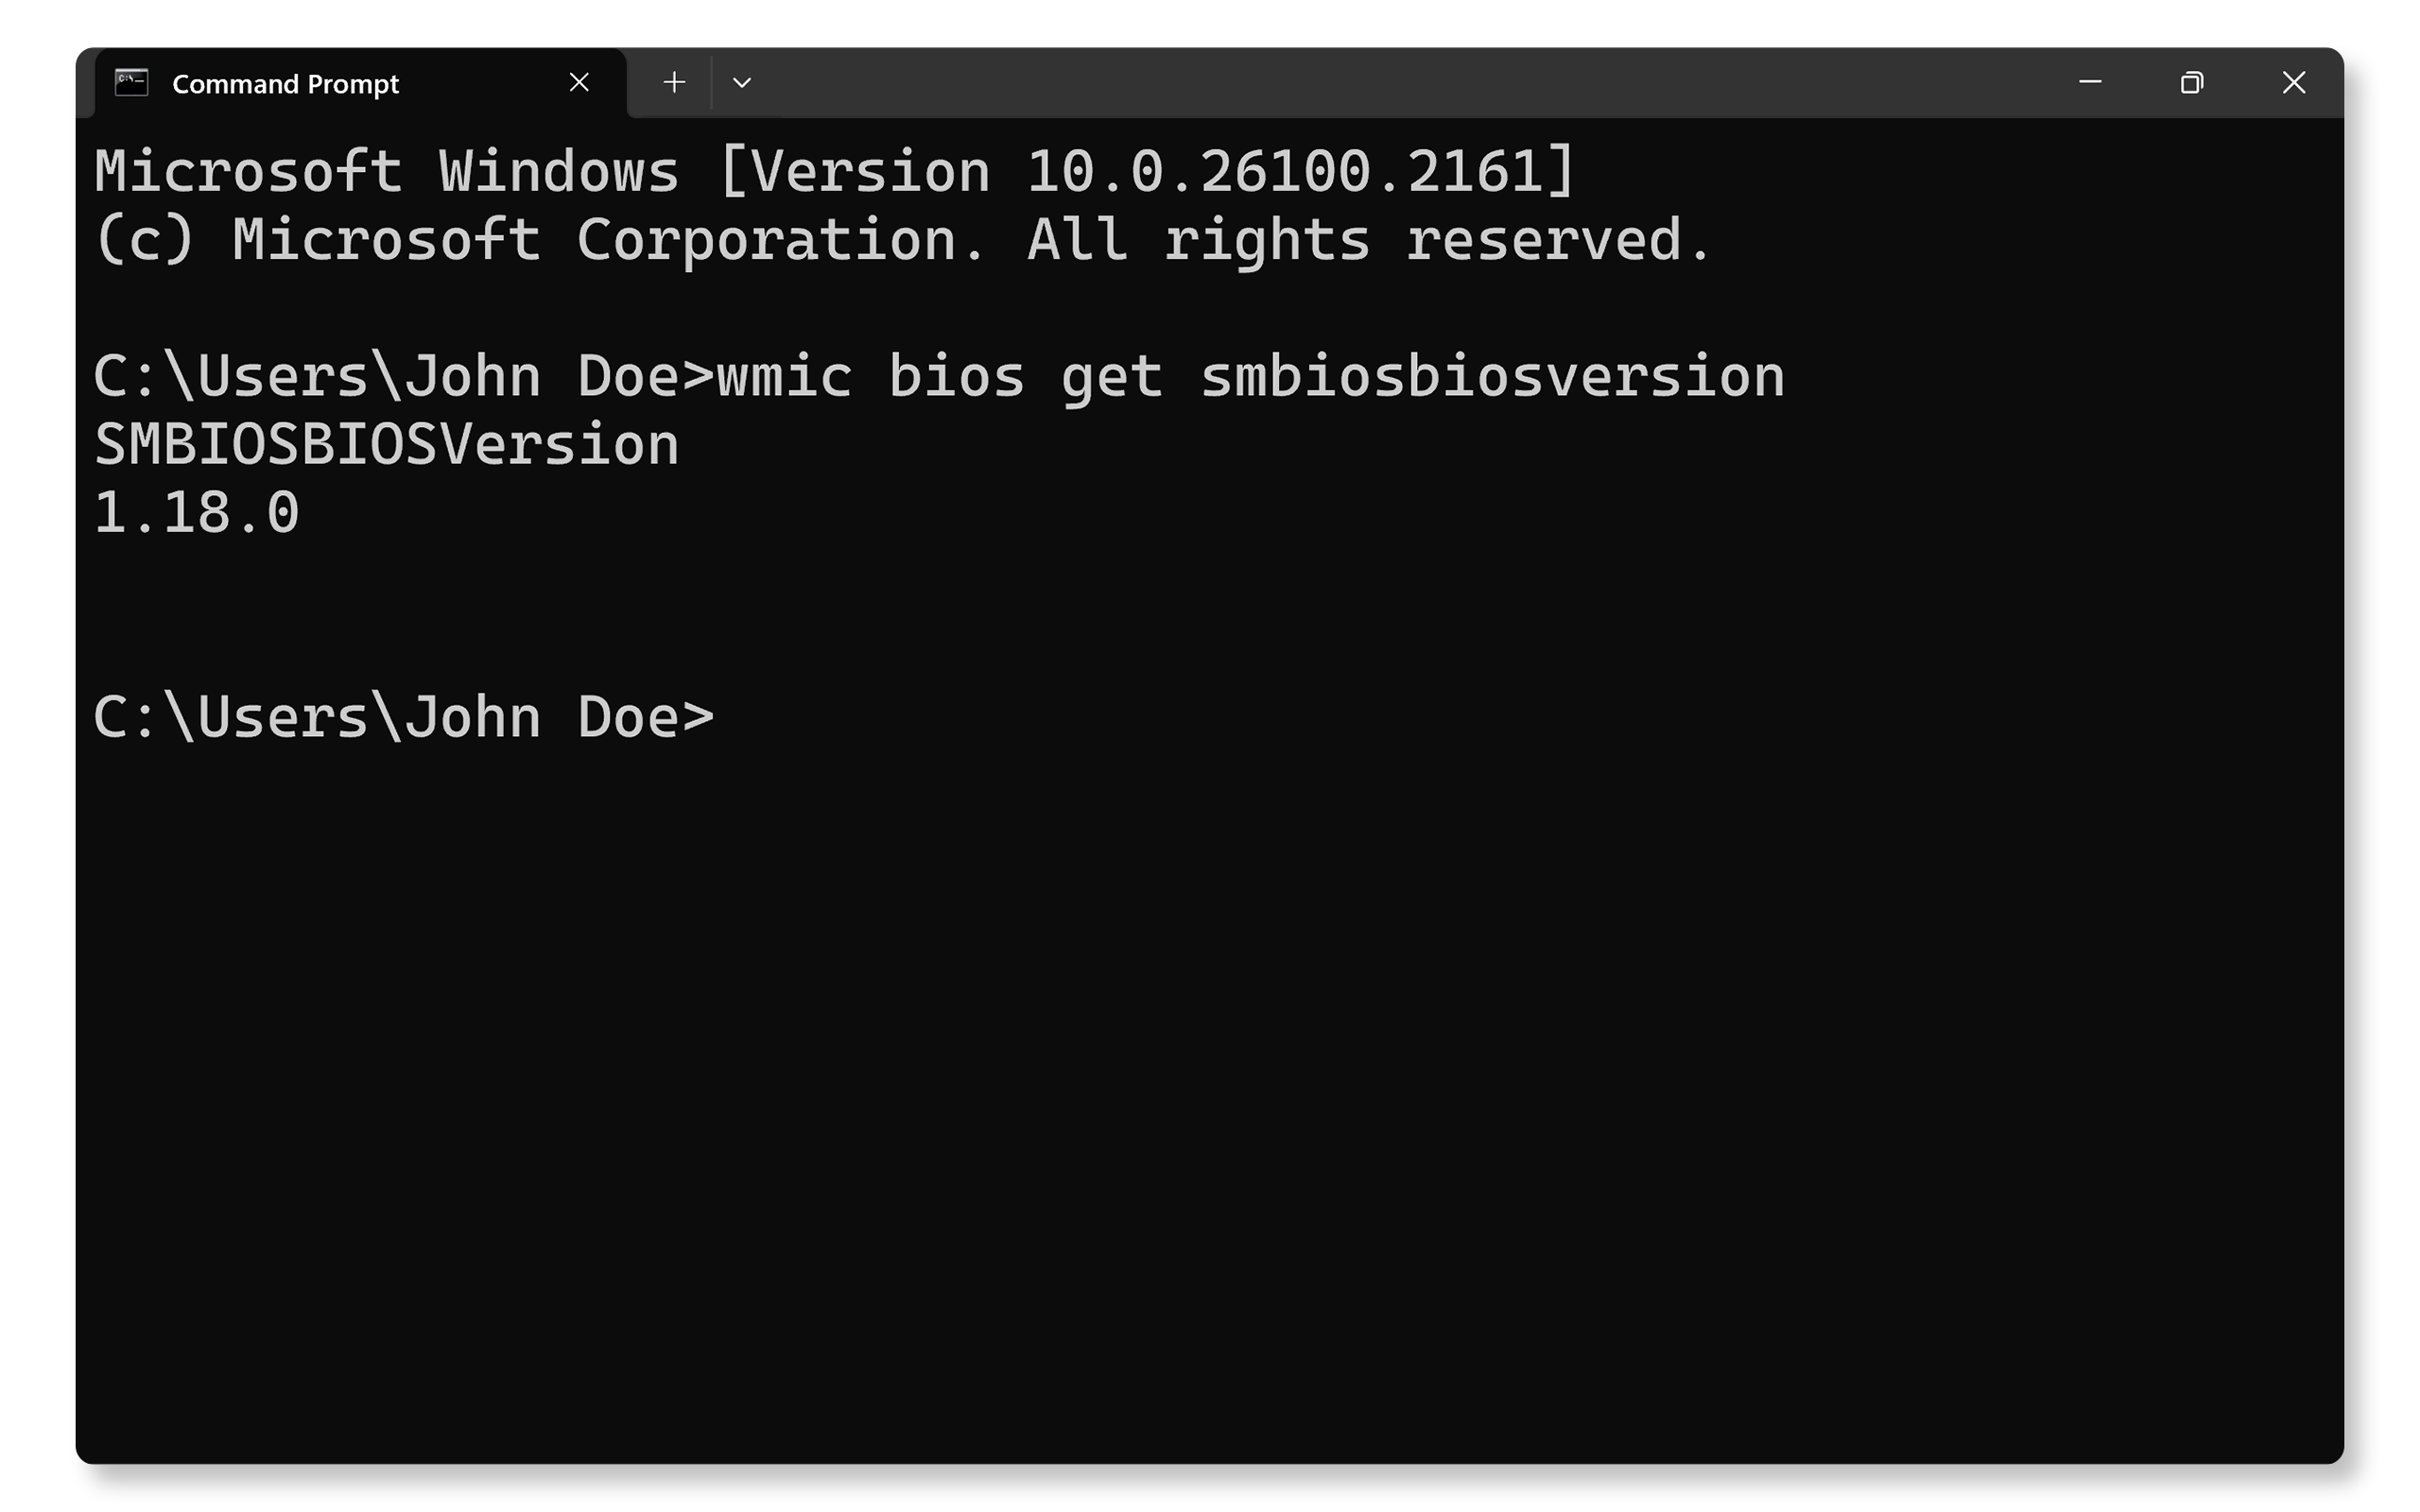
- Open Command Prompt and type wmic bios get smbiosbiosversion.
- Press Enter to display your BIOS version.
Methods to Update BIOS/UEFI
There are many easy ways to update the BIOS/UEFI, so you can pick the one that works best for you, whether you like using automated tools or manually updating it step-by-step:
- Updating through SupportAssist
- Updating through Windows Update
- Updating through Standalone BIOS Update Utility
- Updating Using a USB Flash Drive (Outside Windows)
- Updating through Dell Command | Update
- Updating through Over-The-AIR (OTA) or Remote
- Updating through Dell Update or Alienware Update
Method 1: Updating through SupportAssist
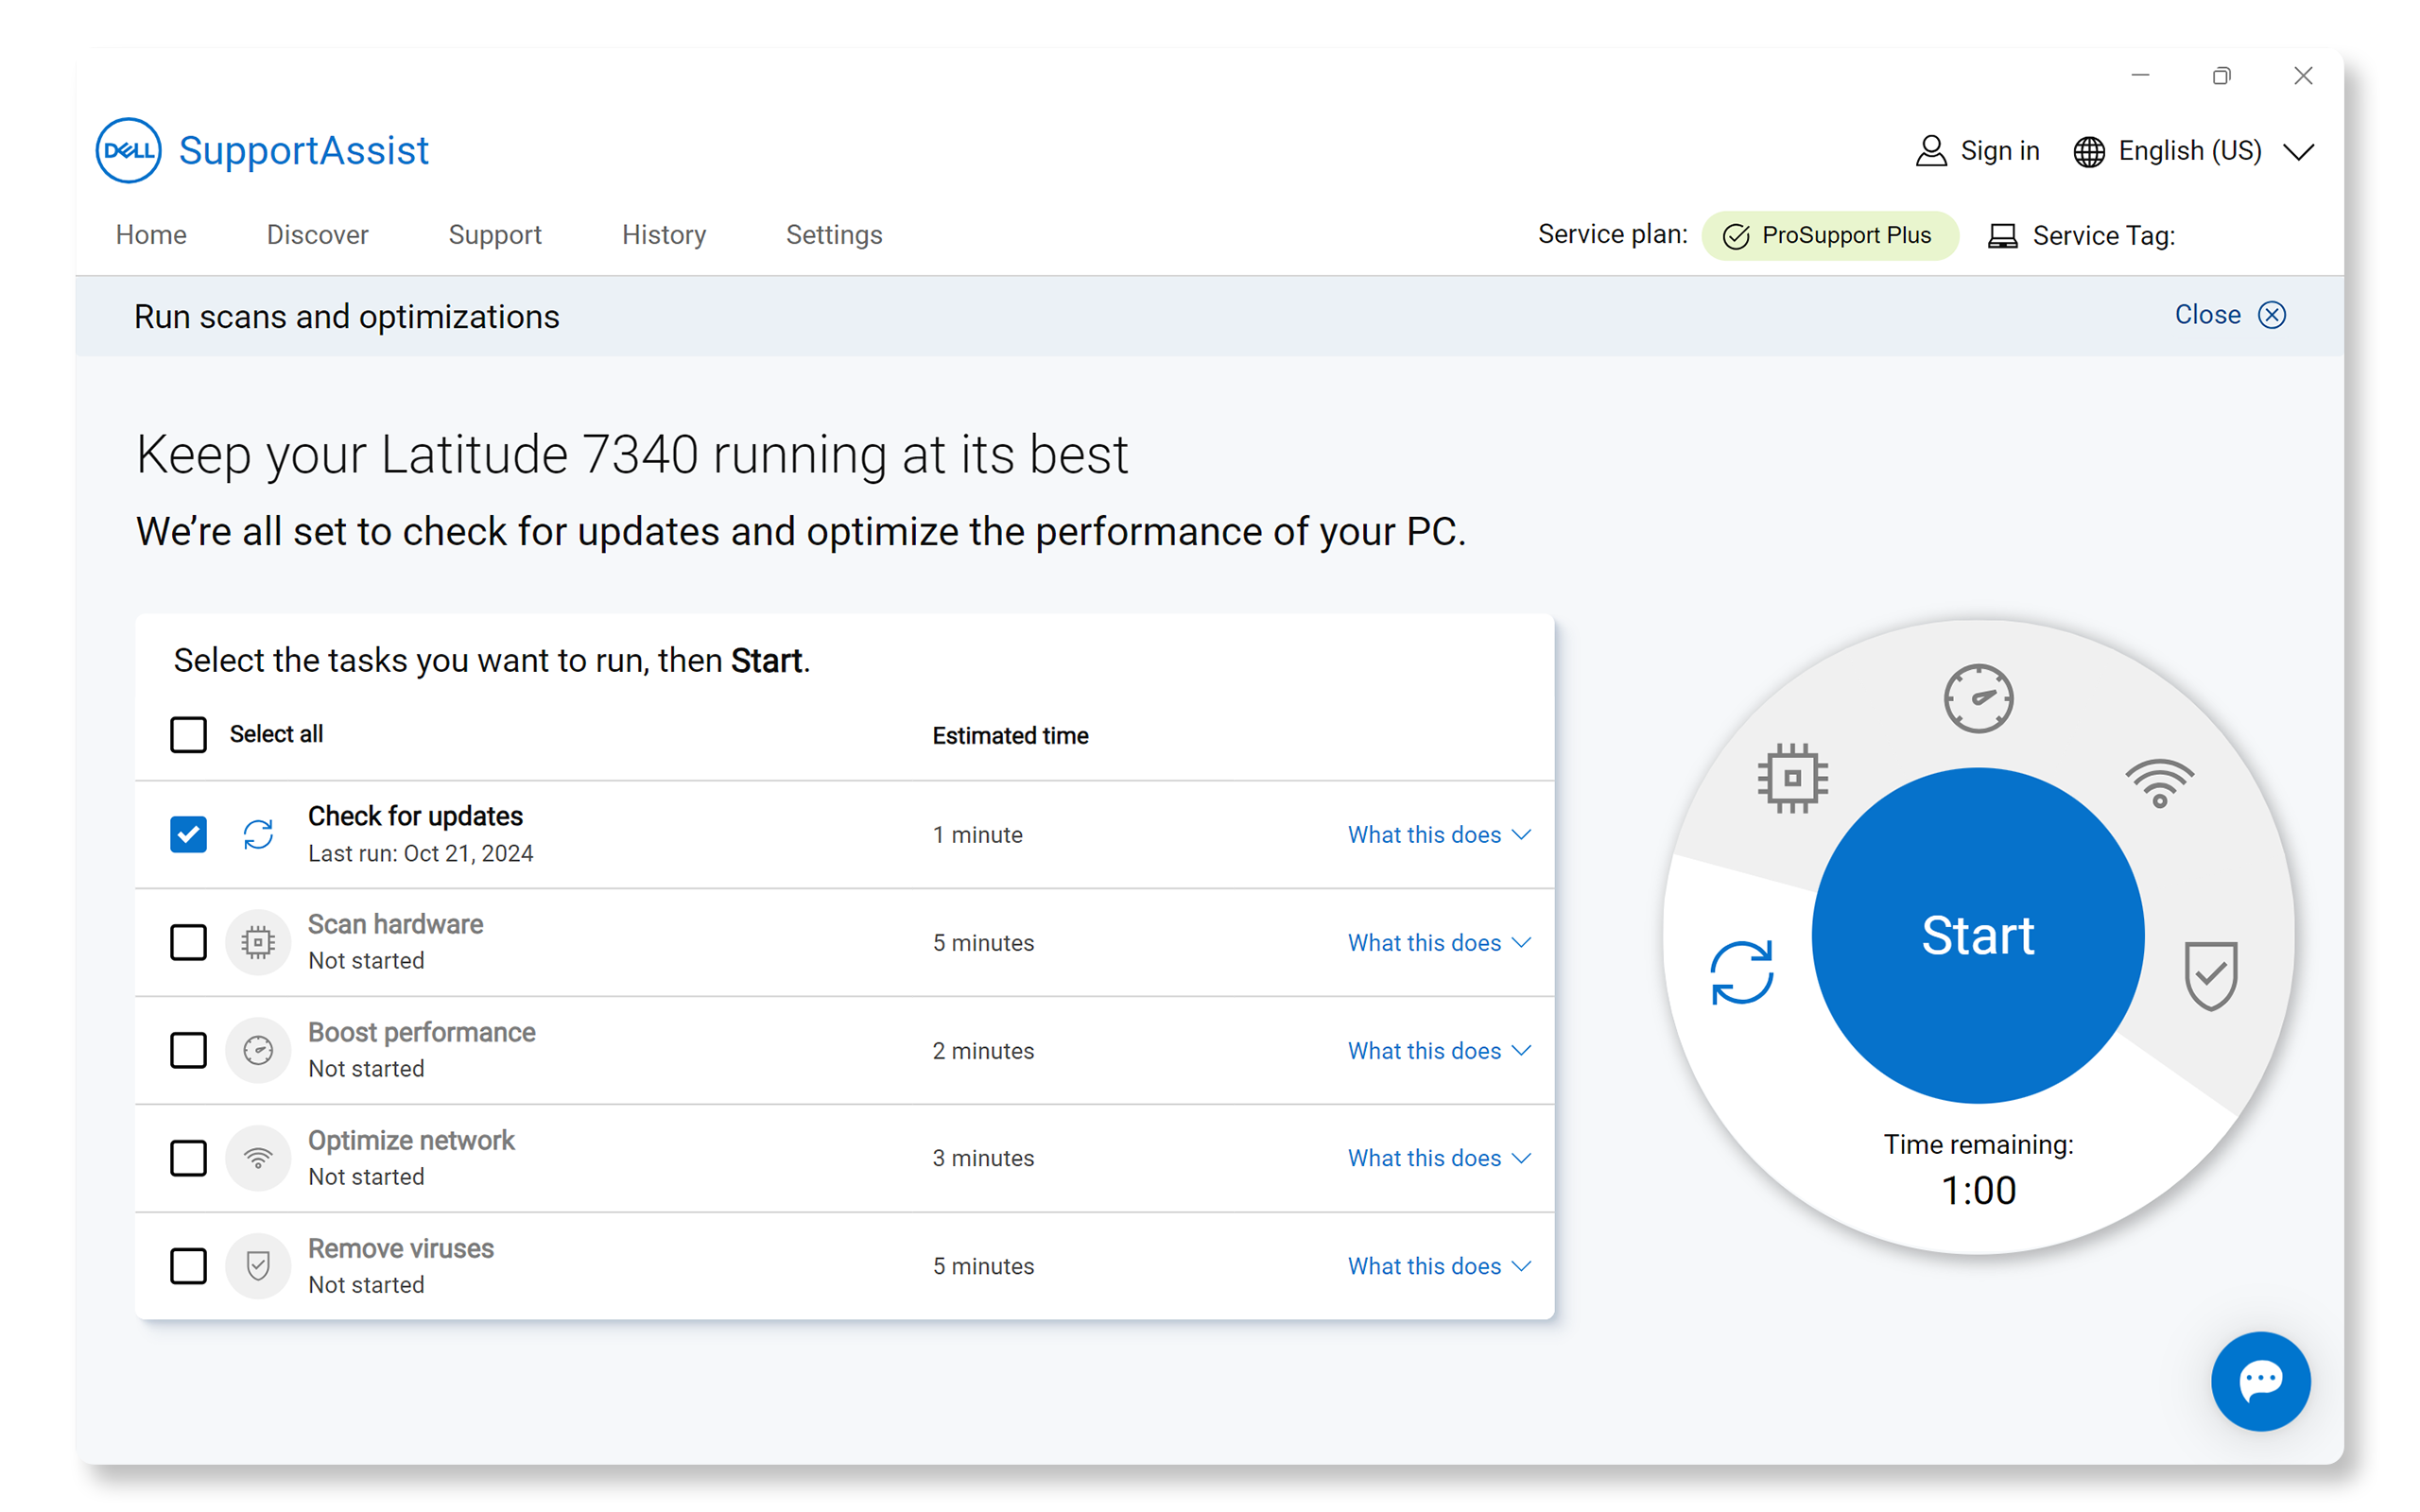
SupportAssist is Dell's automated support tool that helps scan your system for updates and installs them seamlessly. Here's how to update the BIOS/UEFI using SupportAssist:
- Search for SupportAssist in the Start menu and open the app.
- On the Home tab, select Update software.
- Select Start to check for BIOS updates and follow the instructions.
Method 2: Updating through Windows Update
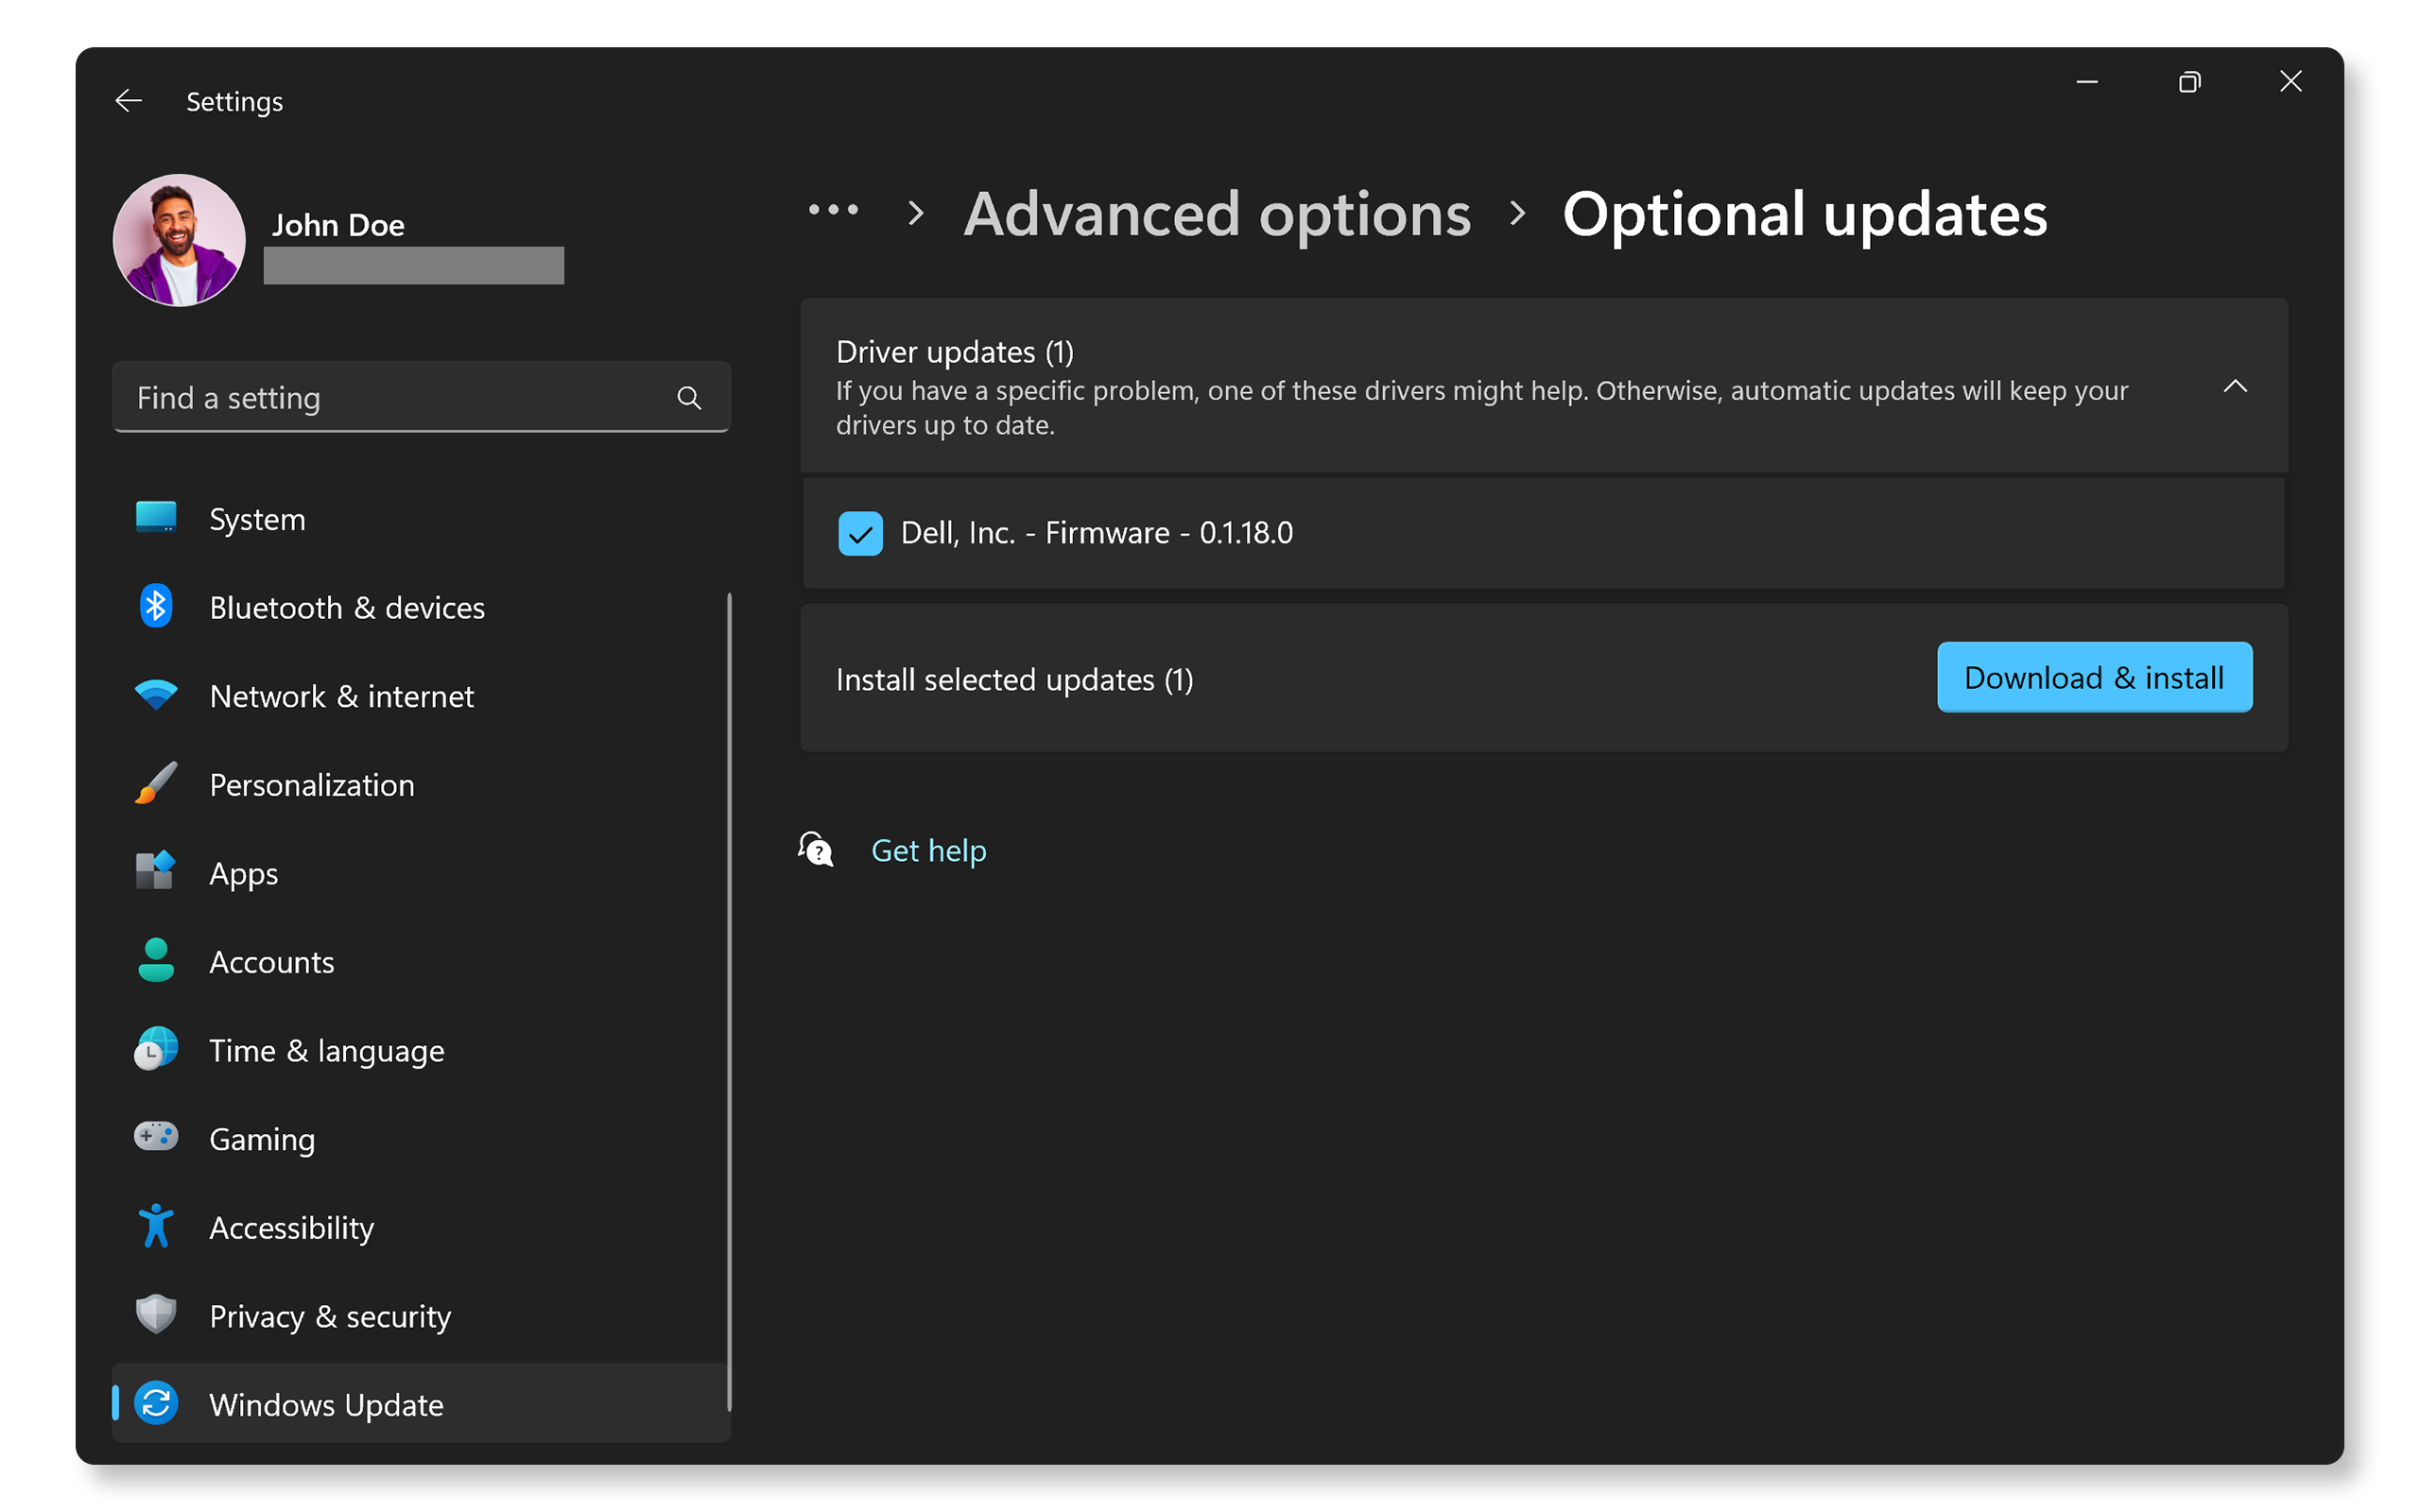
Dell systems also receive BIOS/UEFI updates via Windows Update. These updates appear under optional driver updates as Dell Firmware.
- Go to Start > Settings > Windows Update, and click Check for updates. Open Windows Update settings.
- Now go to Advanced Options > Optional Updates. Under Driver updates, select the BIOS update (if available) and click Download & install.
Method 3: Updating through Standalone BIOS Update Utility
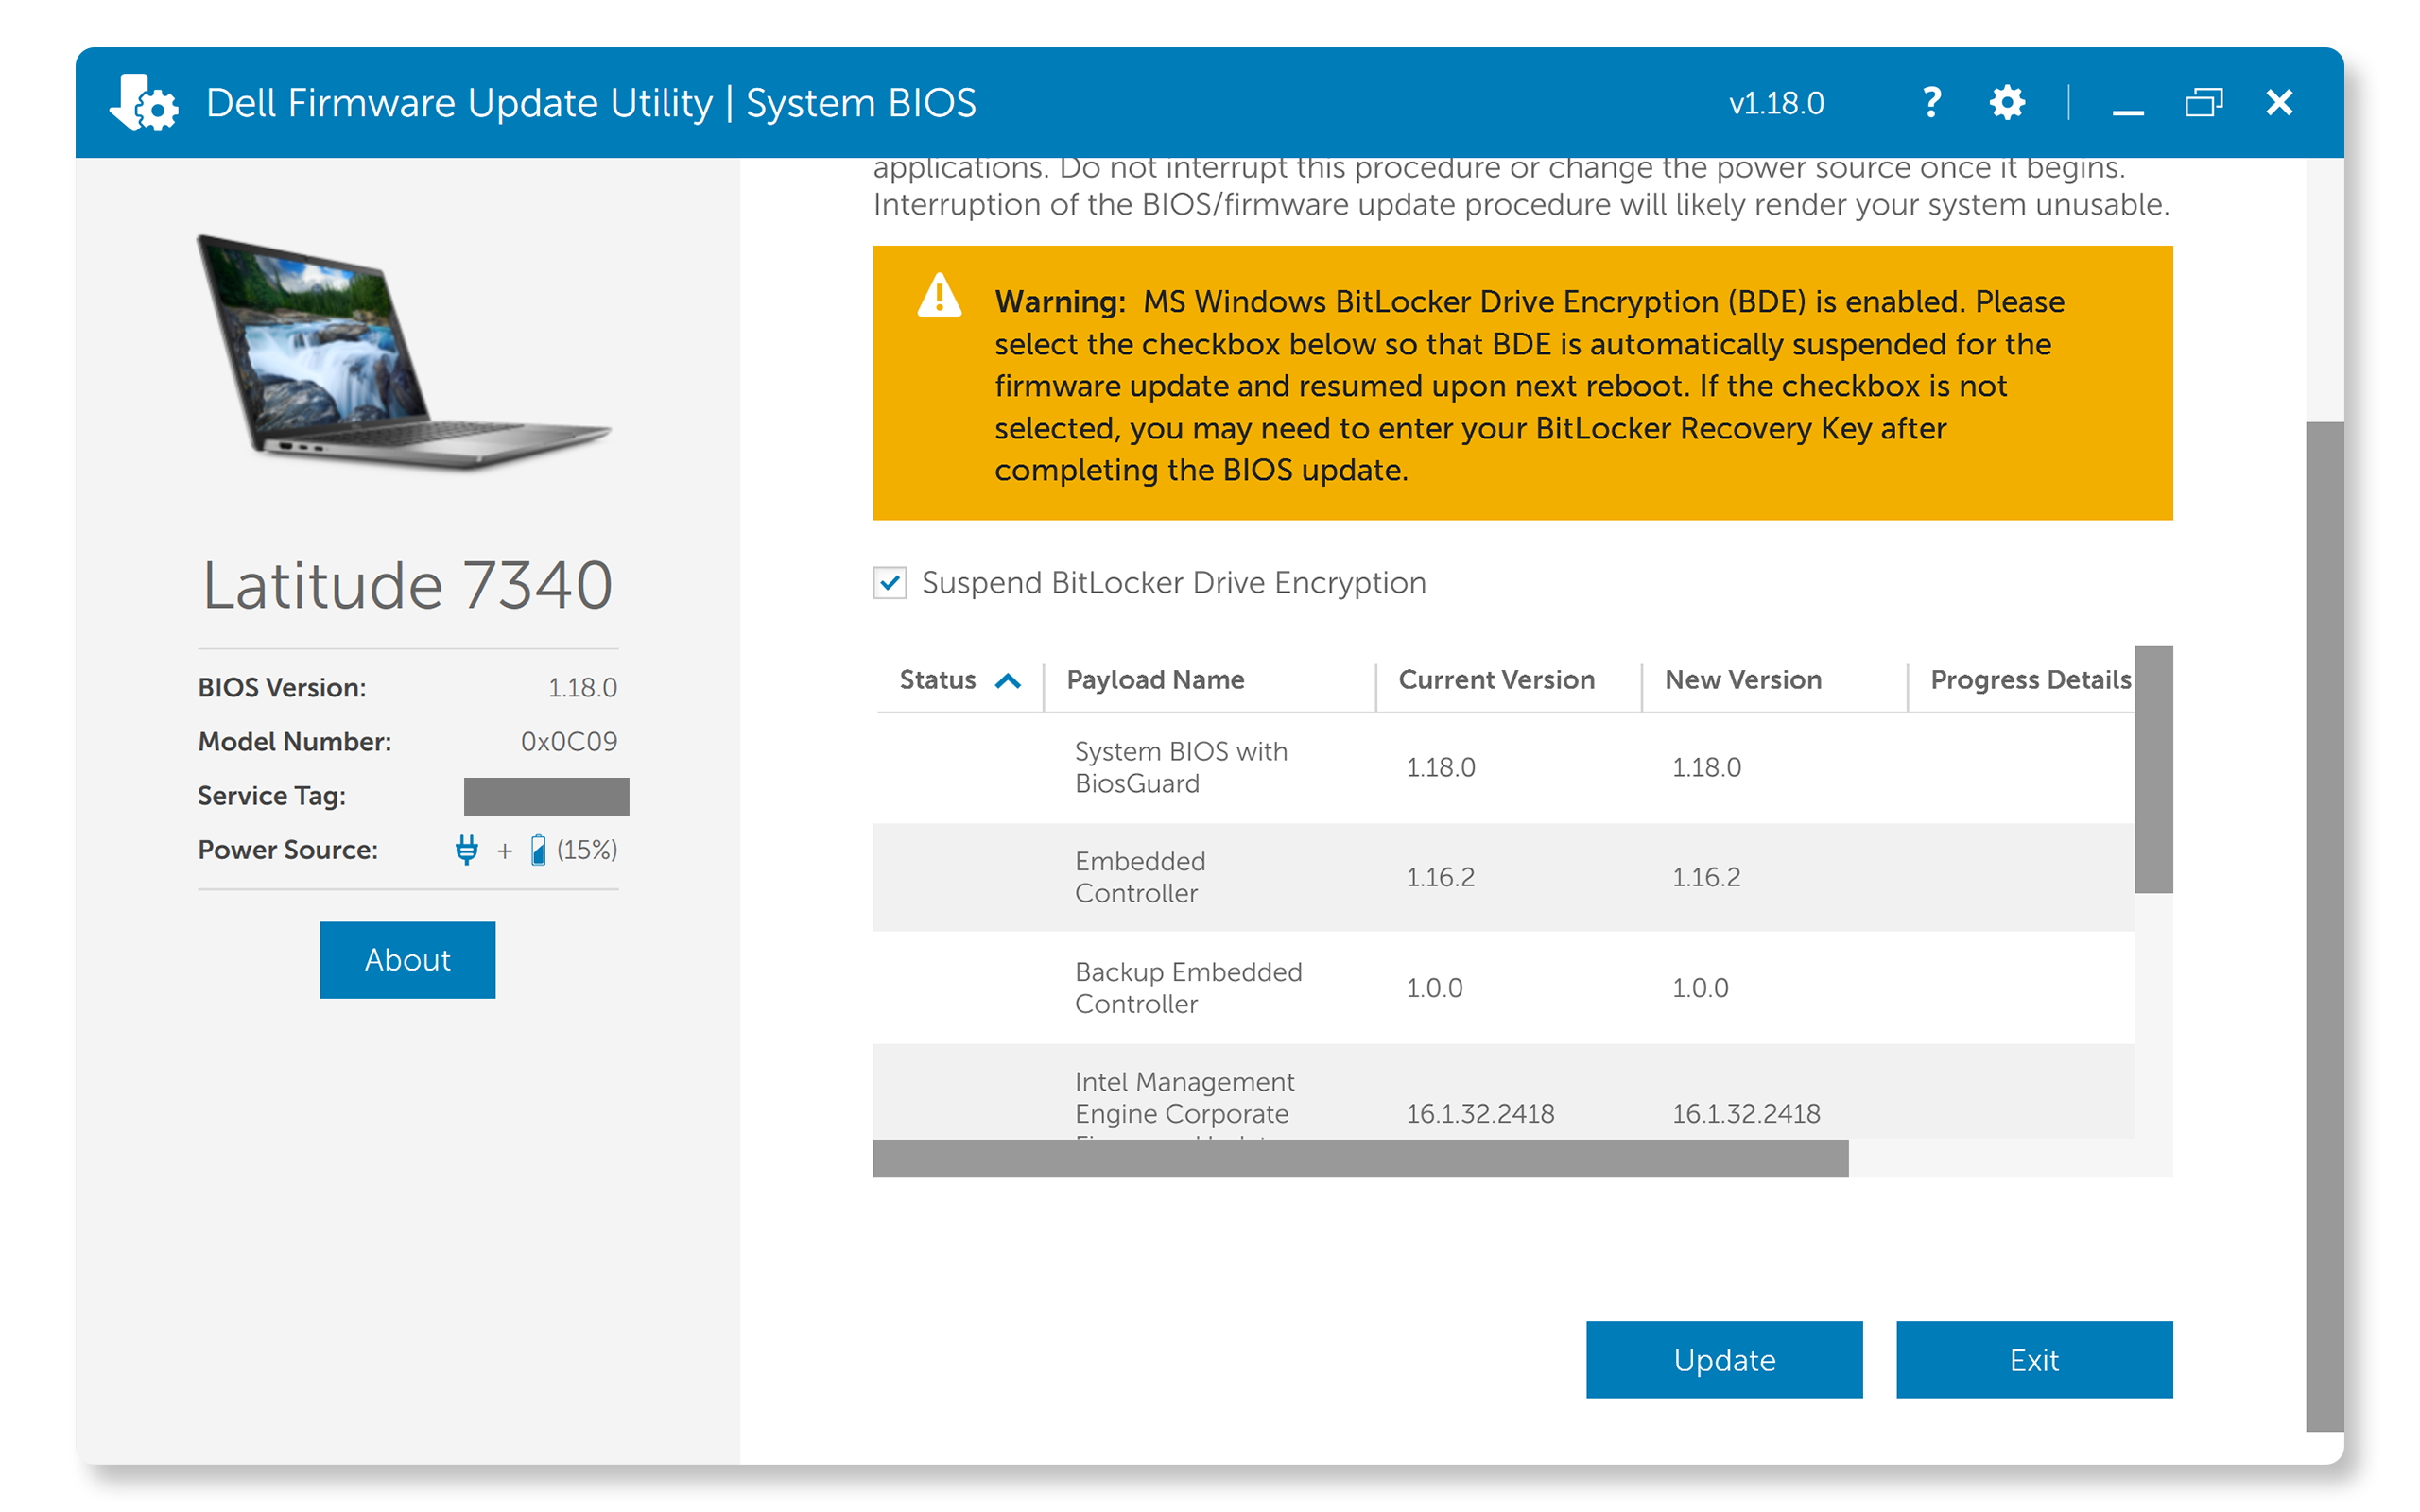
Dell offers a standalone BIOS/UEFI firmware update utility in the form of executable files that run directly within the Windows operating system. This utility is specifically designed to be executed only in Windows.
- Download the BIOS Update File: Download the latest BIOS update from the Dell Drivers & Downloads website by entering your computer's Service Tag or Express Service Code.
- Run the Installer: Open the downloaded file and follow the on-screen instructions.
- Reboot and Complete Update: Your system will restart automatically to complete the update.
Method 4: Updating Using a USB Flash Drive
This method is beneficial for users running Ubuntu or other Linux operating systems, or when Windows is not accessible. Additionally, you can use this method to update the BIOS directly from the One Time Boot Menu on compatible systems.
- Prepare a USB Flash Drive: Format the USB drive as FAT32.
- Download the BIOS Update File: Save the update file to the USB drive.
- Access the Boot Menu: Restart your computer and press F12 to access the One Time Boot Menu.
- Choose BIOS Update: Choose the BIOS Update option from the One Time Boot Menu.
- Select the USB Drive: Plug in the USB drive, choose Flash from file (or the three dots), navigate the File Explorer and select the BIOS update file and then click Update BIOS and follow the prompts.

Method 5: Updating through Dell Command | Update
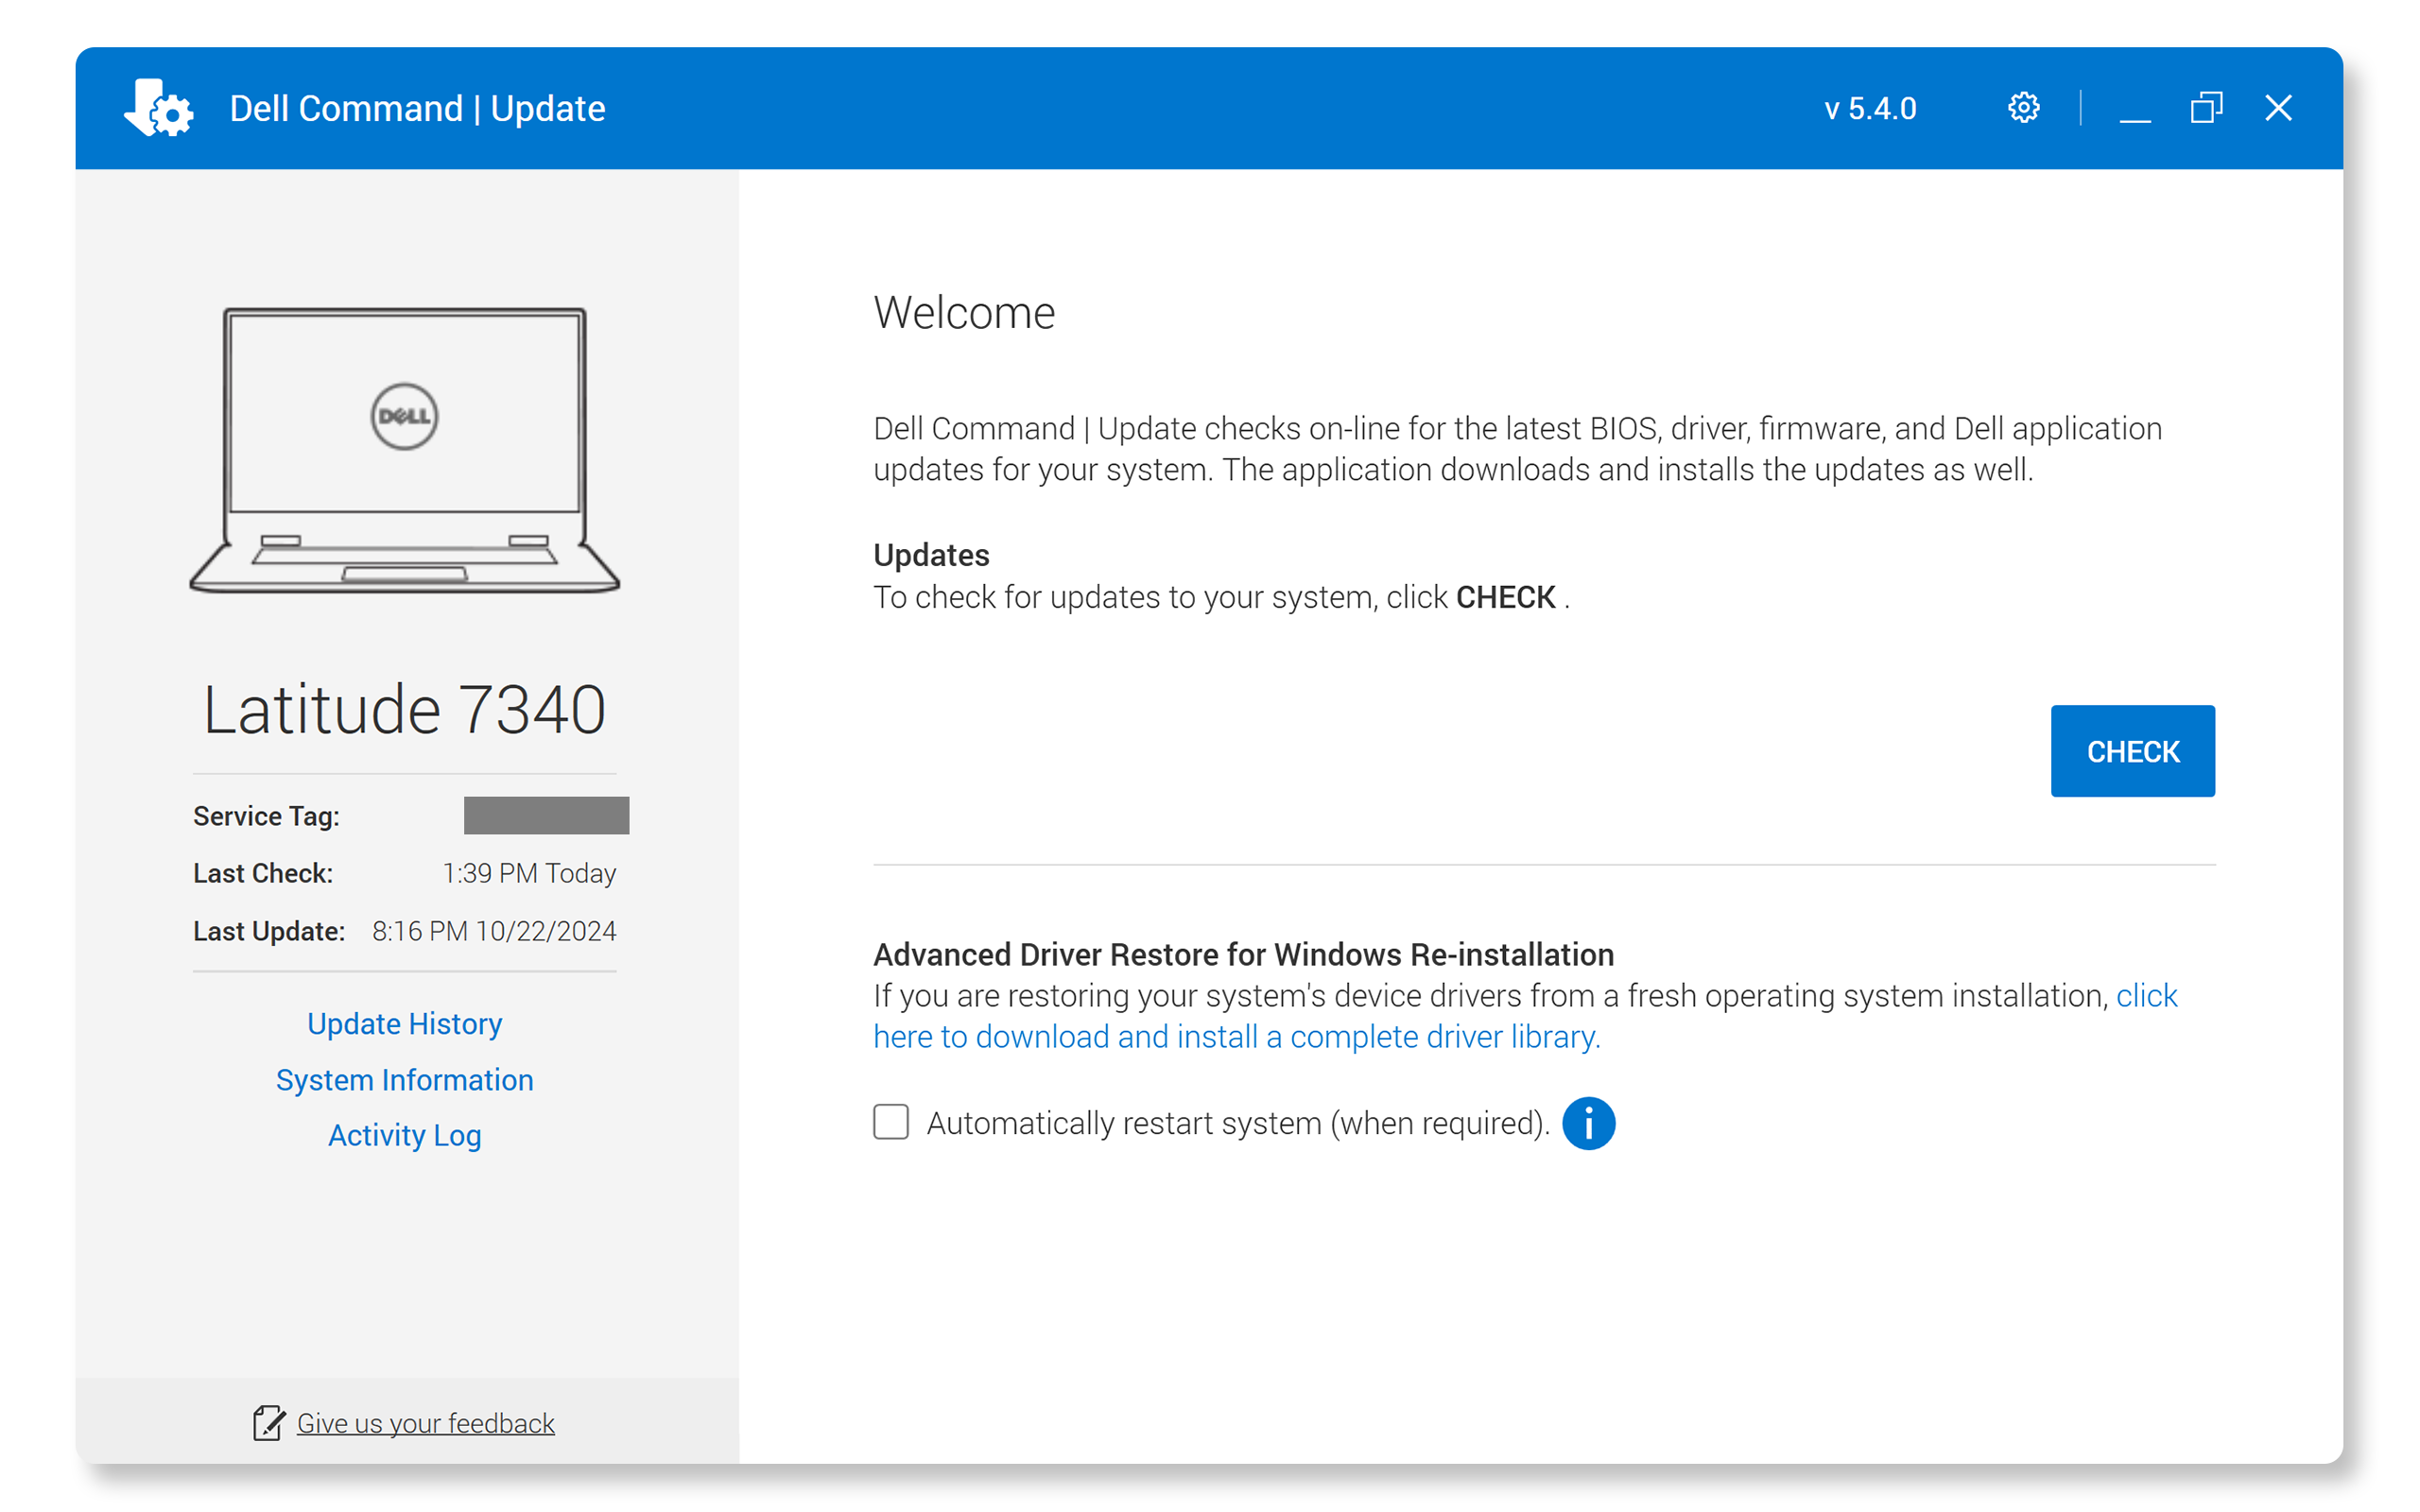
Dell Command | Update is designed for Dell business PCs like Latitude, OptiPlex, and Precision models.
- Search for Dell Command | Update in the Start menu and open the app.
- Click Check to scan your system for available updates.
- If updates are available, select the BIOS/UEFI update from the list and click Install.
- Restart your computer when prompted to complete the installation.
Method 6: Updating through Over-The-AIR (OTA) or Remote
Some newer Dell computers, like the Latitude, can update their BIOS remotely. This is called an Over-The-Air (OTA) update. Here's how you can do it:
- Turn on or restart your system.
- Press the F12 key repeatedly until the One Time Boot Menu is displayed.
- Choose BIOS Flash Update - Remote from the menu.
- Connect to the Internet using an Ethernet cable or by selecting a wireless network from the list.
- Click Update BIOS, check the BIOS version, and confirm to download and complete the update.
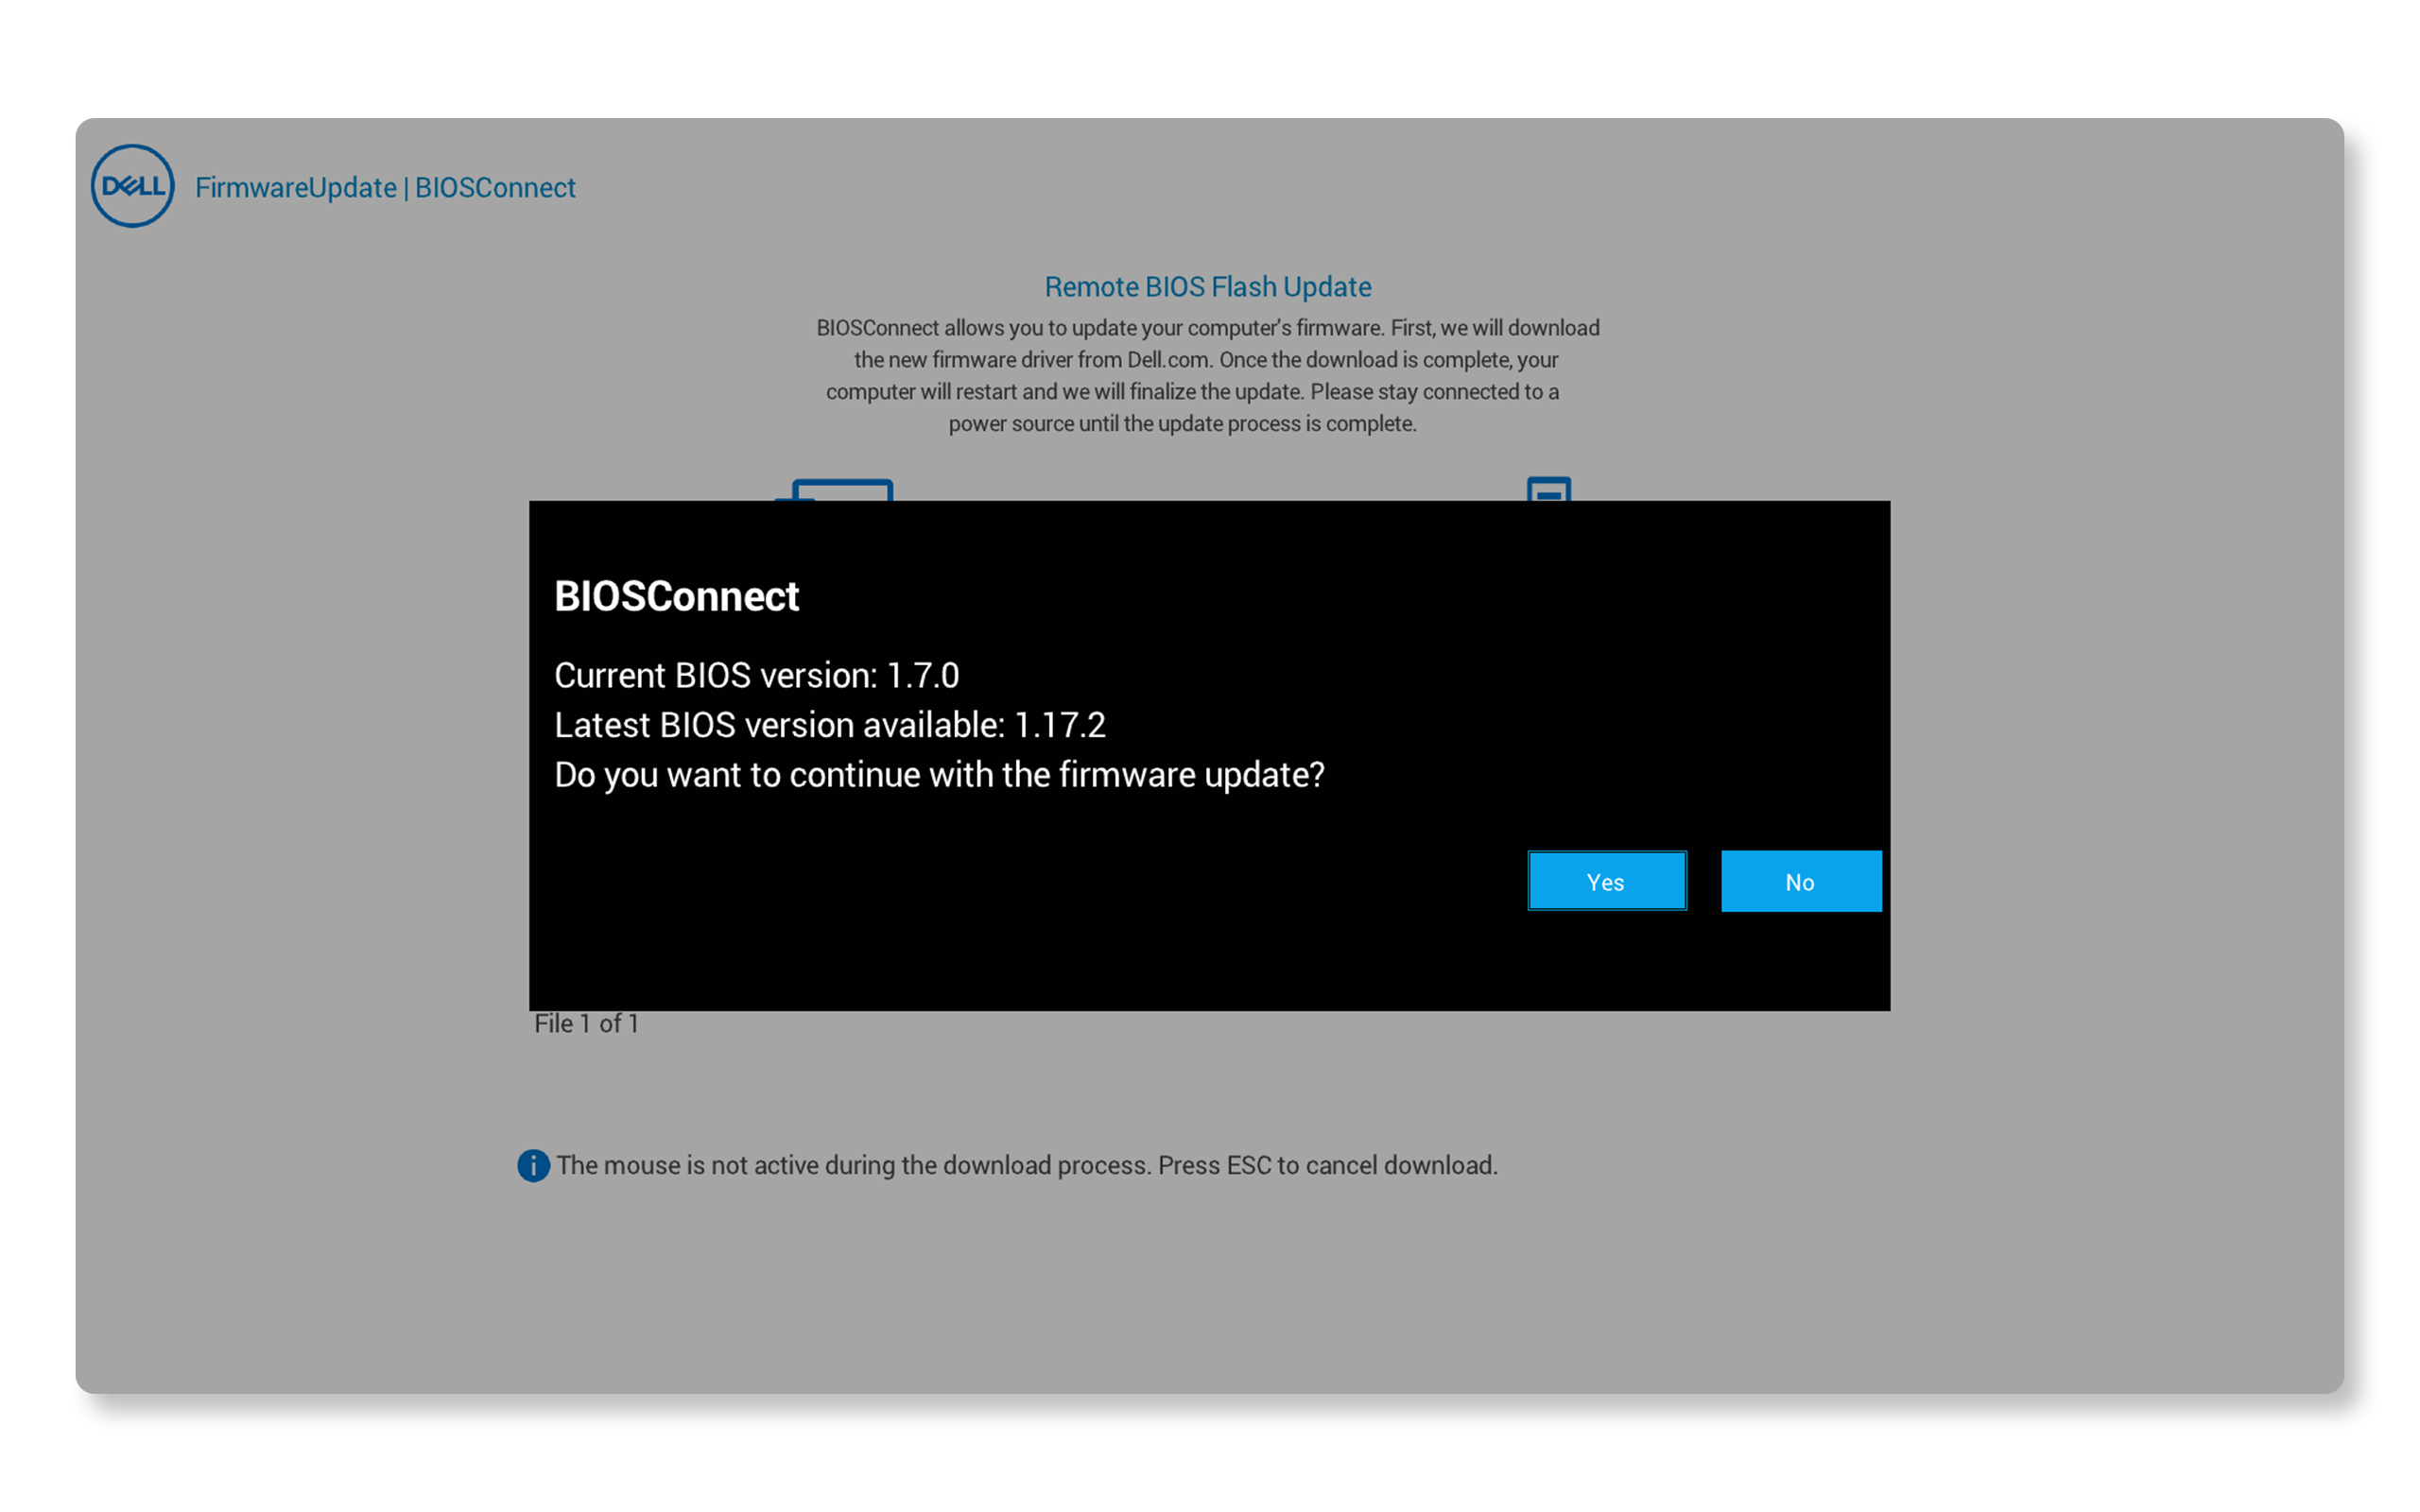
Method 7: Updating through Dell Update or Alienware Update
Dell Update or Alienware Update are preinstalled tools that simplify the update process for consumer and gaming systems like Inspiron, XPS, G-Series, and Alienware. To check for BIOS/UEFI updates:
Note: Support for Dell Update and Alienware Update expires at the end of 2024. Install SupportAssist to keep your system updated and performing its best.
- Search for Dell Update or Alienware Update in the Start menu and open the app.
- Click Check to scan your system for available updates.
- If updates are available, they will appear in a list. Select the BIOS/UEFI update and click Install.
- Restart your computer when prompted to complete the installation.
What to Do If BIOS Update Fails
- For laptops, ensure the Dell provided AC adapter is plugged in and the battery is charged to at least 50%.
- Disconnect external devices such as docking stations, external hard drives, and so on.
- If the update fails when using SupportAssist, Windows Update, Dell Command | Update, or Dell/Alienware Update, you can manually update the BIOS/UEFI using the standalone firmware update utility.
Frequently Asked Questions (FAQ)
Discover answers to common questions about BIOS or UEFI on Dell systems.
1. How often should I update my Dell BIOS?
- It's generally a good idea to update your BIOS only when necessary, such as regular maintenance schedule, when facing specific issues, or when Dell recommends a critical update.
2. How do I know if my Dell computer needs a BIOS update?
- You can check for BIOS updates through preinstalled apps like Dell's SupportAssist, Dell Update, Alienware Update, or Dell Command | Update software or by visiting Dell Drivers & Downloads website and entering your computer's Service Tag to see if there's a critical or recommended update for your computer.
3. Can I go back to a previous BIOS version if the update causes issues?
- BIOS downgrades might be restricted when there are security updates and important fixes with earlier versions that impact the functionality of the system.
- If a downgrade is supported, you can download the BIOS firmware utility for the previous version and run it to roll back the BIOS.
4. Can I update the BIOS if my battery is low?
- No, it's not recommended to update the BIOS with a low battery on a laptop. Plug in your device to ensure it has stable power source throughout the update process.
5. Is there any way to automate BIOS updates on Dell systems?
- Yes, you can automate BIOS updates using preinstalled apps like Dell's SupportAssist, Dell Update, Alienware Update, Dell Command | Update, or Windows Updates which automatically checks for and installs the latest updates as they become available.
6. Do I need to install all previous BIOS updates, or just the latest one?
- Generally, BIOS updates are cumulative, so you only need the latest version, which includes all the previous improvements and fixes.
- However, in some instances, there may be a requirement to first install a minimum version of BIOS before you can update to the latest version.
7. How do I enable UEFI on my Dell system?
- To enable UEFI on supported Dell systems, follow these steps:
- Restart the Computer: Begin by restarting the computer.
- Enter the BIOS/UEFI Menu: As the system reboots, press F2 repeatedly to access the BIOS/UEFI setup menu.
- Locate Boot Settings: Once in the BIOS menu, go to the Boot tab or Boot Configuration section.
- Select UEFI Boot Mode: Find the option for Boot Mode and switch from Legacy (BIOS) to UEFI.
- Save and Exit: Save your changes and exit the BIOS. The system will now boot using UEFI.
- Enabling UEFI may require that your disk is set up with GPT partition style. If it isn't, you may need to convert from MBR to GPT which requires reinstalling Windows.
8. What is Dell SafeBIOS, and how does it help during a BIOS update?
- Dell SafeBIOS is a security feature designed to protect the integrity of your BIOS firmware. It continuously monitors the BIOS for unauthorized changes or tampering, providing extra assurance that the system's firmware remains secure.
- SafeBIOS includes BIOS verification tools that checks the BIOS against known-good version, especially after updates. This feature is helpful because it ensures that only verified, trusted updates are applied, reducing the risk of malware or corruption during the BIOS update process.
- Dell SafeBIOS is available on many newer Dell business systems.
9. Can I convert BIOS to UEFI on my Dell computer?
- All newer Dell systems come with UEFI firmware.
- Update the BIOS to the latest version.
- If you still don't find the UEFI option after updating your BIOS to the latest version, it means your computer might not support UEFI.
10. How do I format a USB drive to FAT32 in Windows or Ubuntu for a BIOS update?
- Formatting to FAT32 ensures compatibility with the Dell BIOS update utility.
- In Windows:
- Plug in the USB drive, then right-click on it in File Explorer and select Format.
- Choose FAT32 as the file system and click Start to format.
- In Ubuntu:
- Plug in the USB drive and open the Disks utility.
- Select the USB drive, click the gear icon and choose Format Partition.
- Choose FAT32 and confirm the action
11. Will updating the BIOS delete my data?
- No, updating the BIOS does not impact the data stored on your hard drive.
- However, it's a good practice to back up your data before starting any firmware update.
- If your computer is encrypted with BitLocker, enter the recovery key when asked. Log into your Microsoft Account to find your BitLocker key under the Devices section. Note: Dell does not store or have access to BitLocker recovery keys.
12. Why does my BIOS update fail?
- A BIOS update may fail if:
- The BIOS update file is corrupt.
- Incompatible with your system.
- There is a power interruption.
- Always get BIOS updates directly using Dell apps like SupportAssist, Dell Command | Update, Windows Update, or from the Dell Drivers & Downloads website.
- If updating BIOS fails using SupportAssist or other Dell apps, or via Windows Update, update the BIOS/UEFI using the standalone firmware update utility.
13. How do I access the BIOS/UEFI on my computer?
- To access the BIOS/UEFI settings, restart your computer and press the F2 key repeatedly as soon as the Dell logo appears.
- You may also use F12 key to access the One Time Boot Menu, select BIOS or System Setup and press Enter.
14. What should I do if pressing F2 key doesn't work?
- Ensure you are pressing the F2 key immediately after turning on your computer and before the Dell logo disappears.
- Press the F2 key repeatedly instead of holding it down.
- If your keyboard has an "Fn" key, try pressing Fn + F2 together.
15. What if my keyboard isn't responding during startup?
- If your keyboard isn't responding, try using a different USB port or a different keyboard.
- Ensure that the keyboard is properly connected and functioning.
- Try using a USB keyboard, instead of a Bluetooth or wireless keyboard.
16. Why don't I see the same options in my BIOS/UEFI as others?
- BIOS/UEFI interface can vary between different models. The options available depend on your computer's hardware and firmware version. Check your computer's user manual for device-specific details.
17. What should I do if I can't find a specific setting in the BIOS/UEFI?
- If you can't find a specific setting, check your computer's user manual for guidance. You can also enable the "Advanced" or "Expert" mode within the BIOS/UEFI, which may display additional options.


