Make Your Computer Faster: Boost Performance and Speed Up Your PC
Understanding Why Your Dell Computer Slows Down
Before we begin troubleshooting, it's essential to understand why your computer is slowing down. Here are some typical reasons:
- Accumulated temporary files and unnecessary programs
- Outdated software and drivers
- Too many startup programs hogging memory
- Visual effects that consume resources
- Possible malware infections
Common Symptoms of Slow Performance
- Applications taking longer to load: Programs that once launched instantly now take several seconds or minutes.
- Freezing or unresponsive system: Frequent system freezes may indicate an underlying software conflict or hardware issue.
- High disk or CPU usage: Persistent high resource usage can overburden your system, slowing everything down.
- Slow boot or shutdown times: Prolonged startup or shutdown processes may point to software issues or too many startup programs.
How to Improve System Performance
A slow computer can often be fixed with simple, quick adjustments. By implementing these quick fixes, you can significantly enhance your computer's performance. These initial steps are not just easy; they are a great starting point to improve your computing experience effortlessly!
Regularly Restart Your Computer
It may sound simple, but restarting your computer can often resolve temporary slowdowns. Rebooting refreshes system resources, clears temporary files in system memory, and closes background applications.
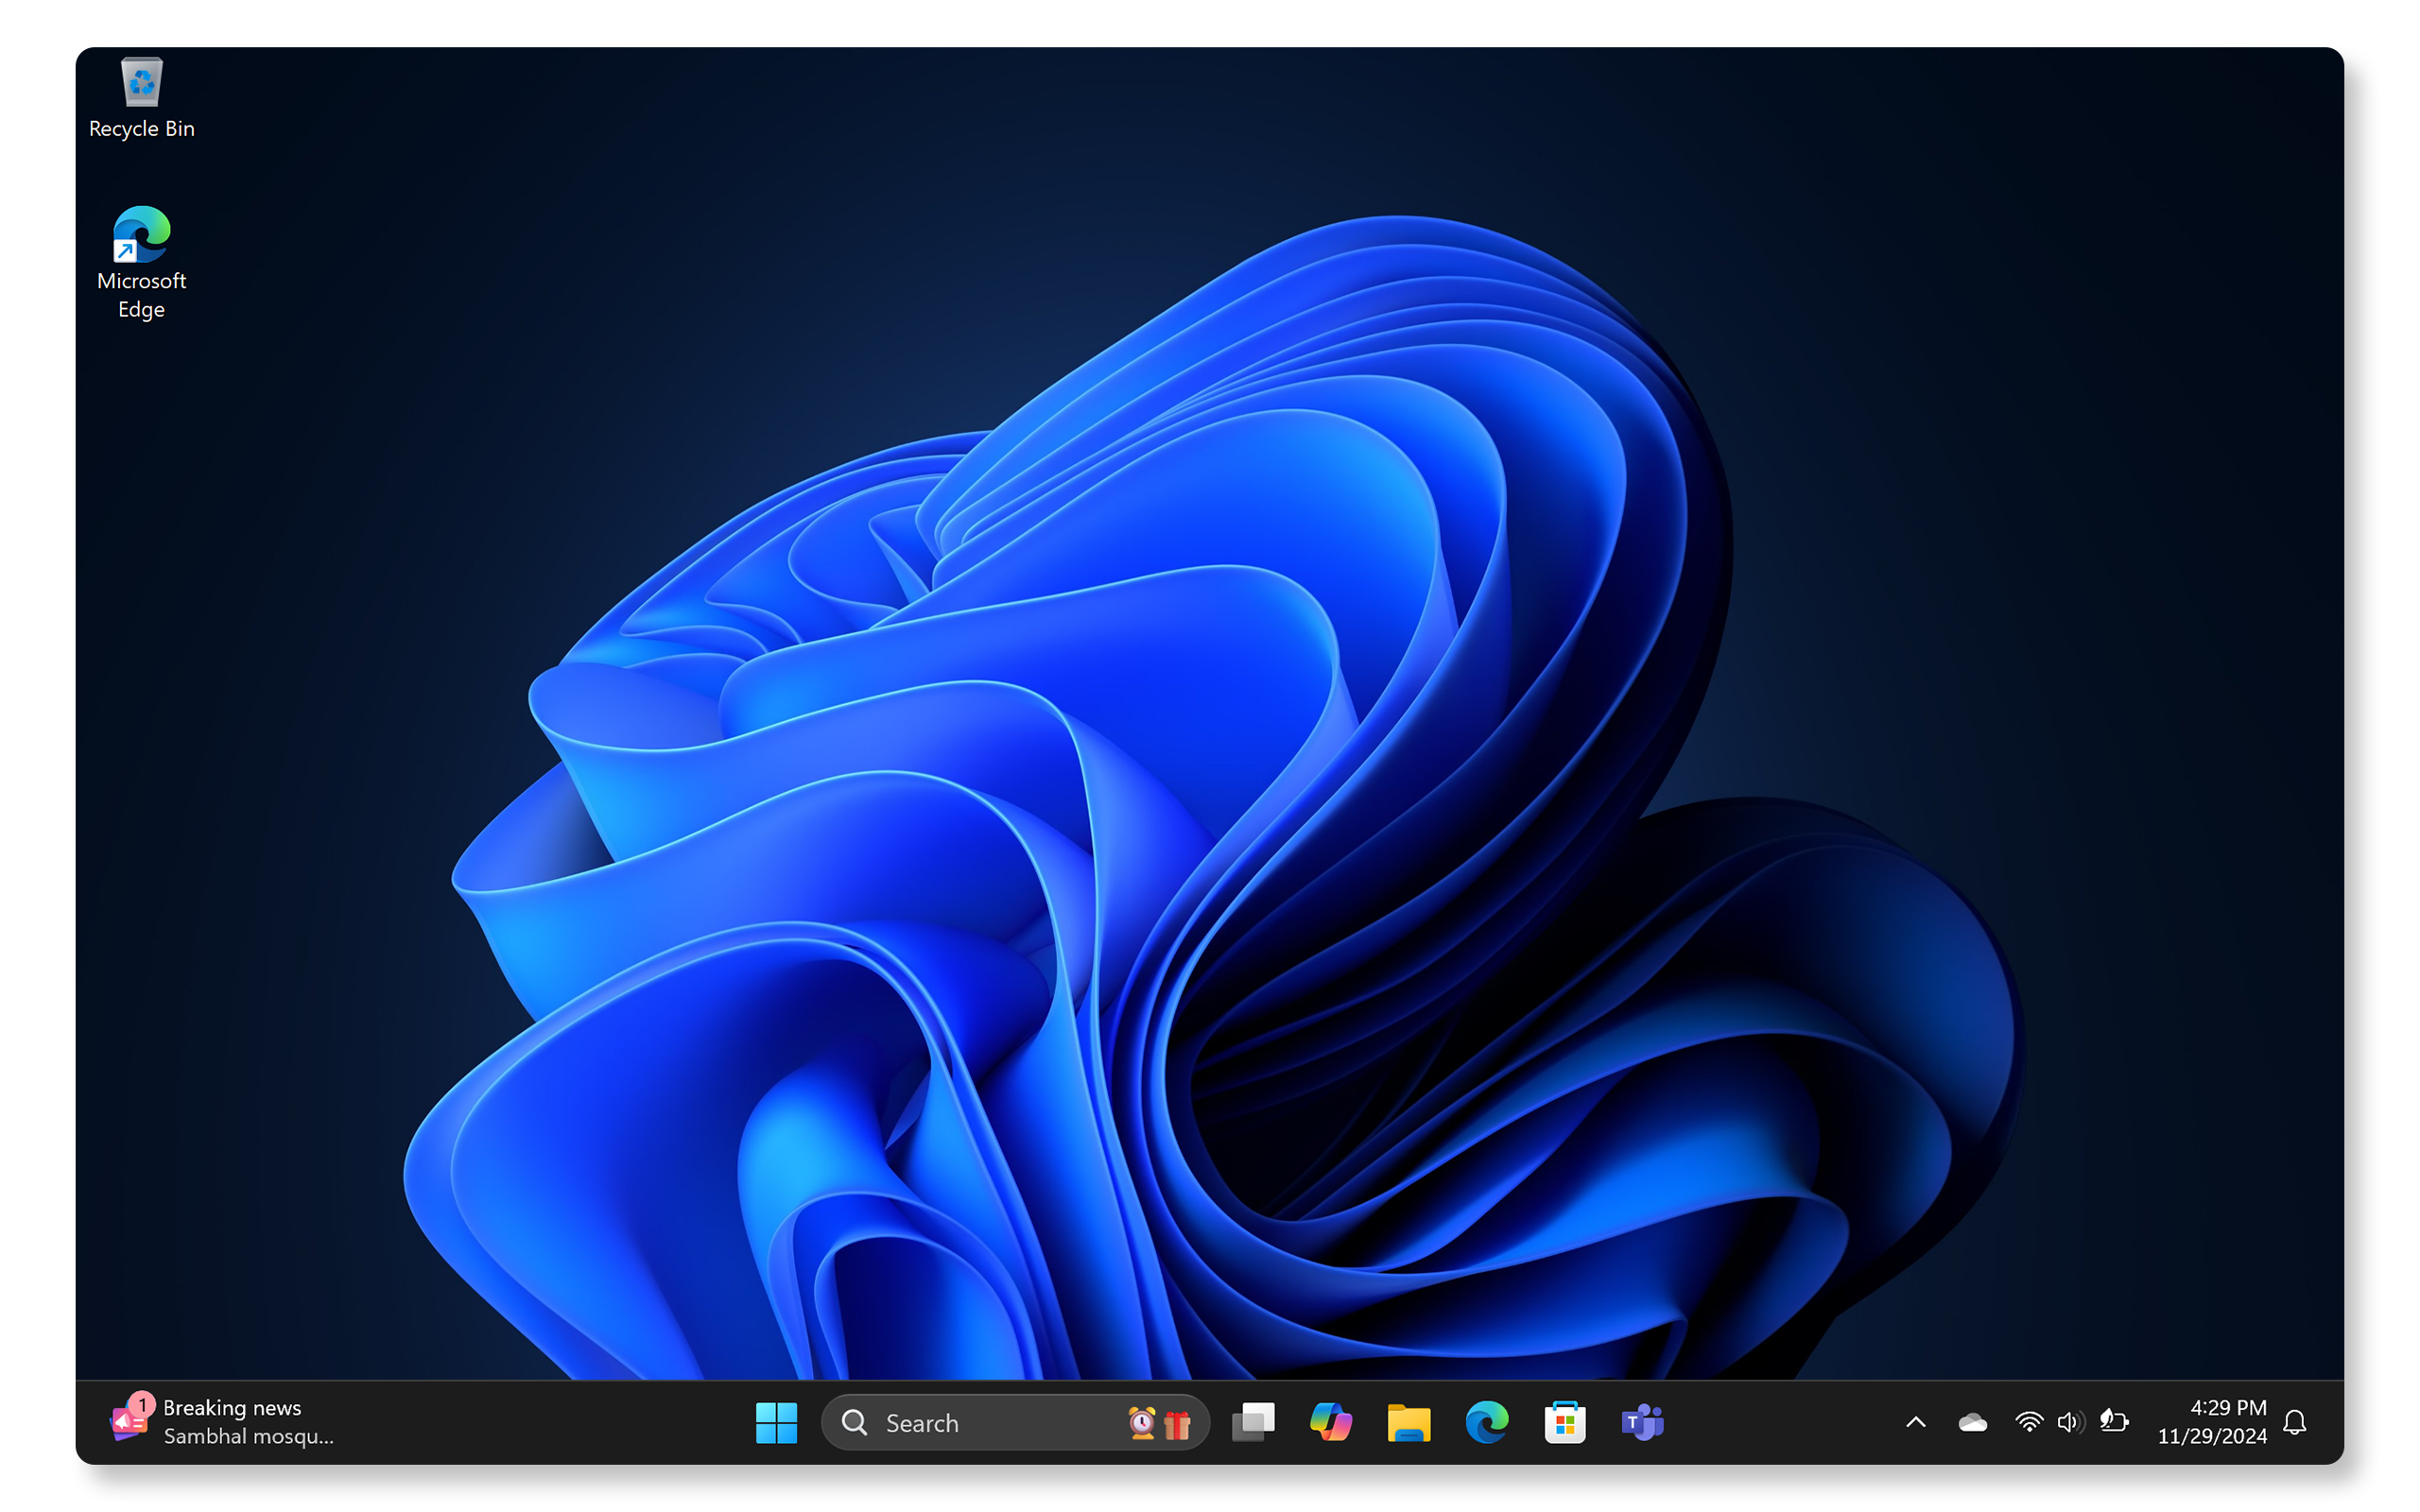
Clean the Desktop and Taskbar
Too many desktop shortcuts and files can slow things down. Organize your desktop by removing unused shortcuts and moving files to Documents or Pictures folder. This reduces background processes that impact speed.
Boost Performance with SupportAssist
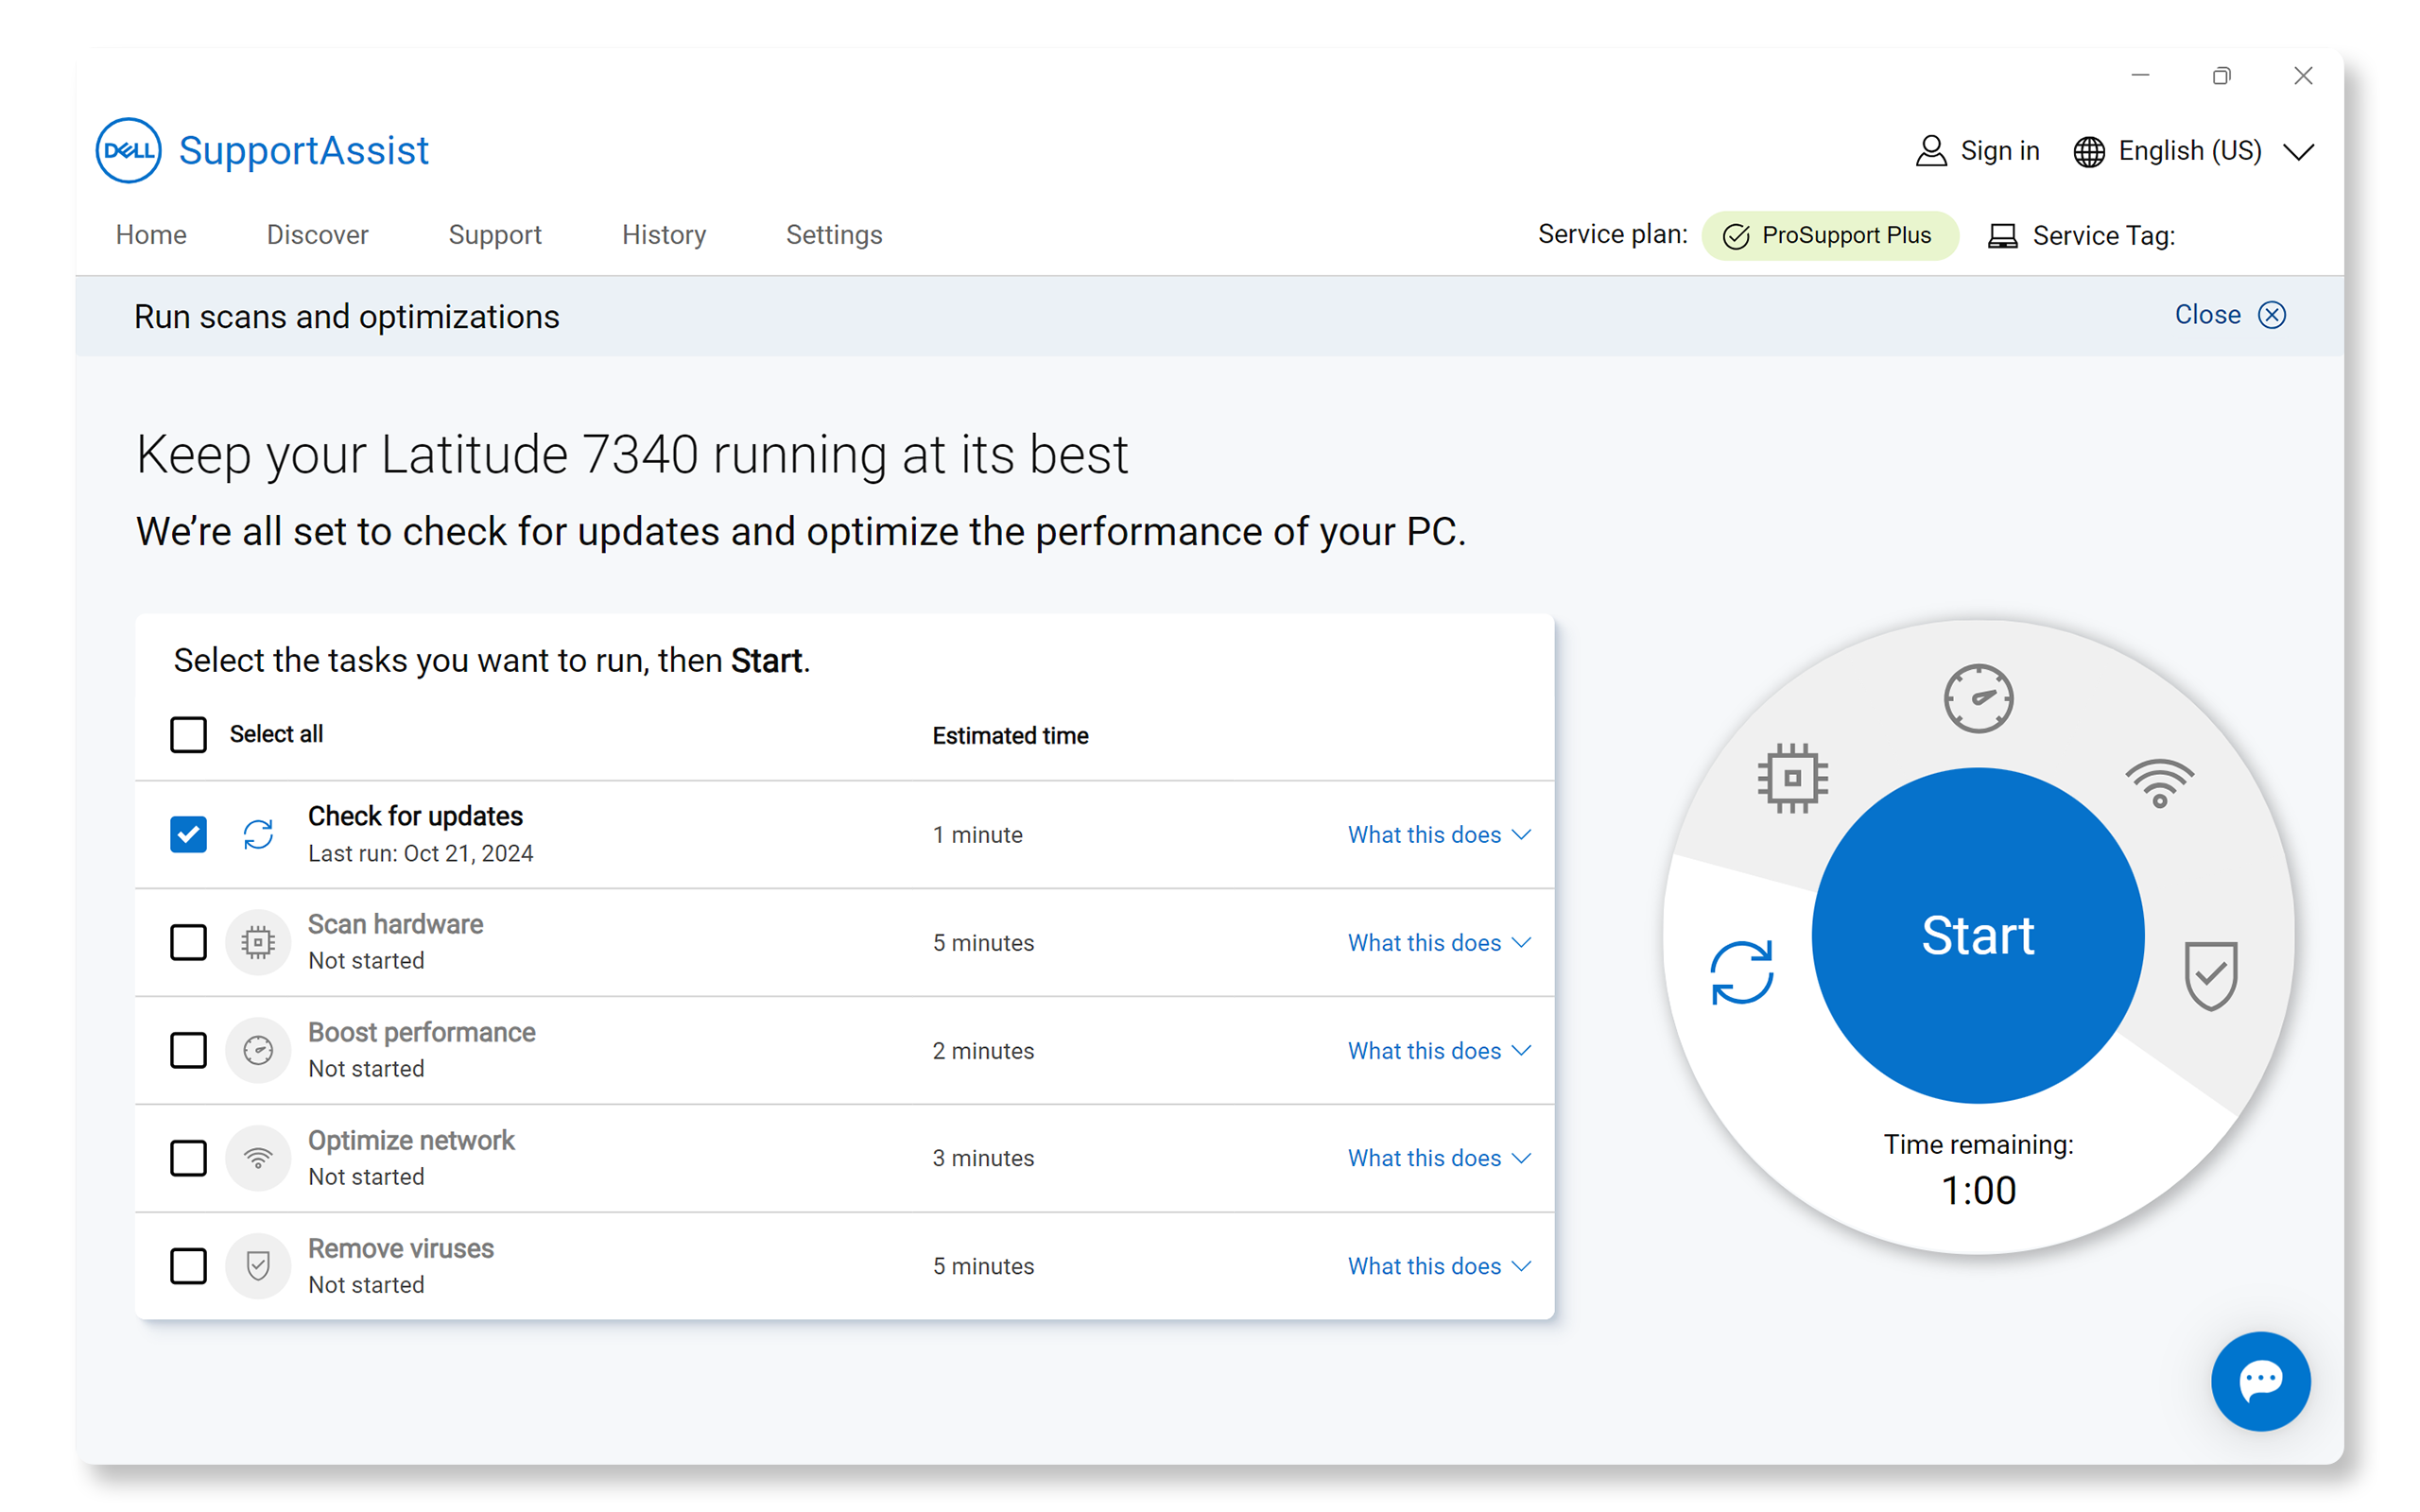
Dell's SupportAssist tool can automatically free up hard drive space, remove clutter, and improve system performance with file optimization. To begin optimizing your system:
- Search for SupportAssist in the Start menu and open the app.
- On the Home tab, select Boost performance.
- Click Start to begin optimizing your system.
- After SupportAssist applies the changes, restart the computer and check.

Update Drivers and BIOS/UEFI
Updating drivers and BIOS improves compatibility and performance issues.
Update Drivers using SupportAssist
- Search for SupportAssist in the Start menu and open the app.
- On the Home tab, select Update software.
- Select Start to check for driver and BIOS updates.
- Follow the on-screen instructions to complete the installation and restart your computer if prompted.
- Alternatively, go to Dell Drivers & Downloads website to manually download and install Dell drivers. Learn more about driver updates for your Dell.
Update Windows
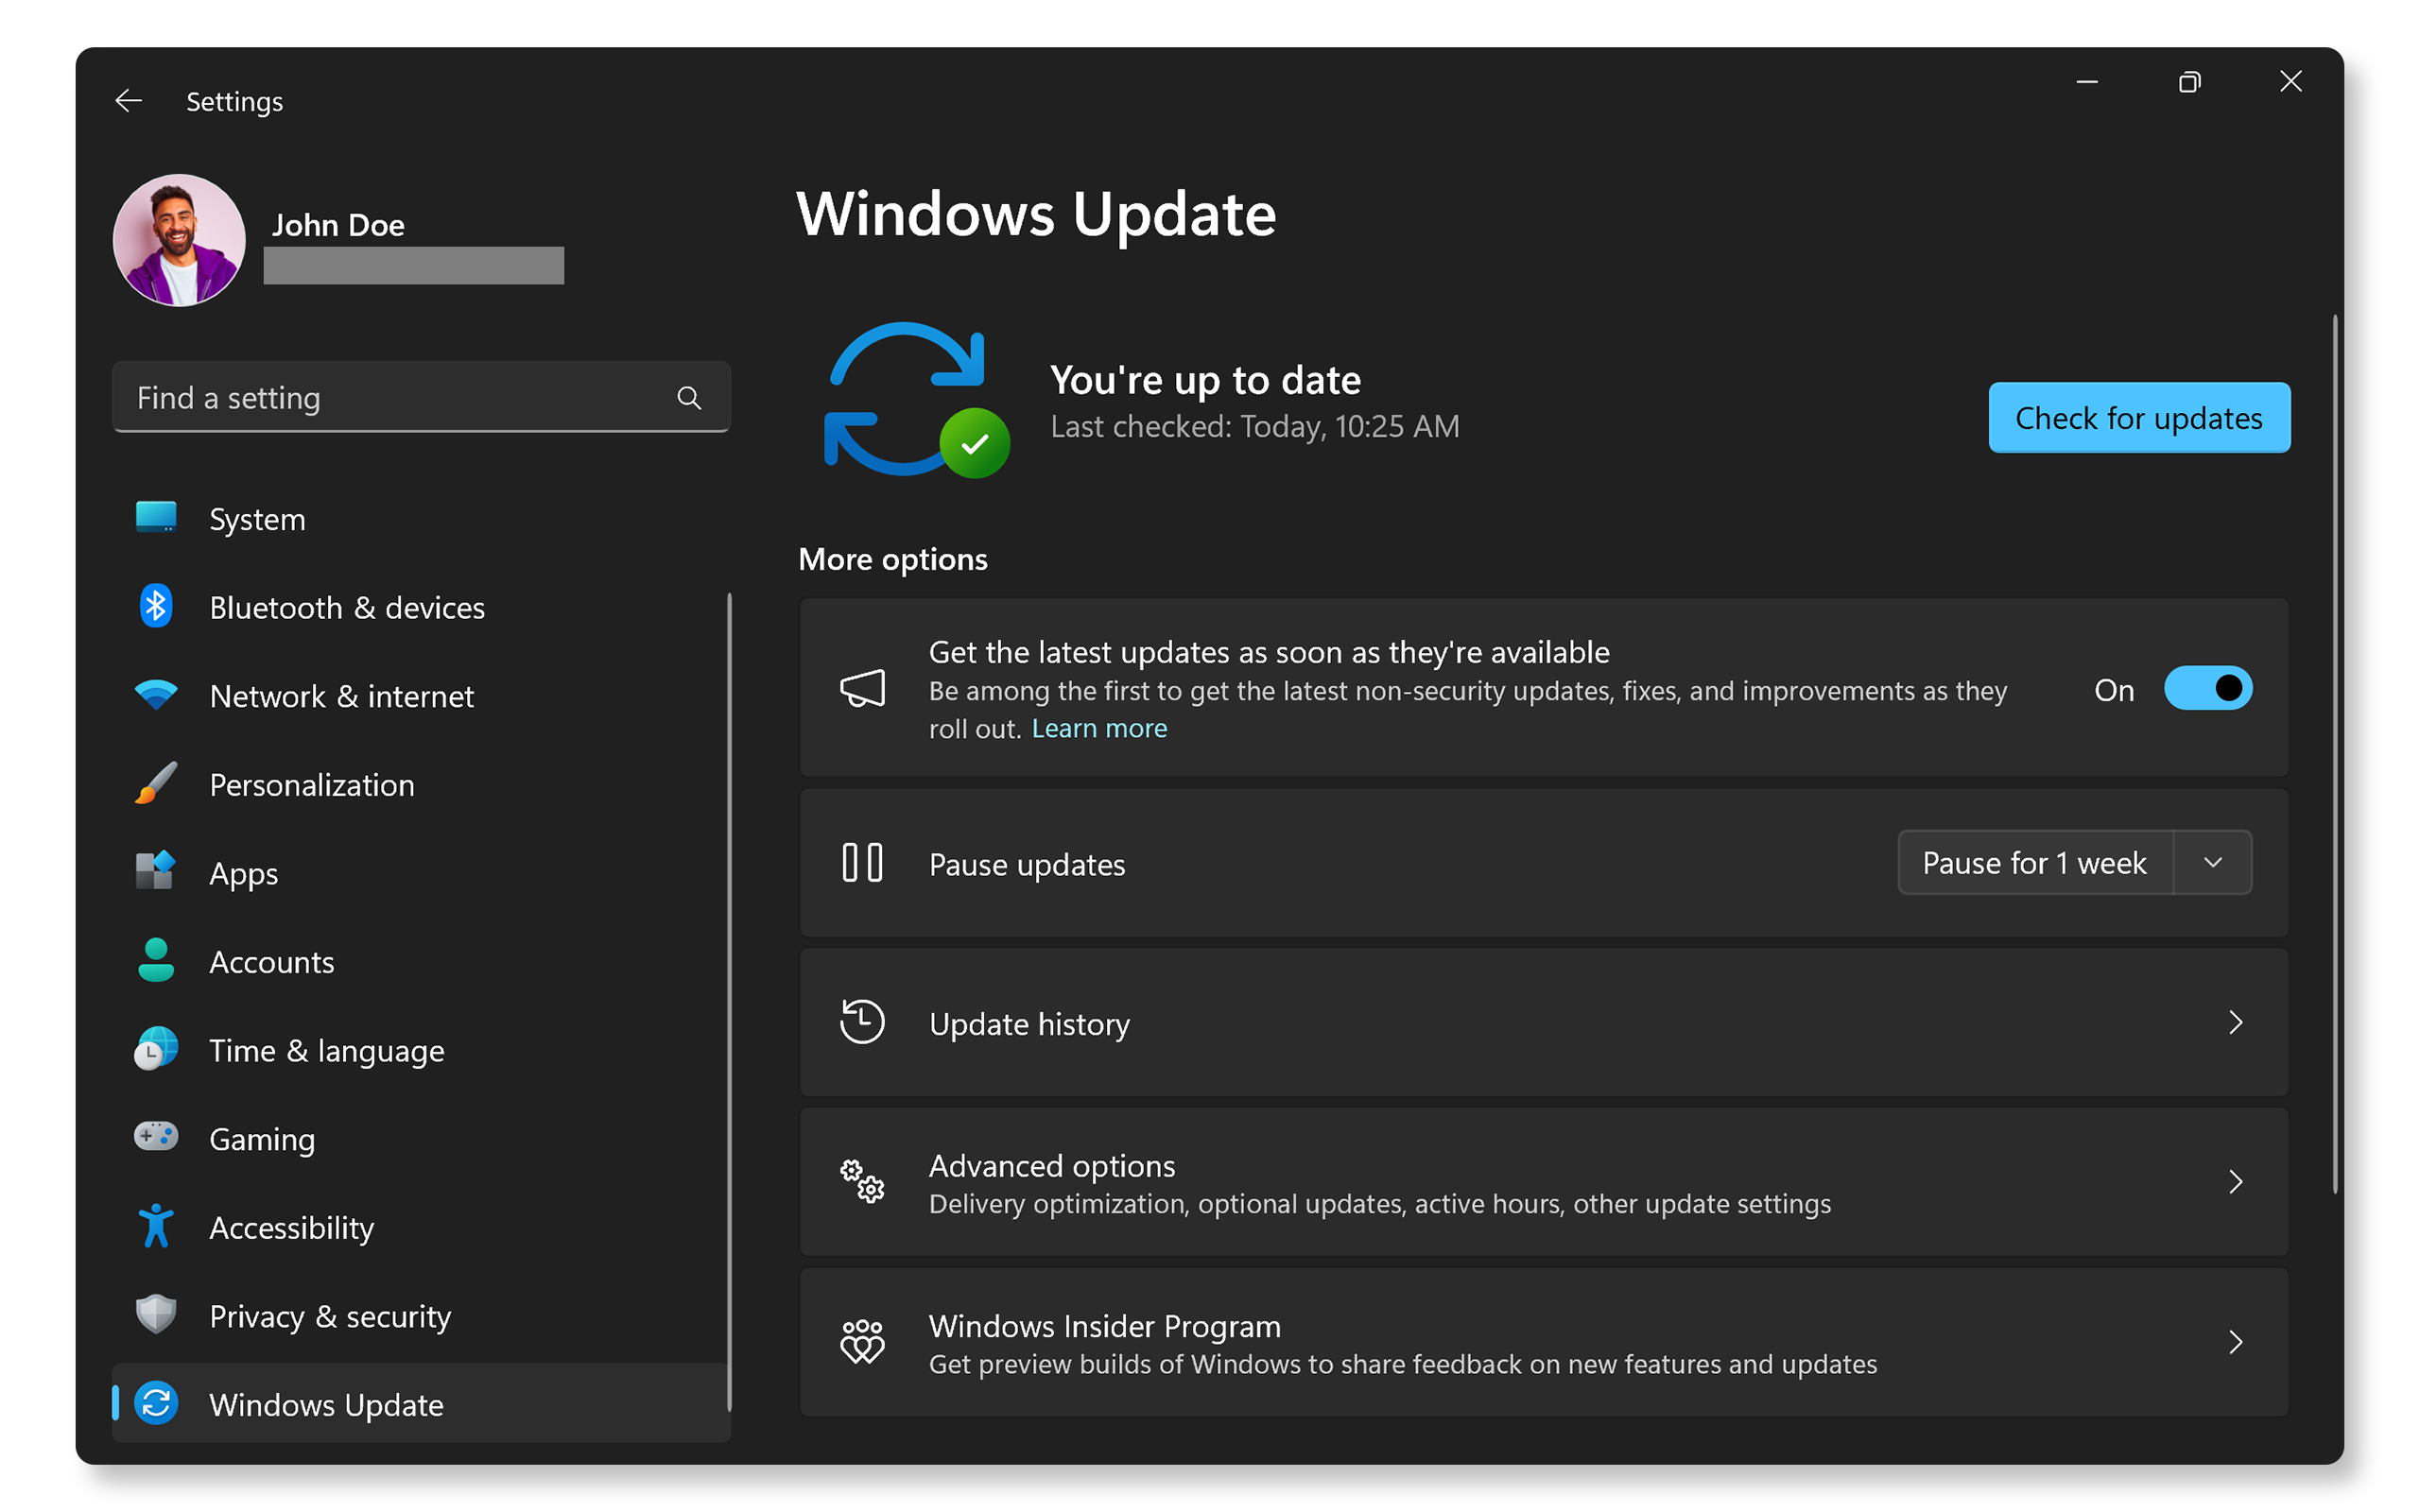
Updating the operating system is one of the easiest ways to keep your computer running fast and smoothly.
- Go to Start > Settings > Windows Update and click Check for updates. Open Windows Update settings.
Free Up Disk Space in Windows
If your Windows device is running low on storage, it might cause slow performance. Here are a few ways to free up some drive space:
Using Disk Cleanup Tool
- Search for Disk Cleanup from the Start menu and open the app.
- Select your main drive (usually C:) and let Windows calculate how much space you can free up.
- Review and select the list of Files to delete.
- Click OK and then click Delete Files to confirm.
Using Windows Settings
Some temporary files are needed by apps. Windows reserves some storage to ensure proper performance and successful updates of your device.
Delete files with Storage Sense
- Go to Start > Settings > System > Storage. Open Windows Storage settings.
- Turn on Storage Sense to let Windows delete unnecessary files automatically.

Delete files manually
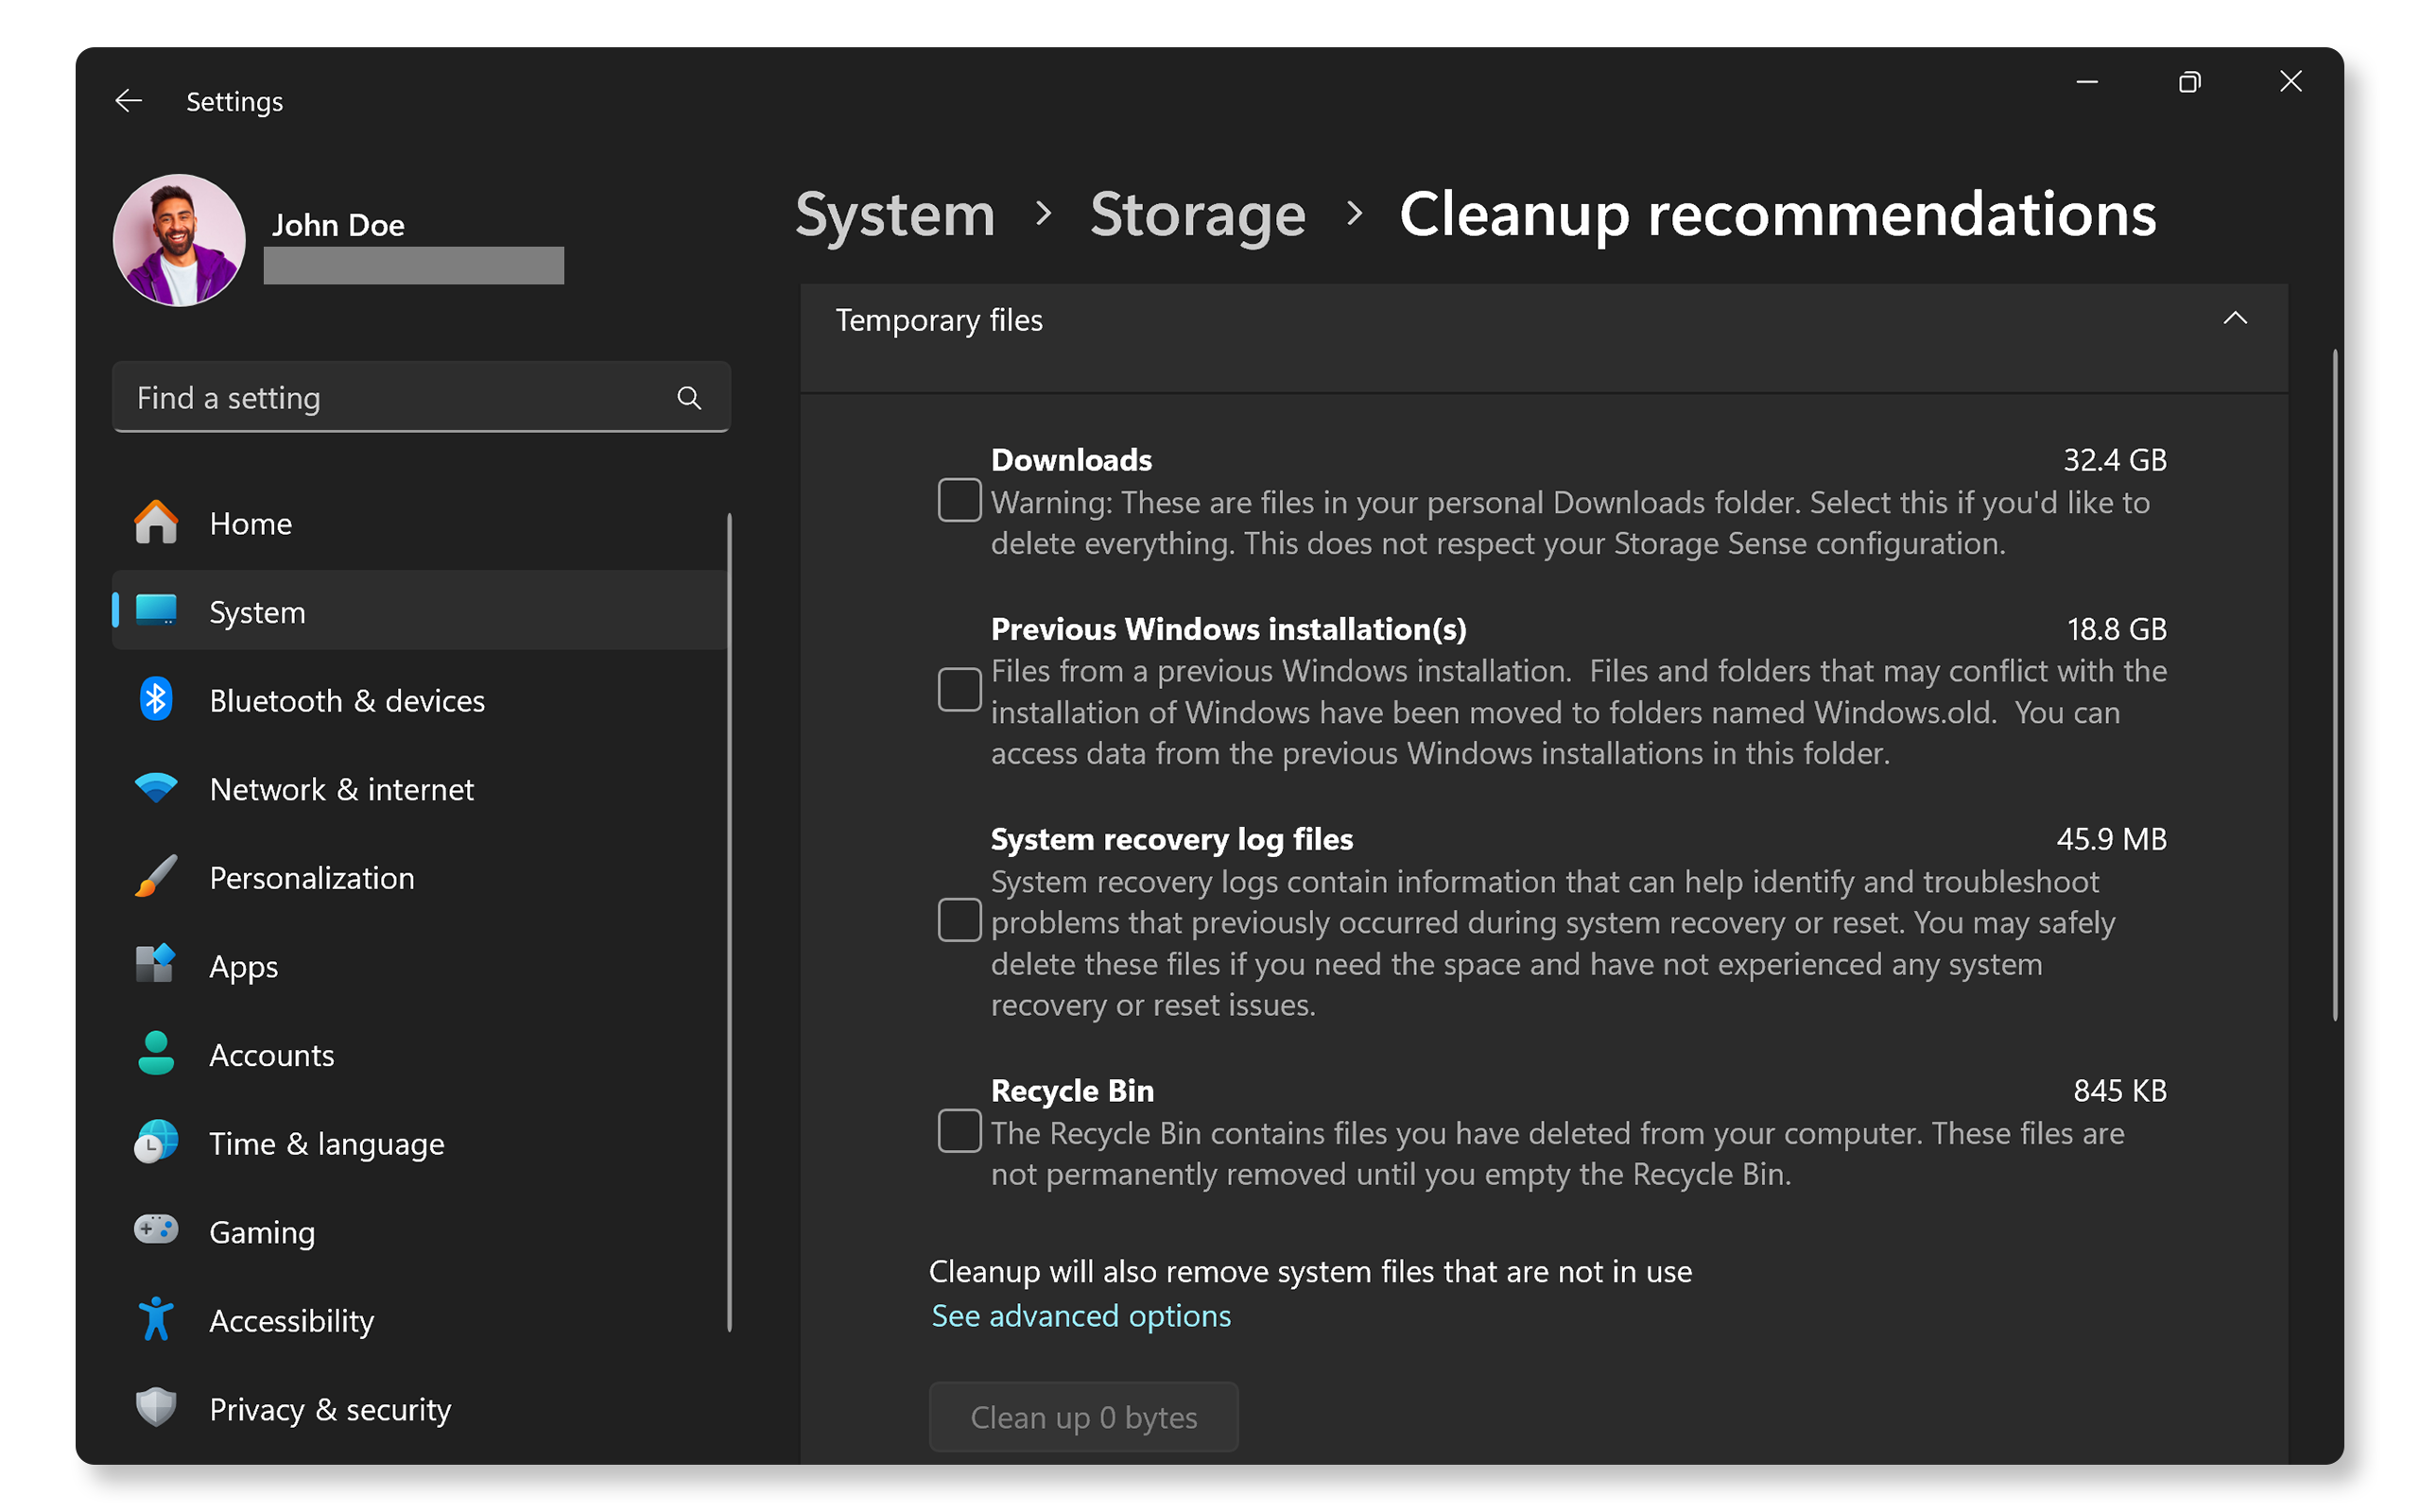
- Go to Start > Settings > System > Storage > Cleanup recommendations. Open Windows Storage settings.
- Select the temporary files, unused files, or unused apps you want to remove, then click the Clean up button for each section.
Uninstall Unnecessary Programs
Having too many programs on your computer can impact performance. Here's how to remove unwanted applications:
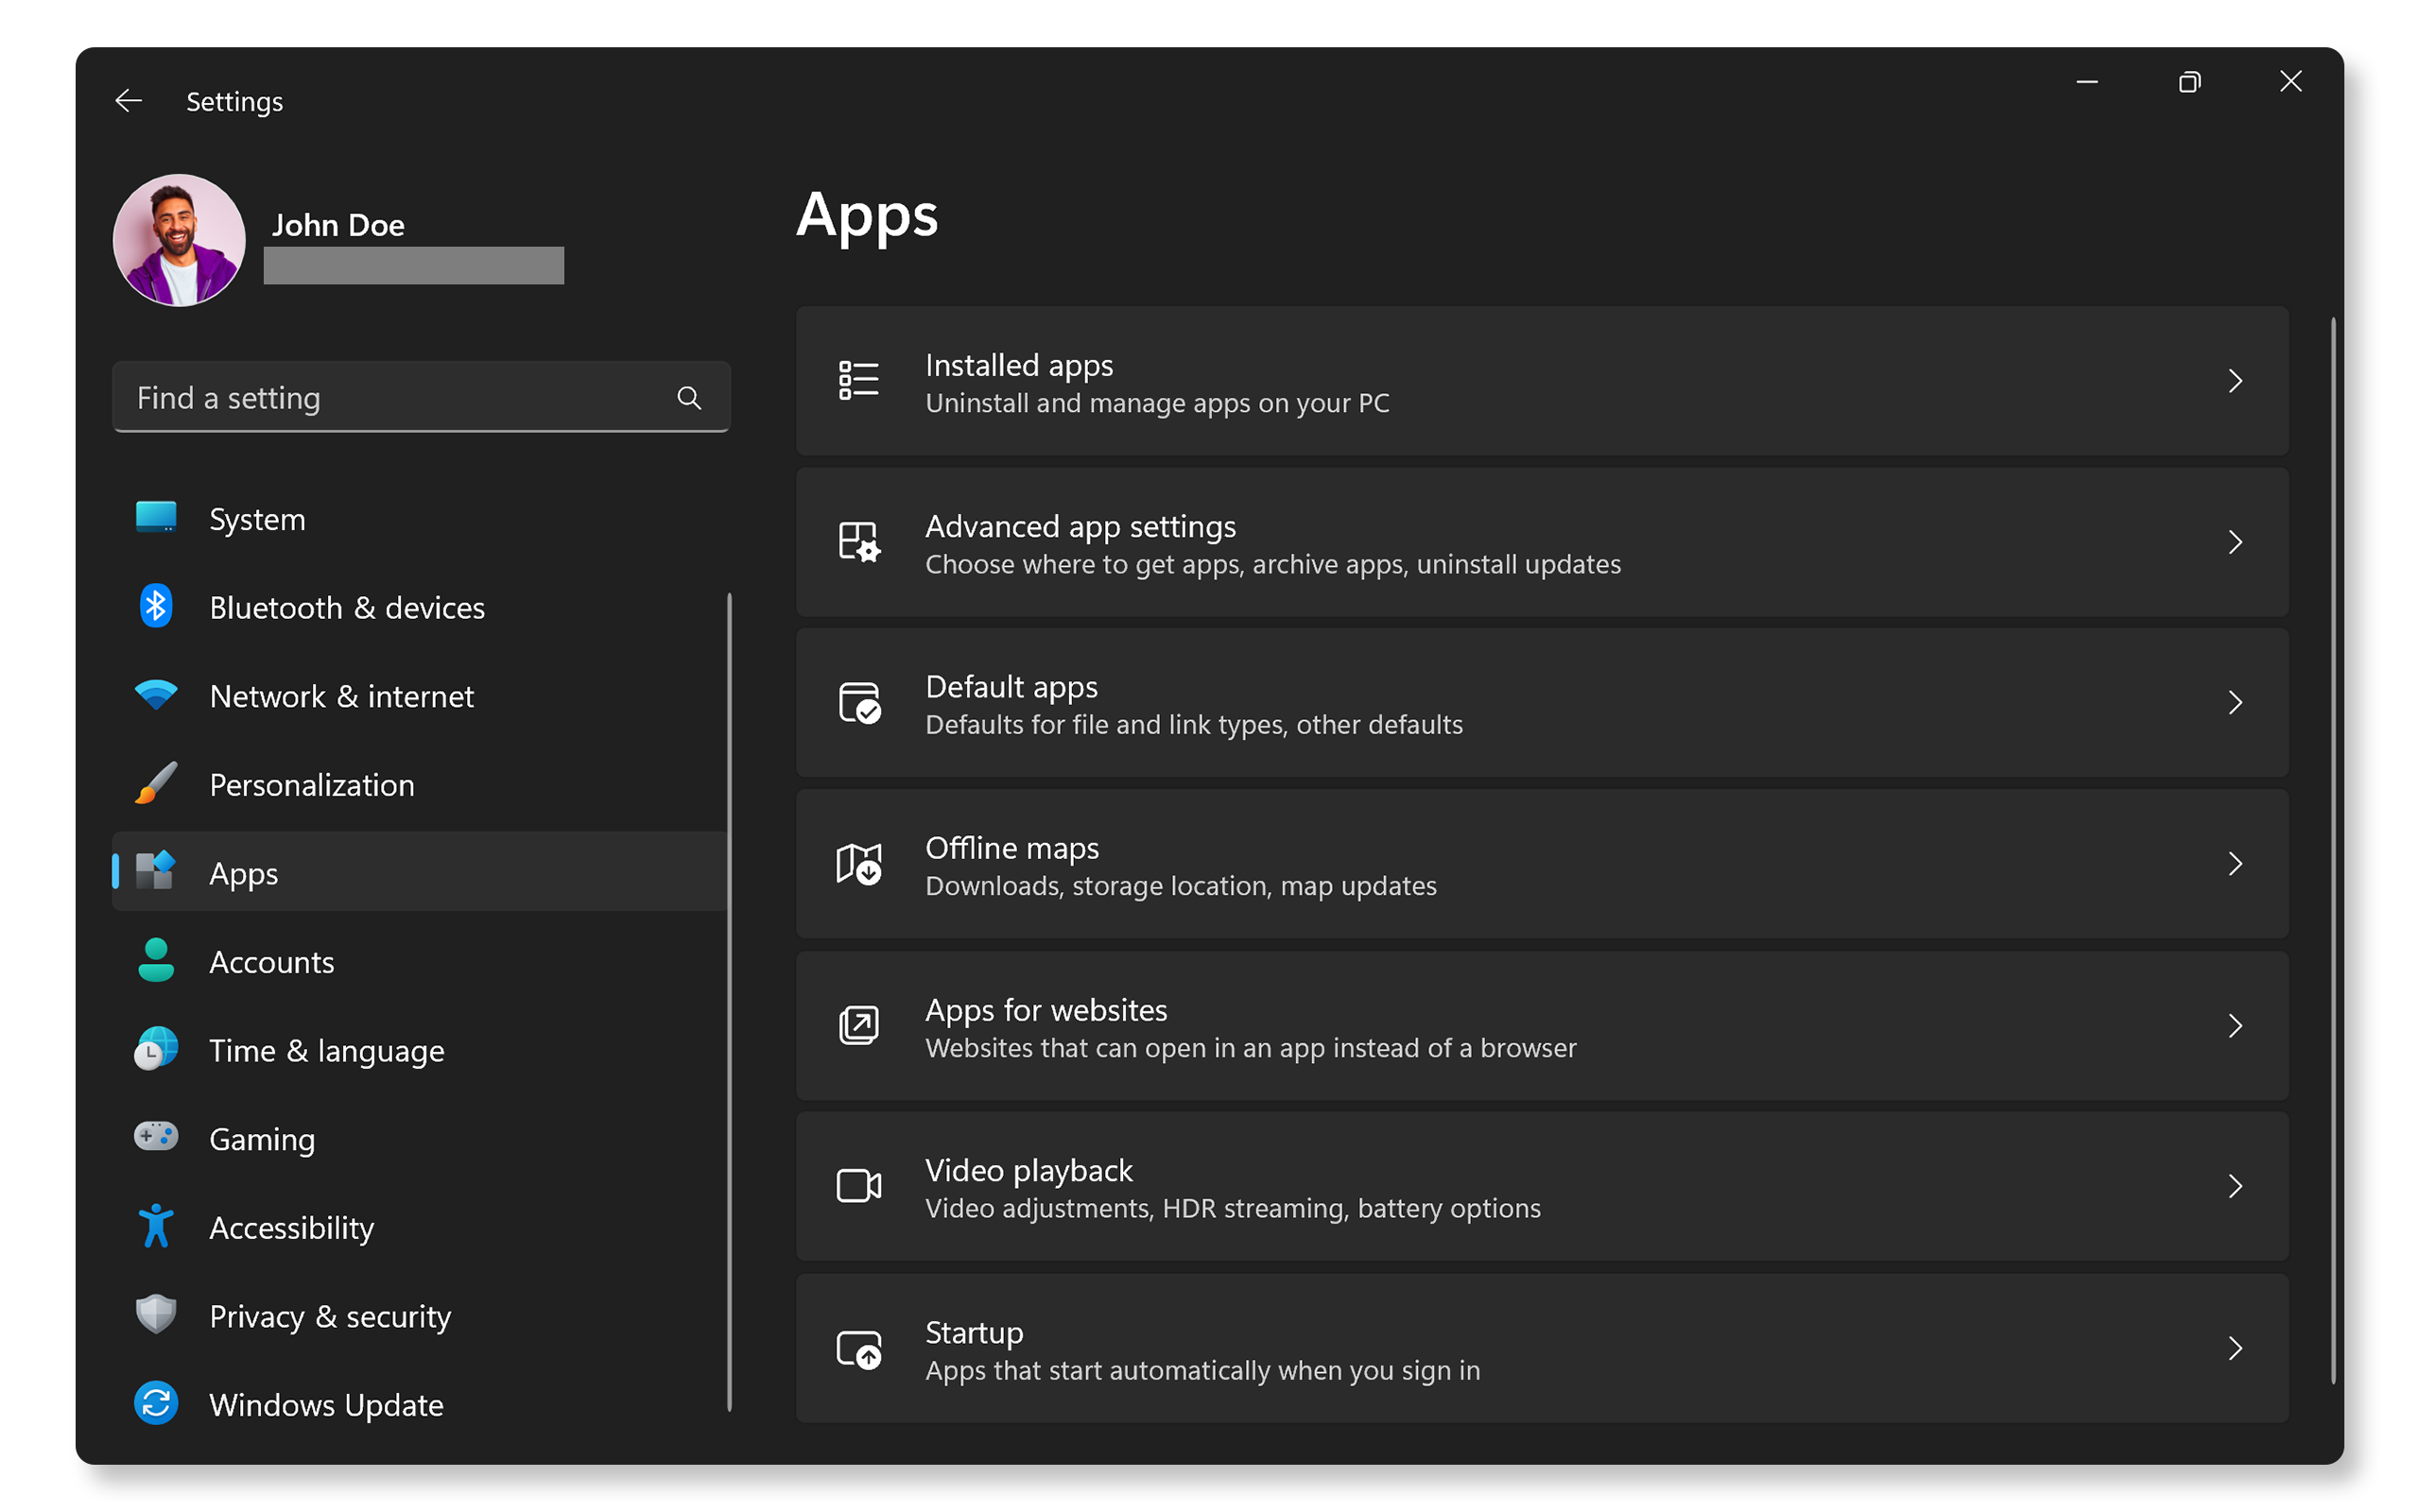
- Go to Start > Settings > Apps > Installed apps. Open Windows Installed apps settings.
- Scroll through and review the list, select any unnecessary program, and click Uninstall.
Check for Malware and Viruses
Malware can consume system resources, slow down your computer, and even cause system crashes. Use Windows Defender or other antivirus software to scan and remove any malicious file or software. To scan your computer using Windows Defender:
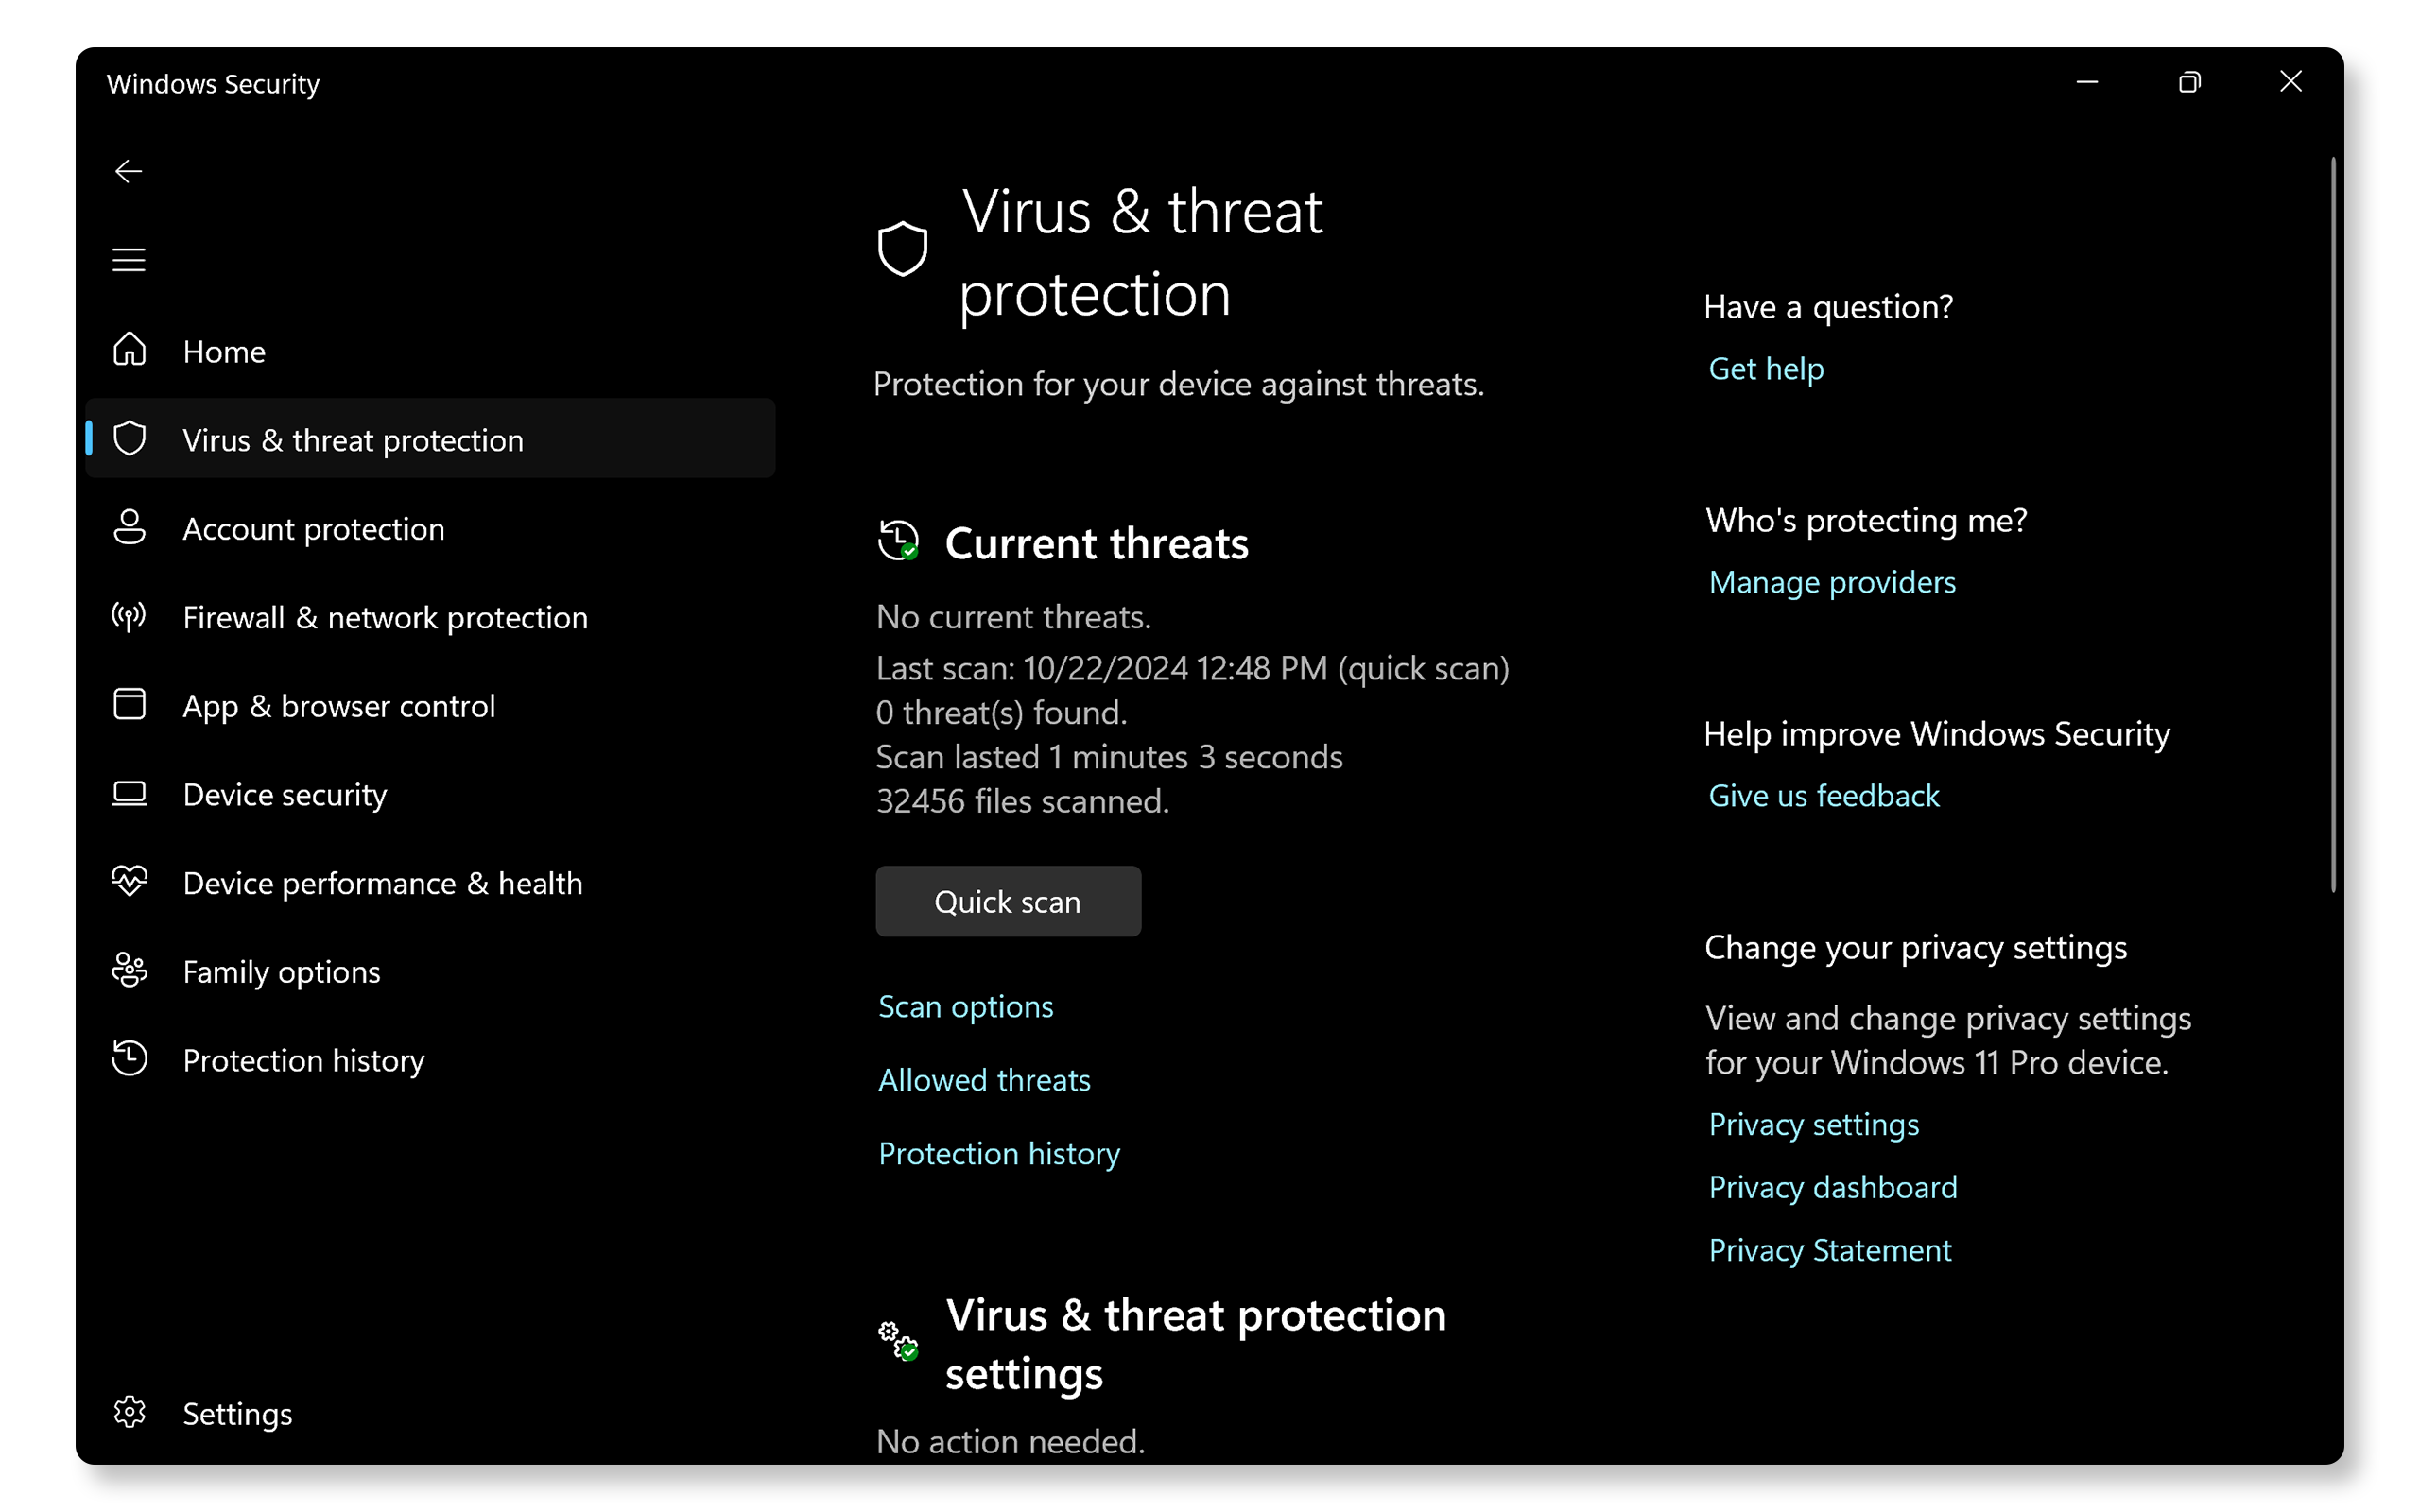
- Search for Windows Security in the Start menu and open the app. Open Windows Security app.
- Select Windows Security and then Virus protection.
- Click Quick Scan to check for malware and viruses. To perform a deep scan, go to Scan options, choose Full Scan, and then click Scan now.
Check and Clean Air Vents and Fan
- Get a can of compressed air and spray the air vents and fan. This helps blow away any dust or dirt that might be stuck.
- Look for dust on the fan. If the fan is dusty, it can make your computer to get too hot.
- Clean the fan (if needed). A clean fan helps your computer run better and avoid performance issues due to heat.
Manage Thermal Settings with Dell Optimizer or Dell Power Manager
Fine-tune your system's thermal settings to balance cooling and performance. These tools are particularly helpful for reducing heat during resource-intensive tasks, which can prevent thermal throttling and improve overall system speed.
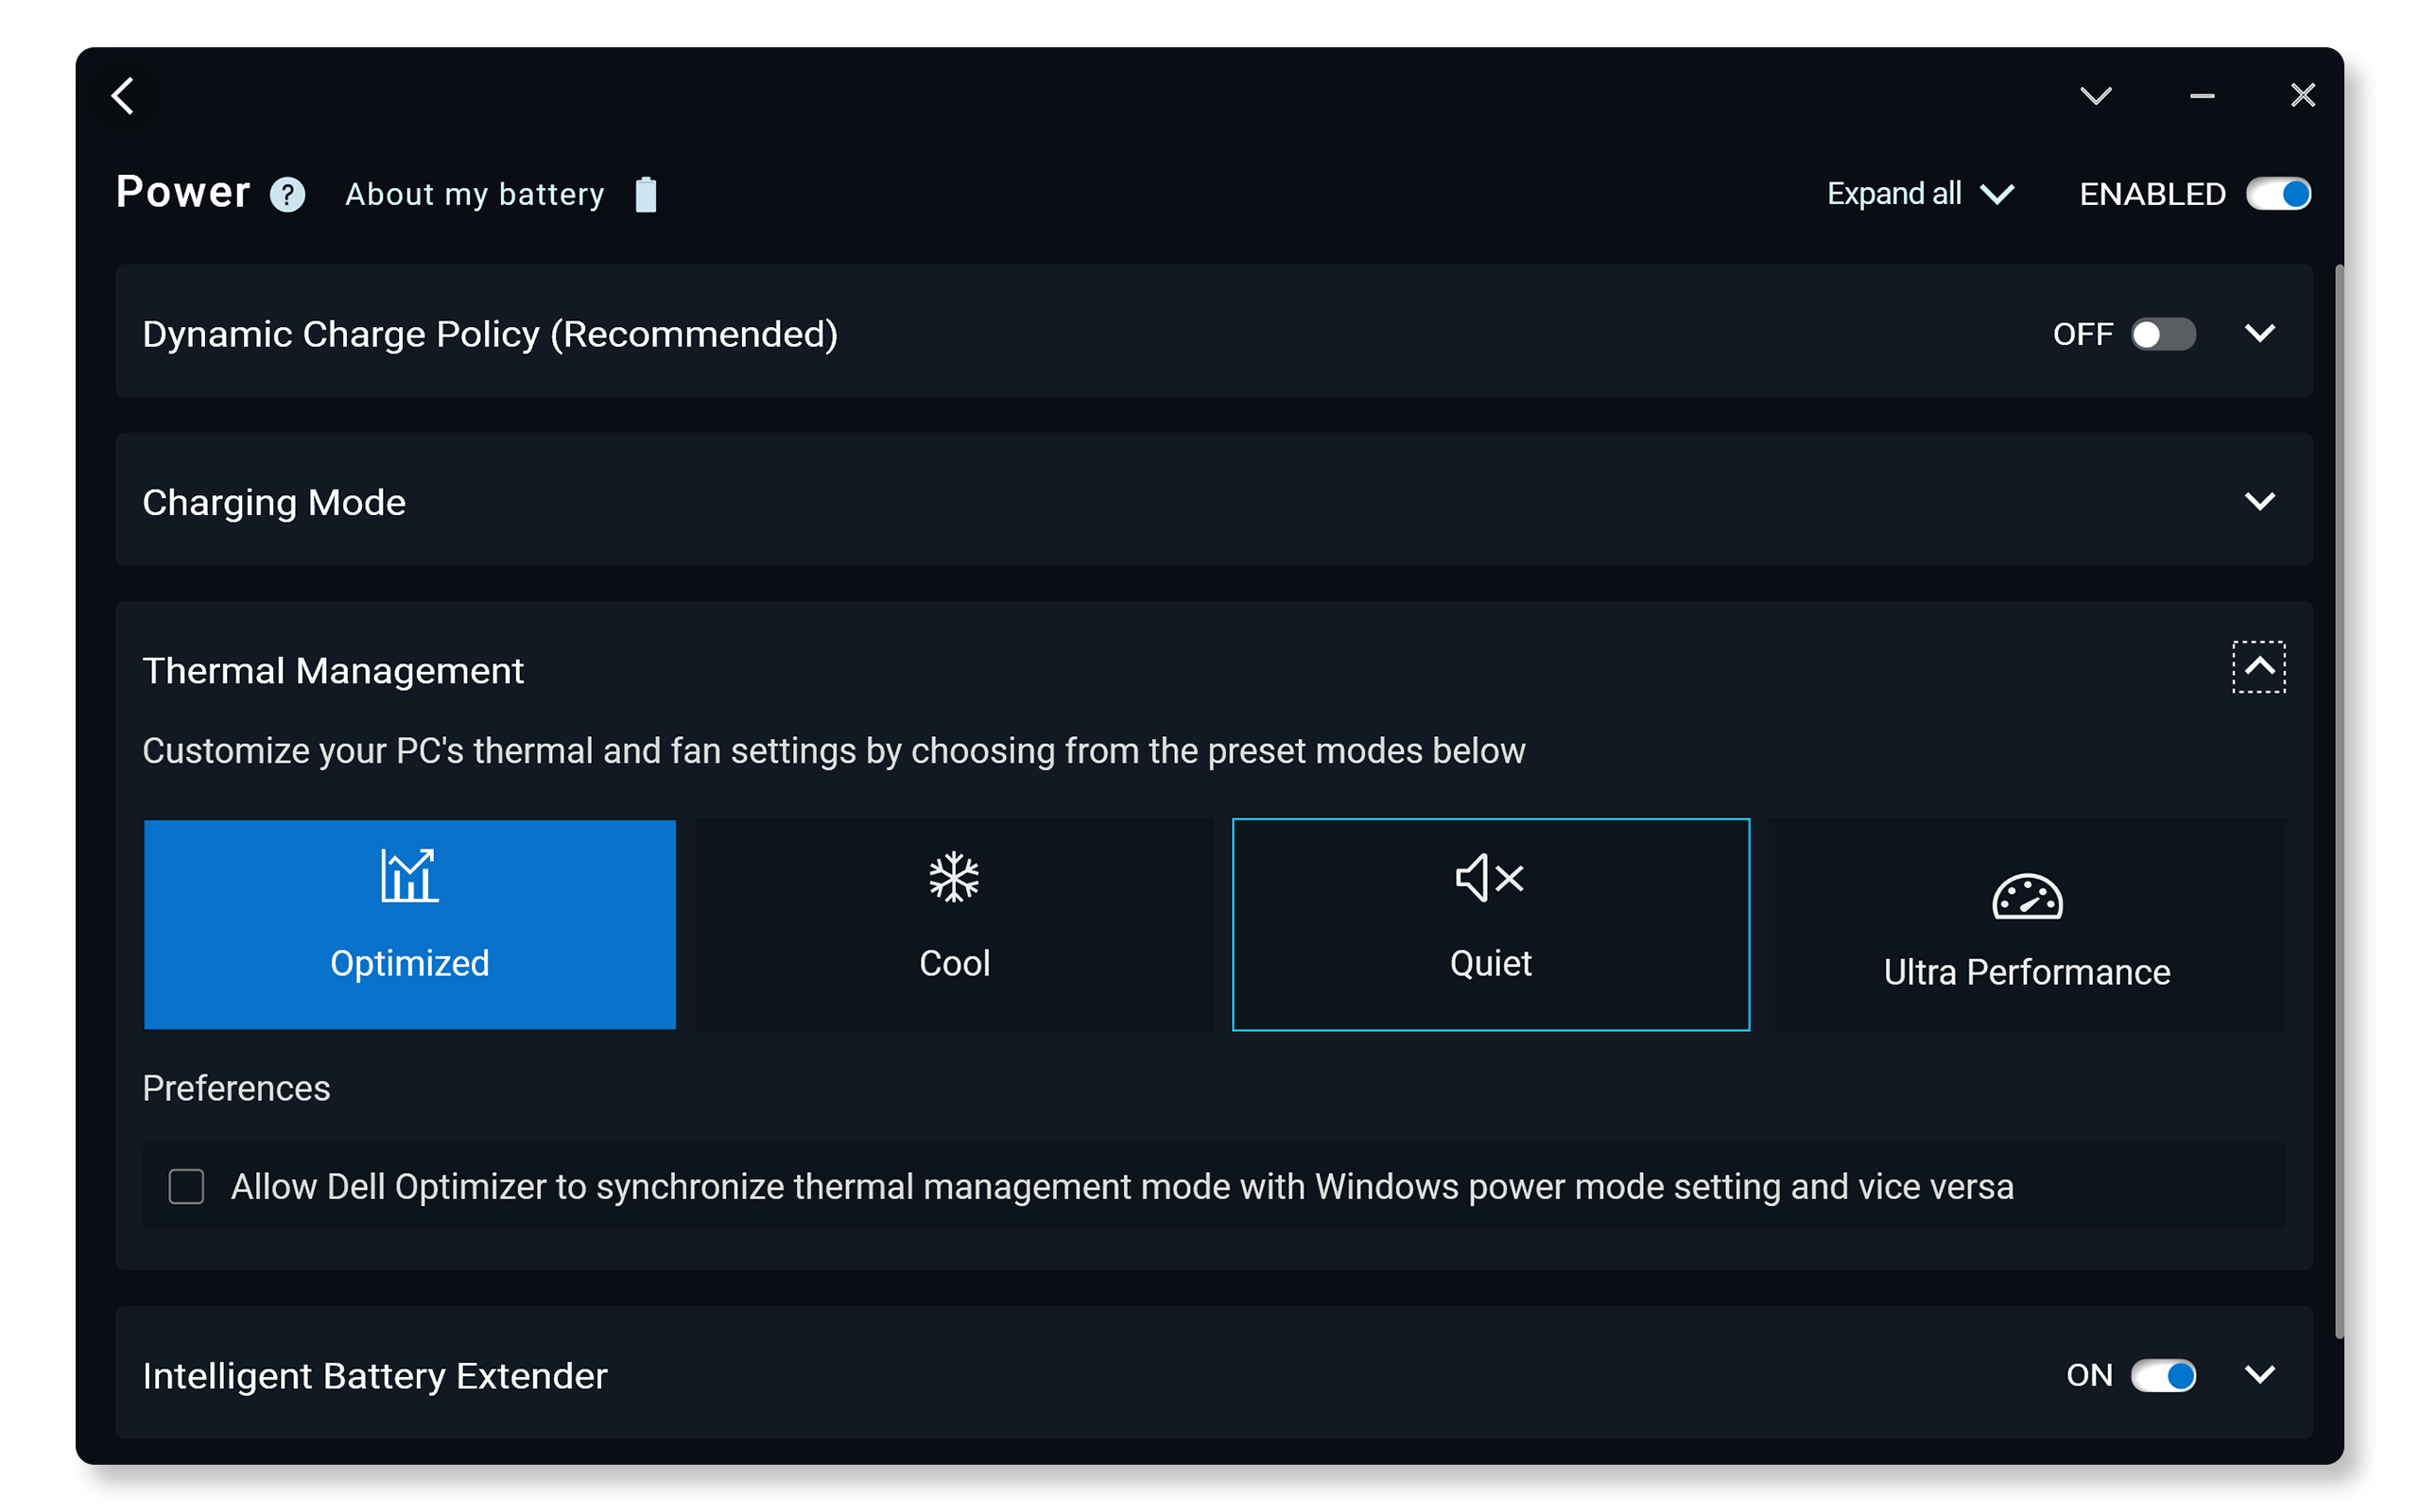
- Launch Dell Optimizer or Dell Power Manager from the Start menu.
- Navigate to the Thermal Management section.
- Choose from available profiles depending on your needs:
- Cool - Processor and cooling fan speed are adjusted to help maintain a cooler system surface temperature. This may mean reduced system performance and more noise.
- Quiet - Processor and cooling fan speed are adjusted to reduce fan noise. This may result in higher system surface temperature and reduced performance.
- Optimized - Standard setting for cooling fan and processor heat management. This setting is a balance of performance, noise, and temperature.
- Ultra Performance - Processor and cooling fan are adjusted for more performance. This may mean higher system surface temperature and more noise.
Run Dell Hardware Diagnostics
Your computer might be slowing down due to a hardware issue. A hardware test on your computer's memory, hard drive and other components helps isolate potential hardware issues.
Using SupportAssist
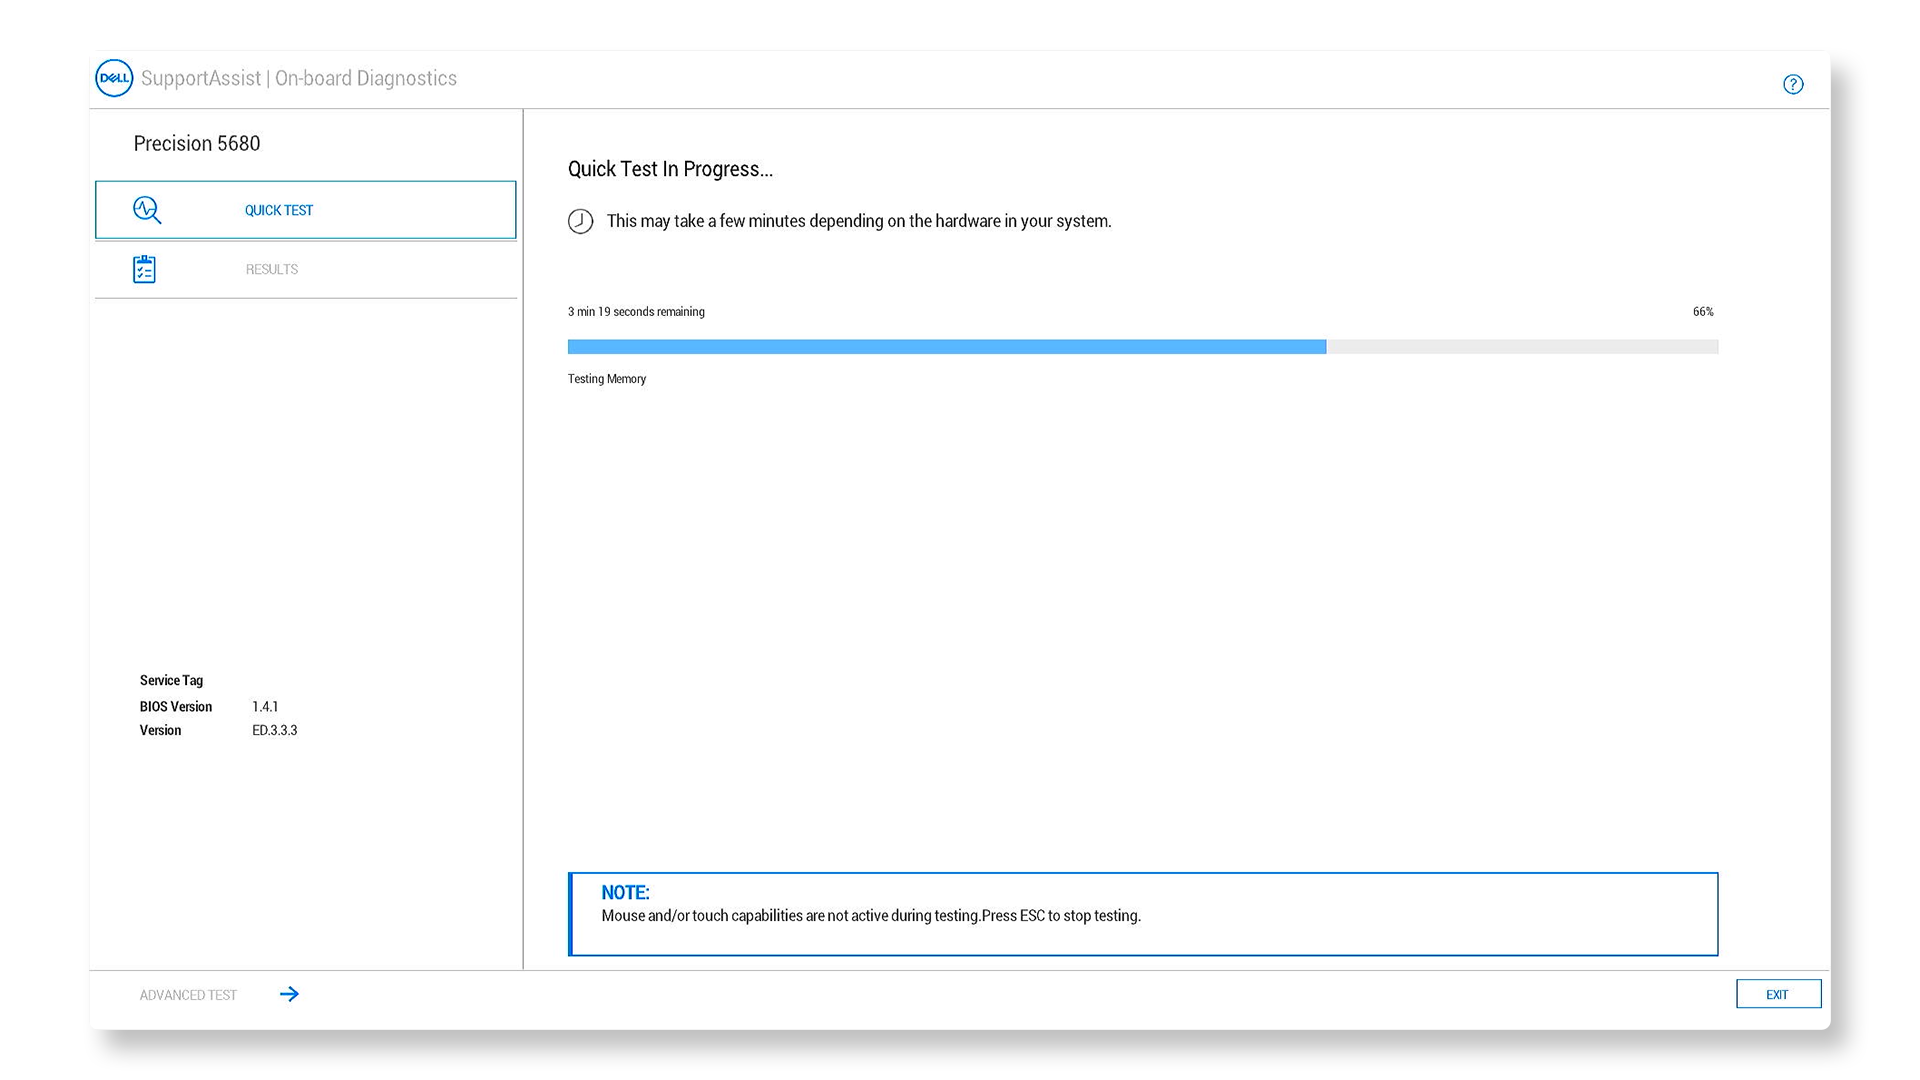
- Run the SupportAssist system test.
- SupportAssist will thoroughly scan your hardware, checking the CPU, system memory, hard drive, and more.
- Once the scan is complete, check the results and follow the instructions.
Pre-Boot System Assessment
If SupportAssist app isn't available or if you don't have access to the Internet, run the onboard diagnostics:
- Restart the computer: Press the power button.
- Enter Boot Menu: Press F12 repeatedly as the computer starts.
- Select Diagnostics: Choose Diagnostics from the menu and press Enter.
- Follow On-Screen Instructions: SupportAssist Pre Boot System Assessment (ePSA on older devices) checks for hardware issues. If the test passes, the hardware is working properly. If the diagnostic test fails, make a note of the error code, validation code, Service Tag, and then look up the error code.
Slow Boot Times
Is your computer taking forever to start up? It might be caused by too many startup programs. Let's streamline the boot process and get you up and running faster!
Check Startup Programs
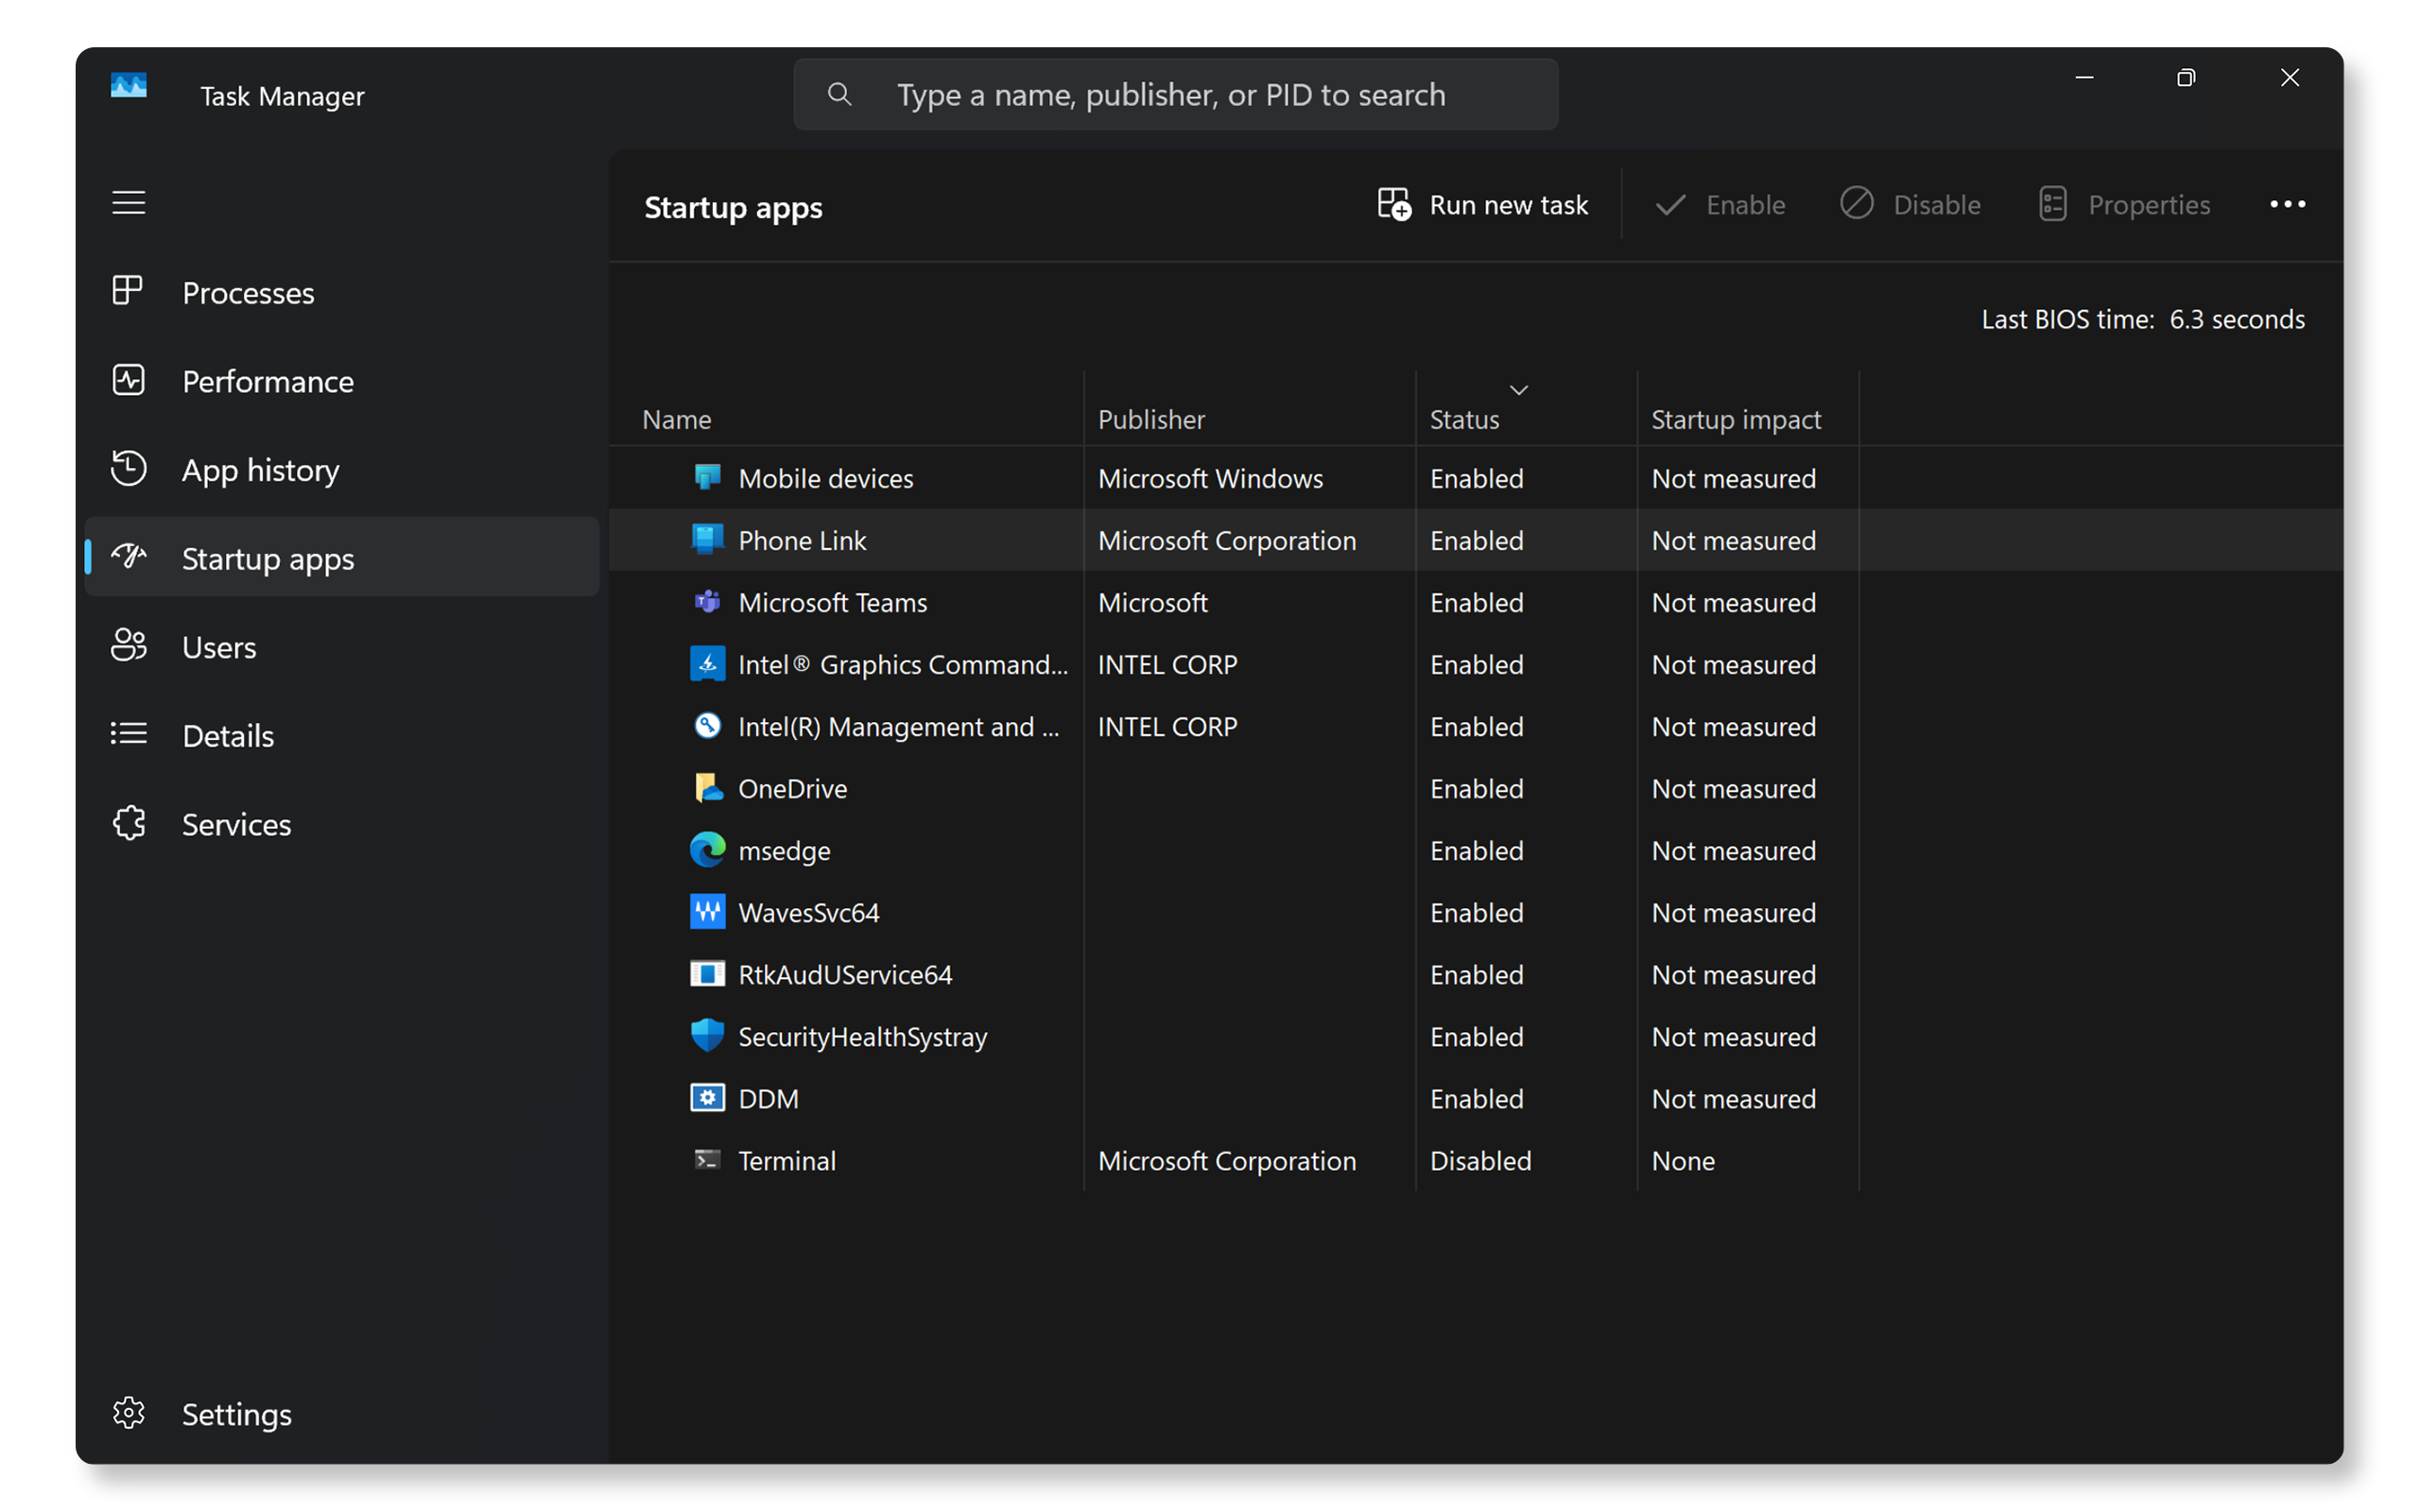
Too many programs running at startup can significantly slow down boot times and overall performance. Here's how to manage them:
- Right-click on the Taskbar and select Task Manager.
- Go to the Startup tab, review each program, and disable unnecessary apps by right-clicking and selecting Disable.
Manage Startup Services
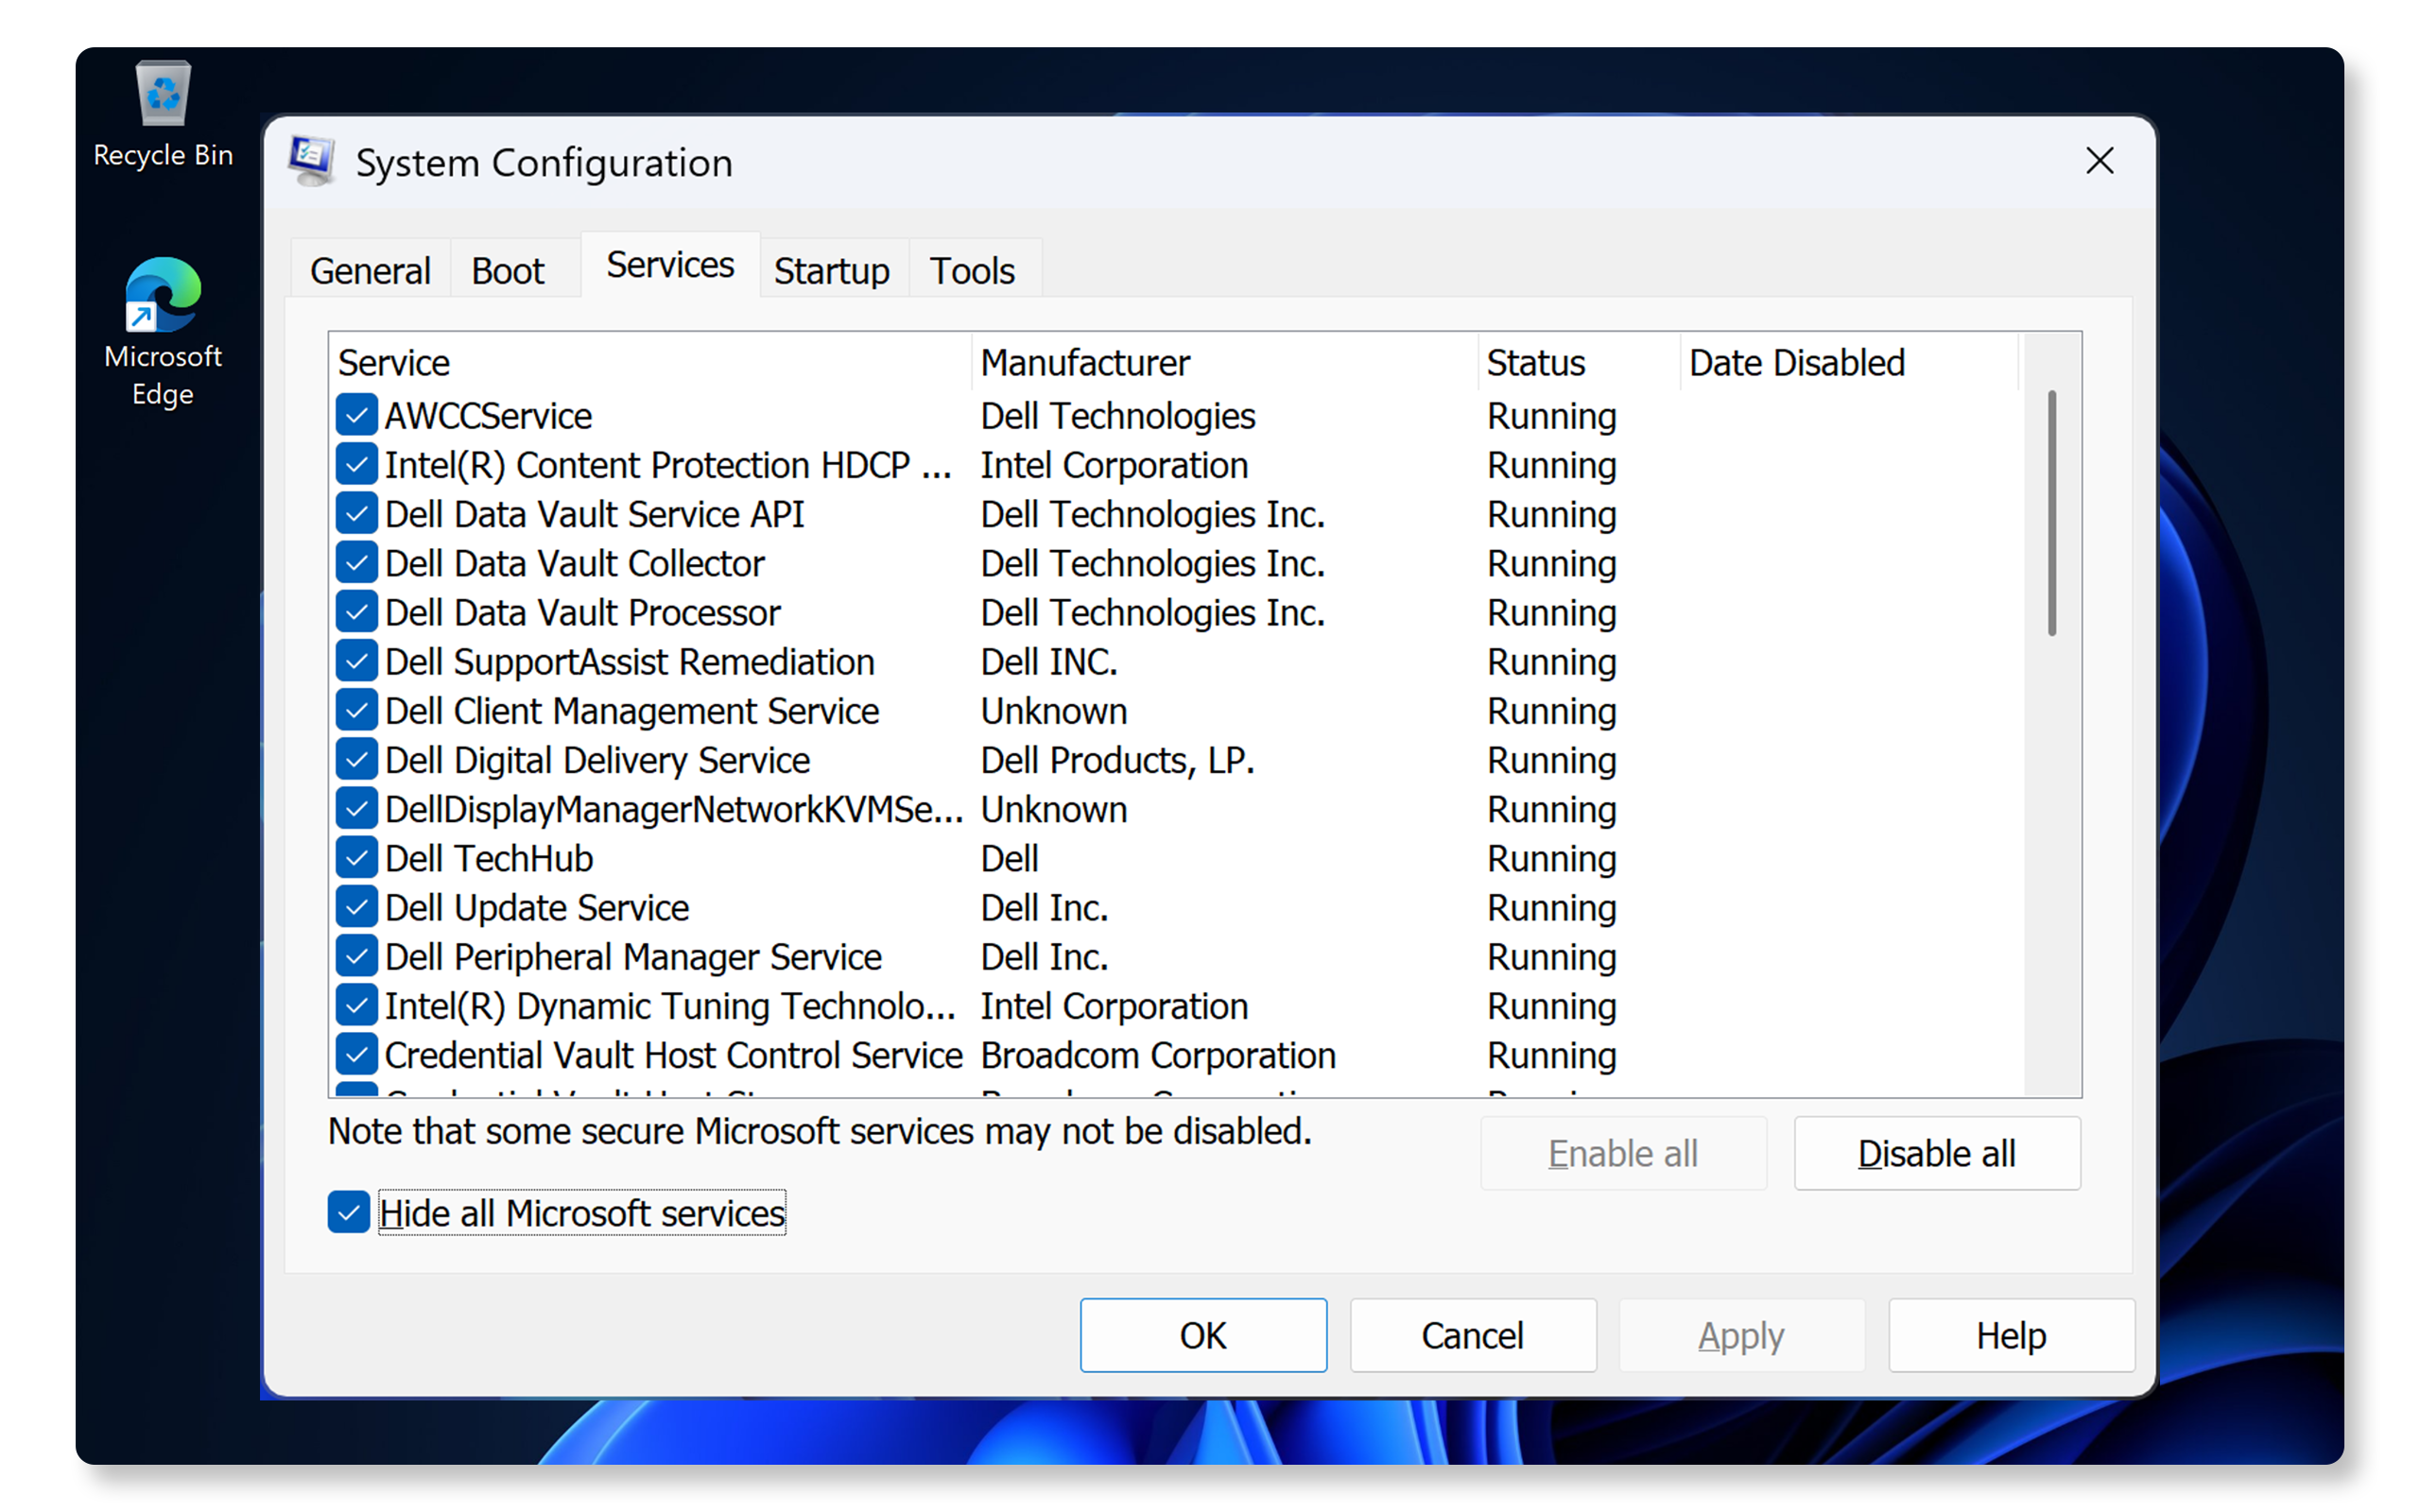
- Press Windows key + R, type msconfig, and press Enter to open System Configuration.
- Go to the Services tab, check Hide all Microsoft services, and disable unnecessary services.
Applications Freezing or Opening Slowly
Are your apps running slowly or freezing up? Keeping them updated and checking for disk errors can make a big difference. Let's get those apps running smoothly again!
Update Applications
- Go to Microsoft Store or visit the applications official website for updates.
- Install available updates to ensure compatibility and performance improvements.
Check for Disk Errors
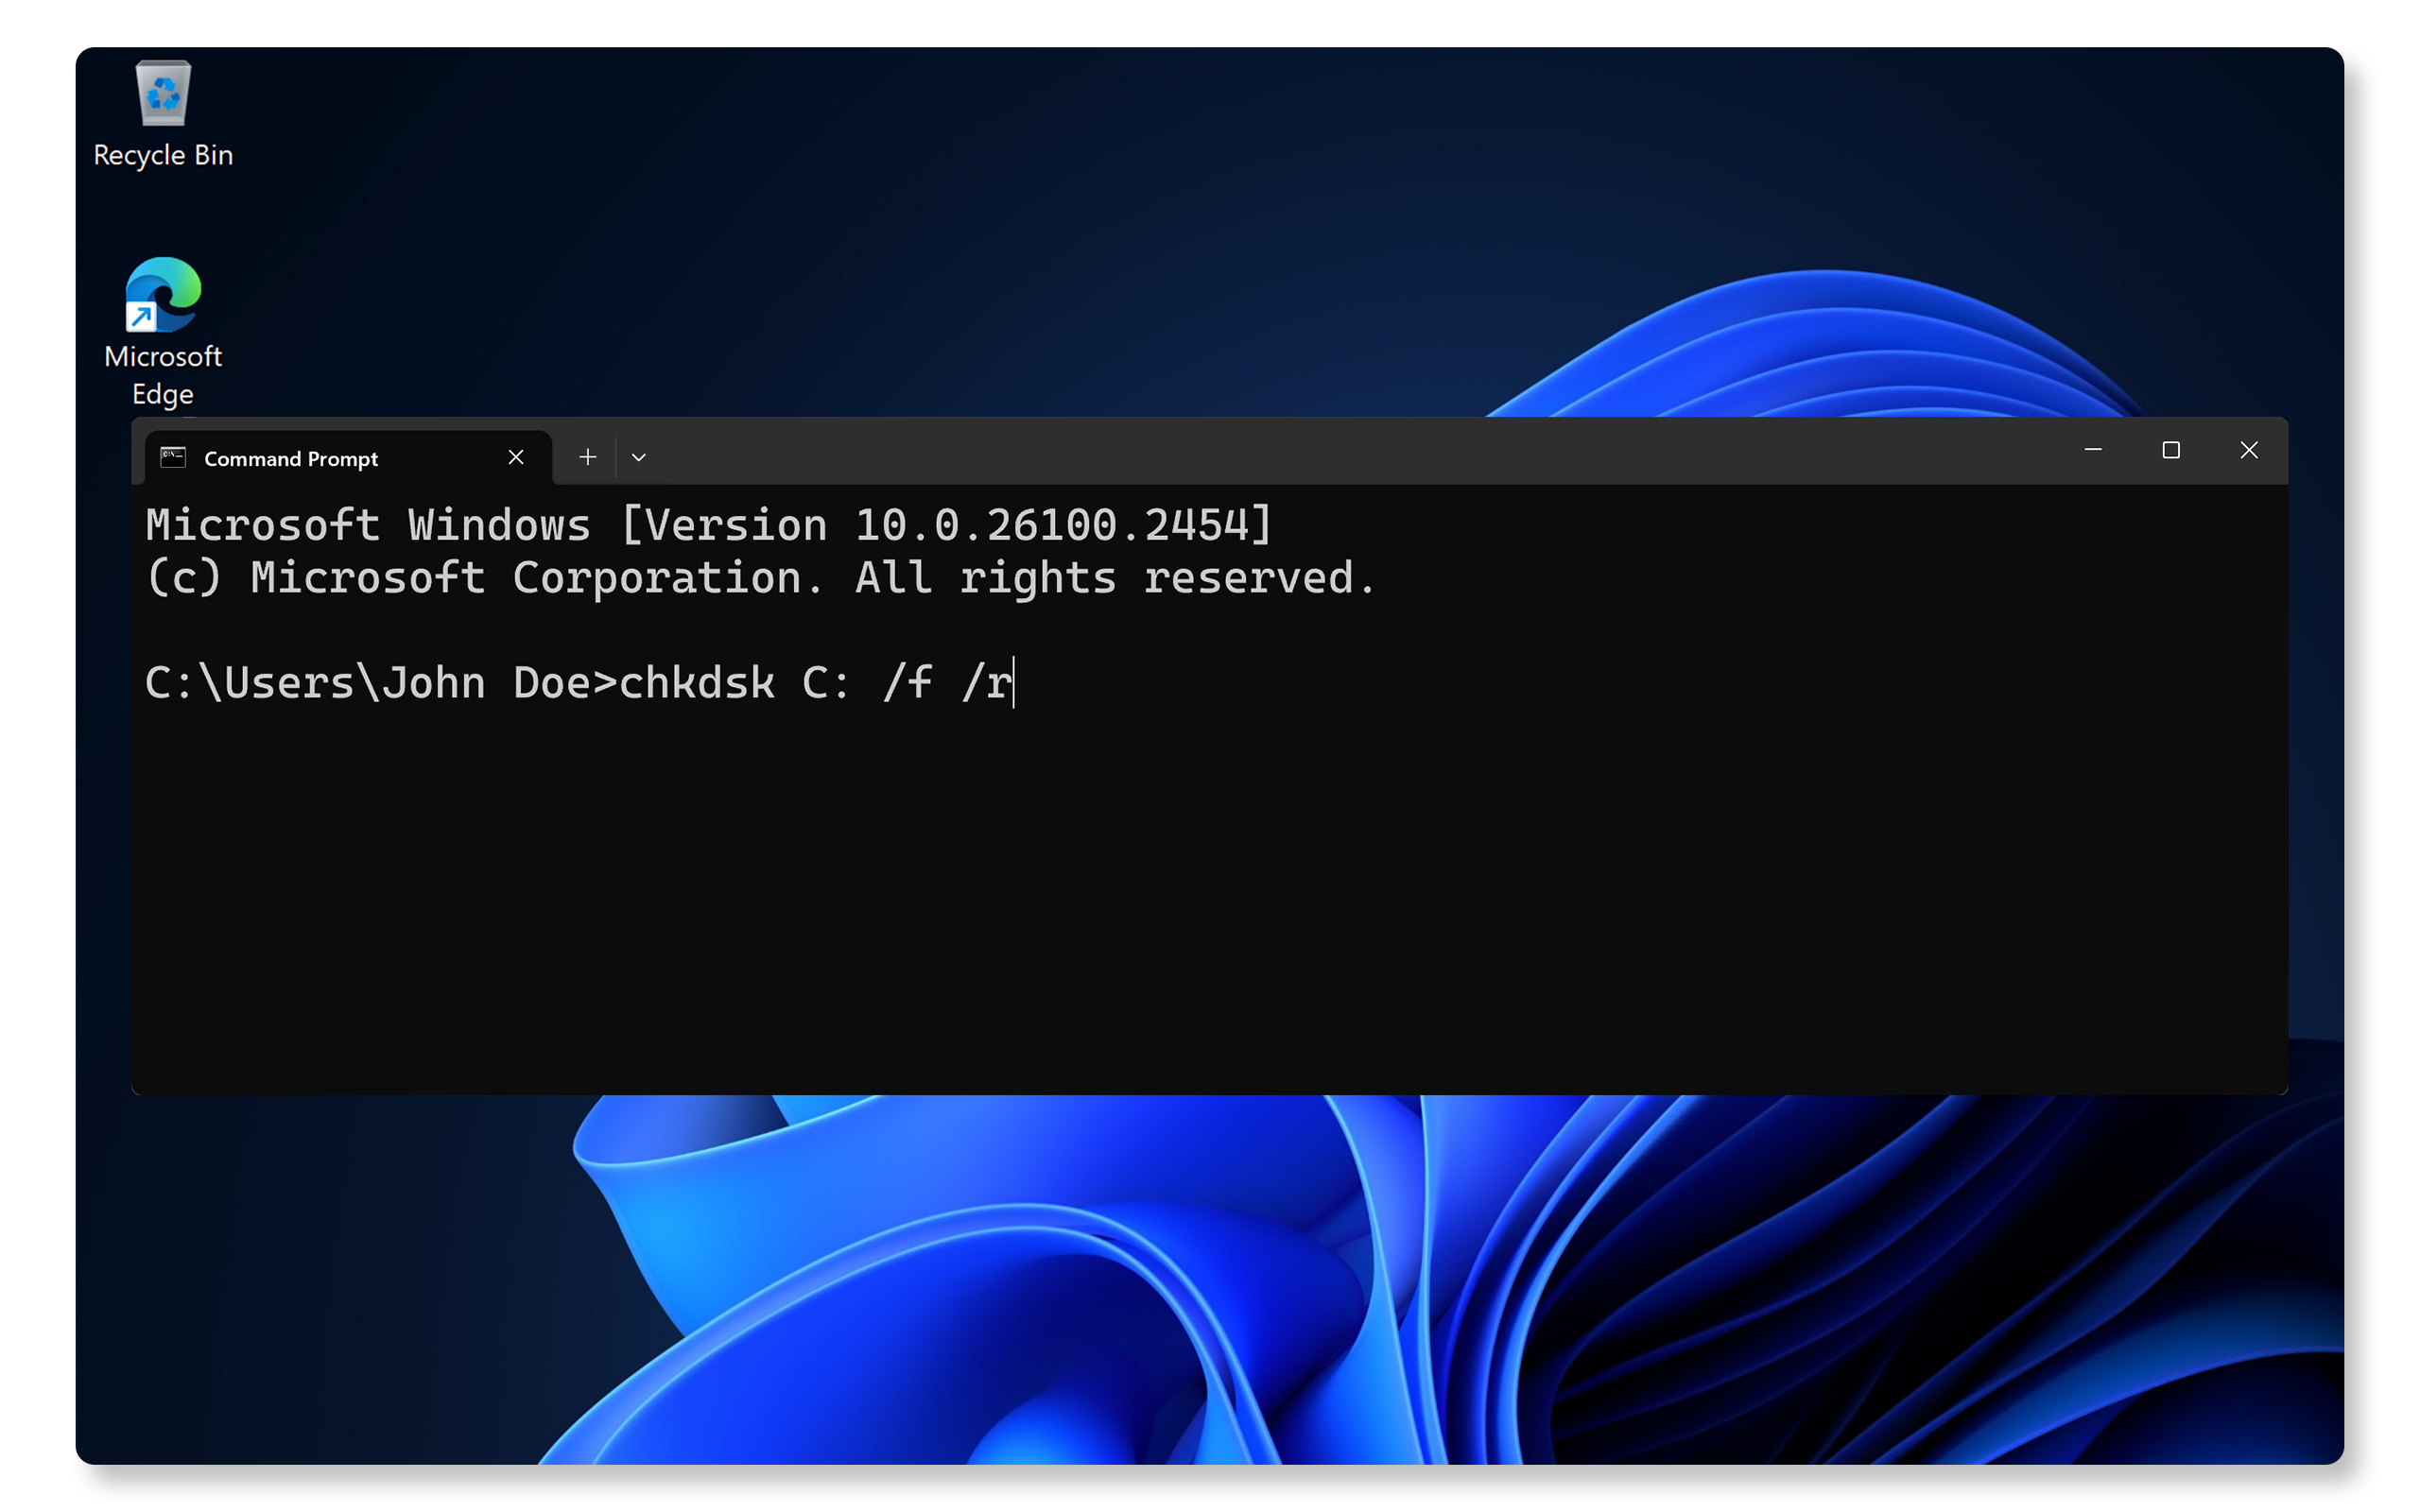
- Open Command Prompt as an administrator.
- Type chkdsk C: /f /r (replace C: with your system drive letter) and press Enter.
- Restart your computer and let the disk check complete.
Slow Browsing Speed
Is your web browser loading pages slowly? Clearing your browser cache and disabling unnecessary browser extensions can speed things up. Let's boost your browsing speed!
Clear Browser Cache
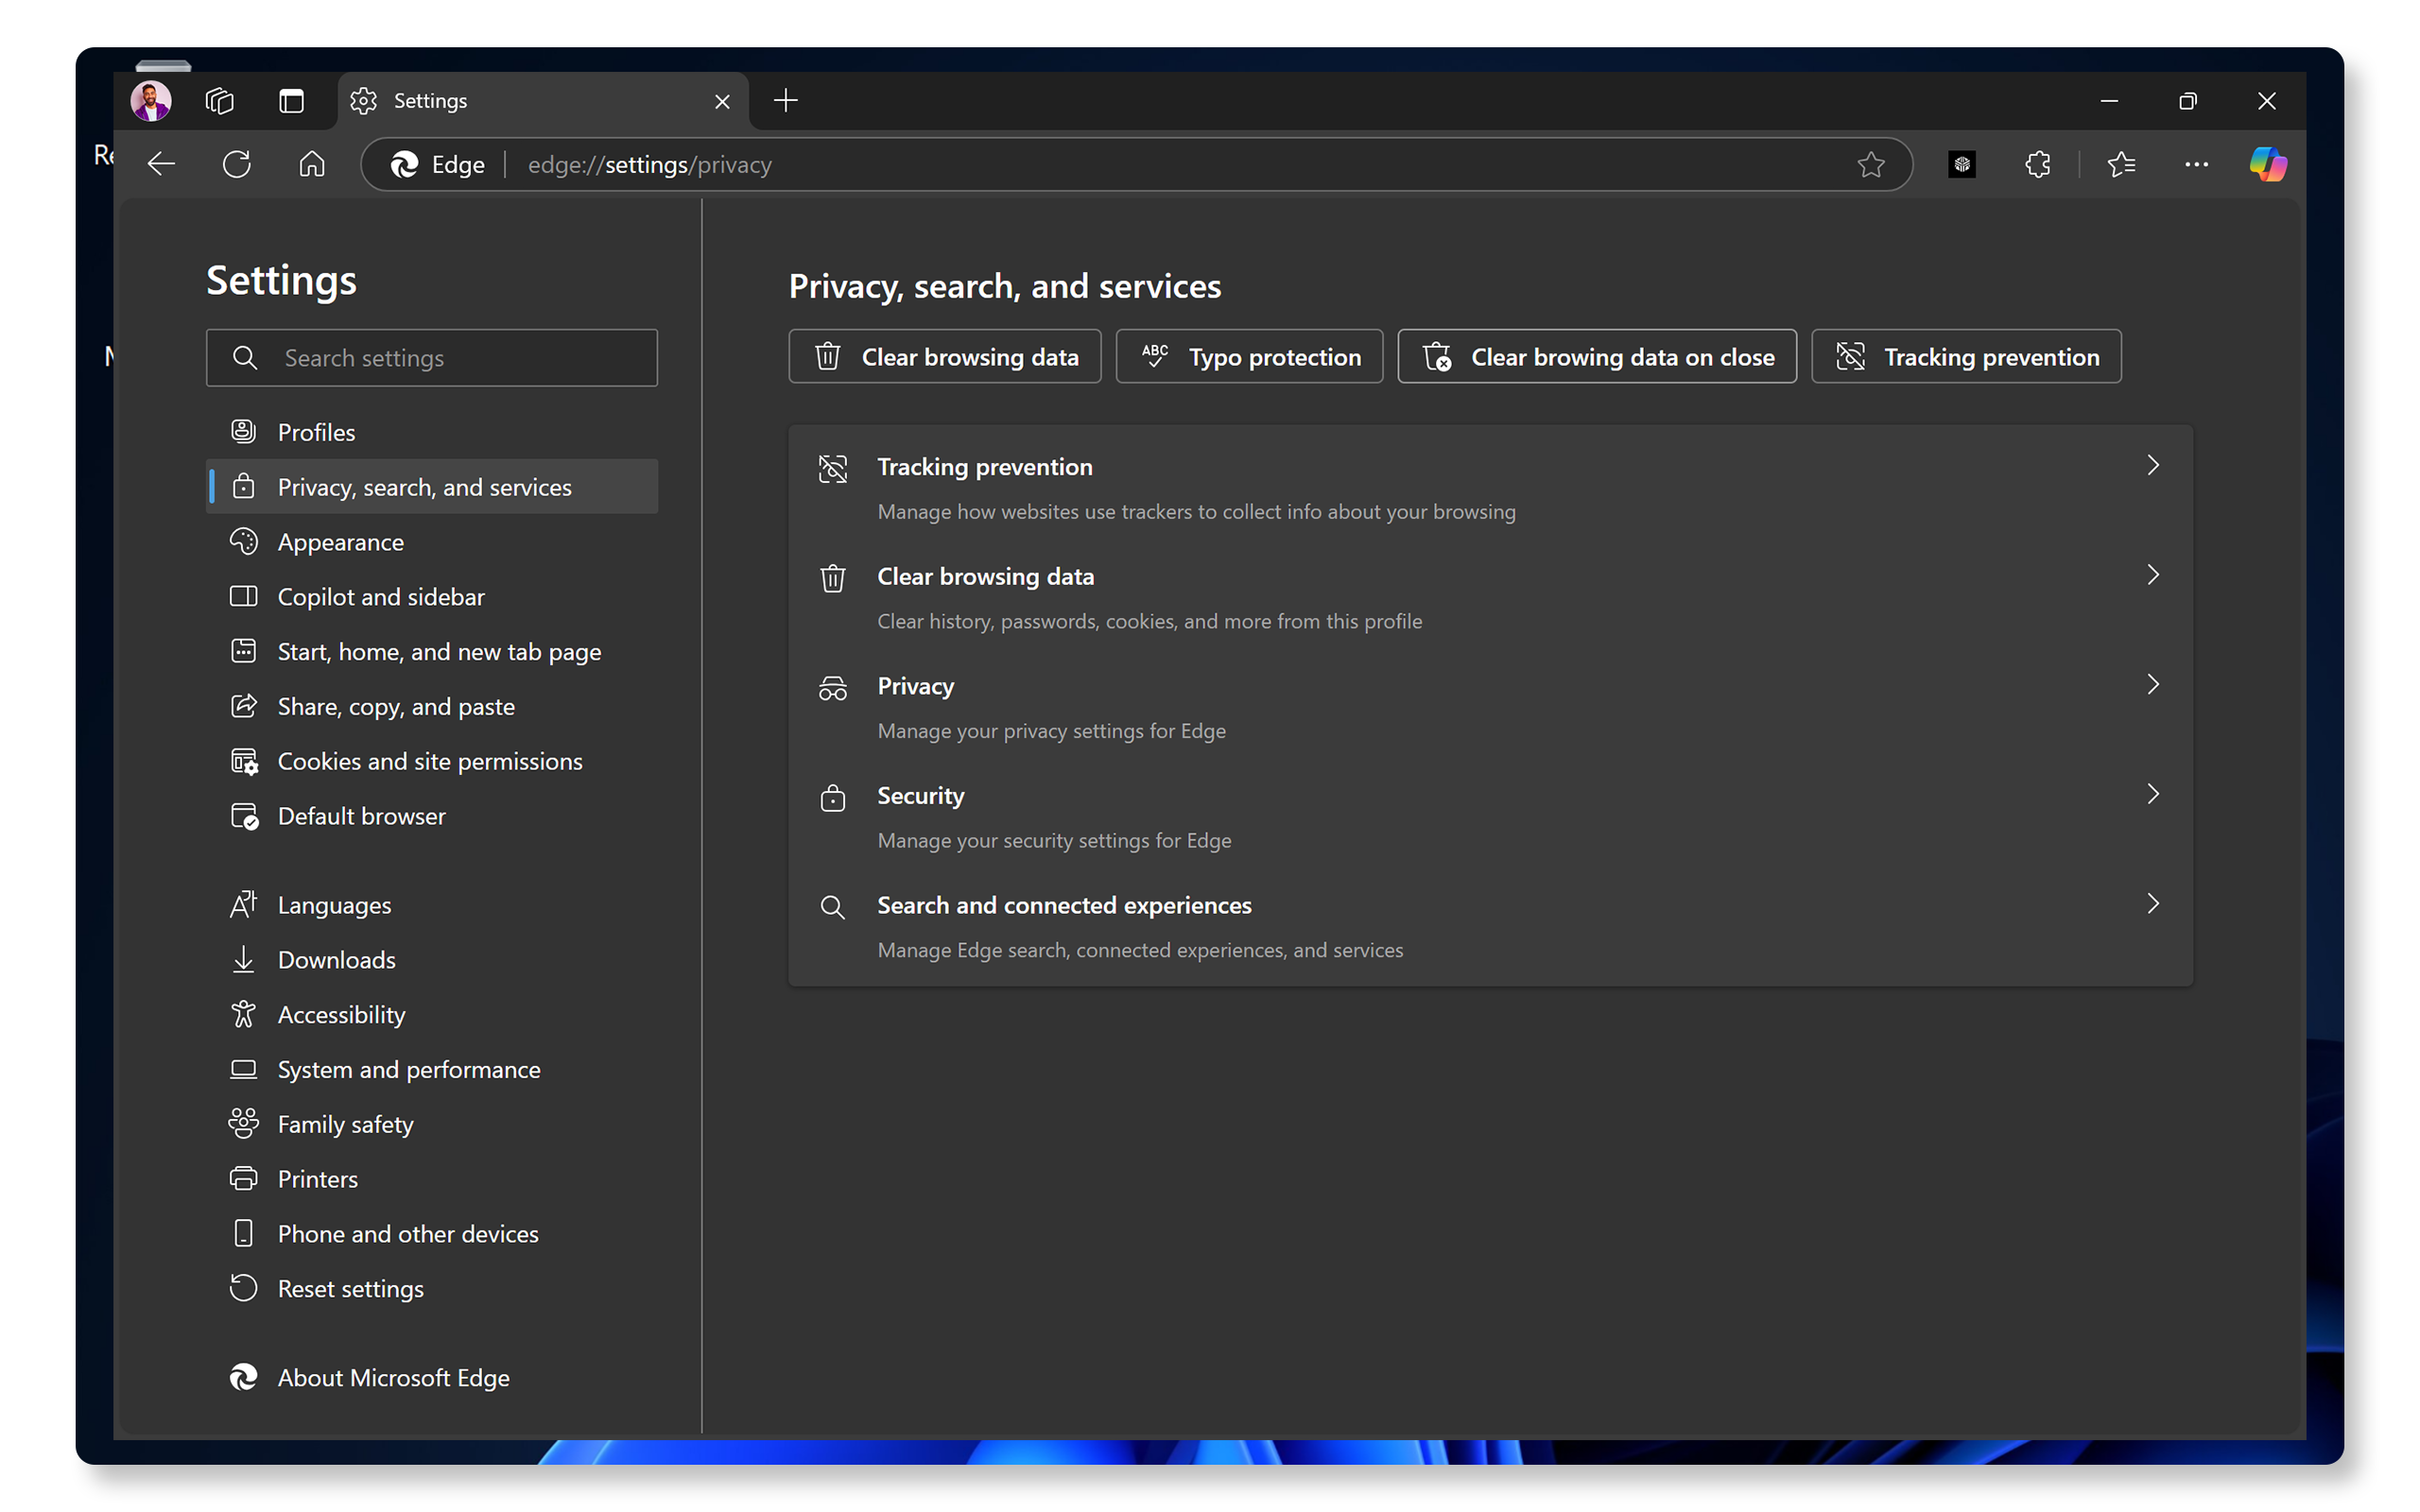
- Open your web browser and press Ctrl + Shift + Delete to open browsing data settings.
- Follow the guides to clear browsing data in Microsoft Edge, Google Chrome, or Mozilla Firefox.
Disable Browser Extension
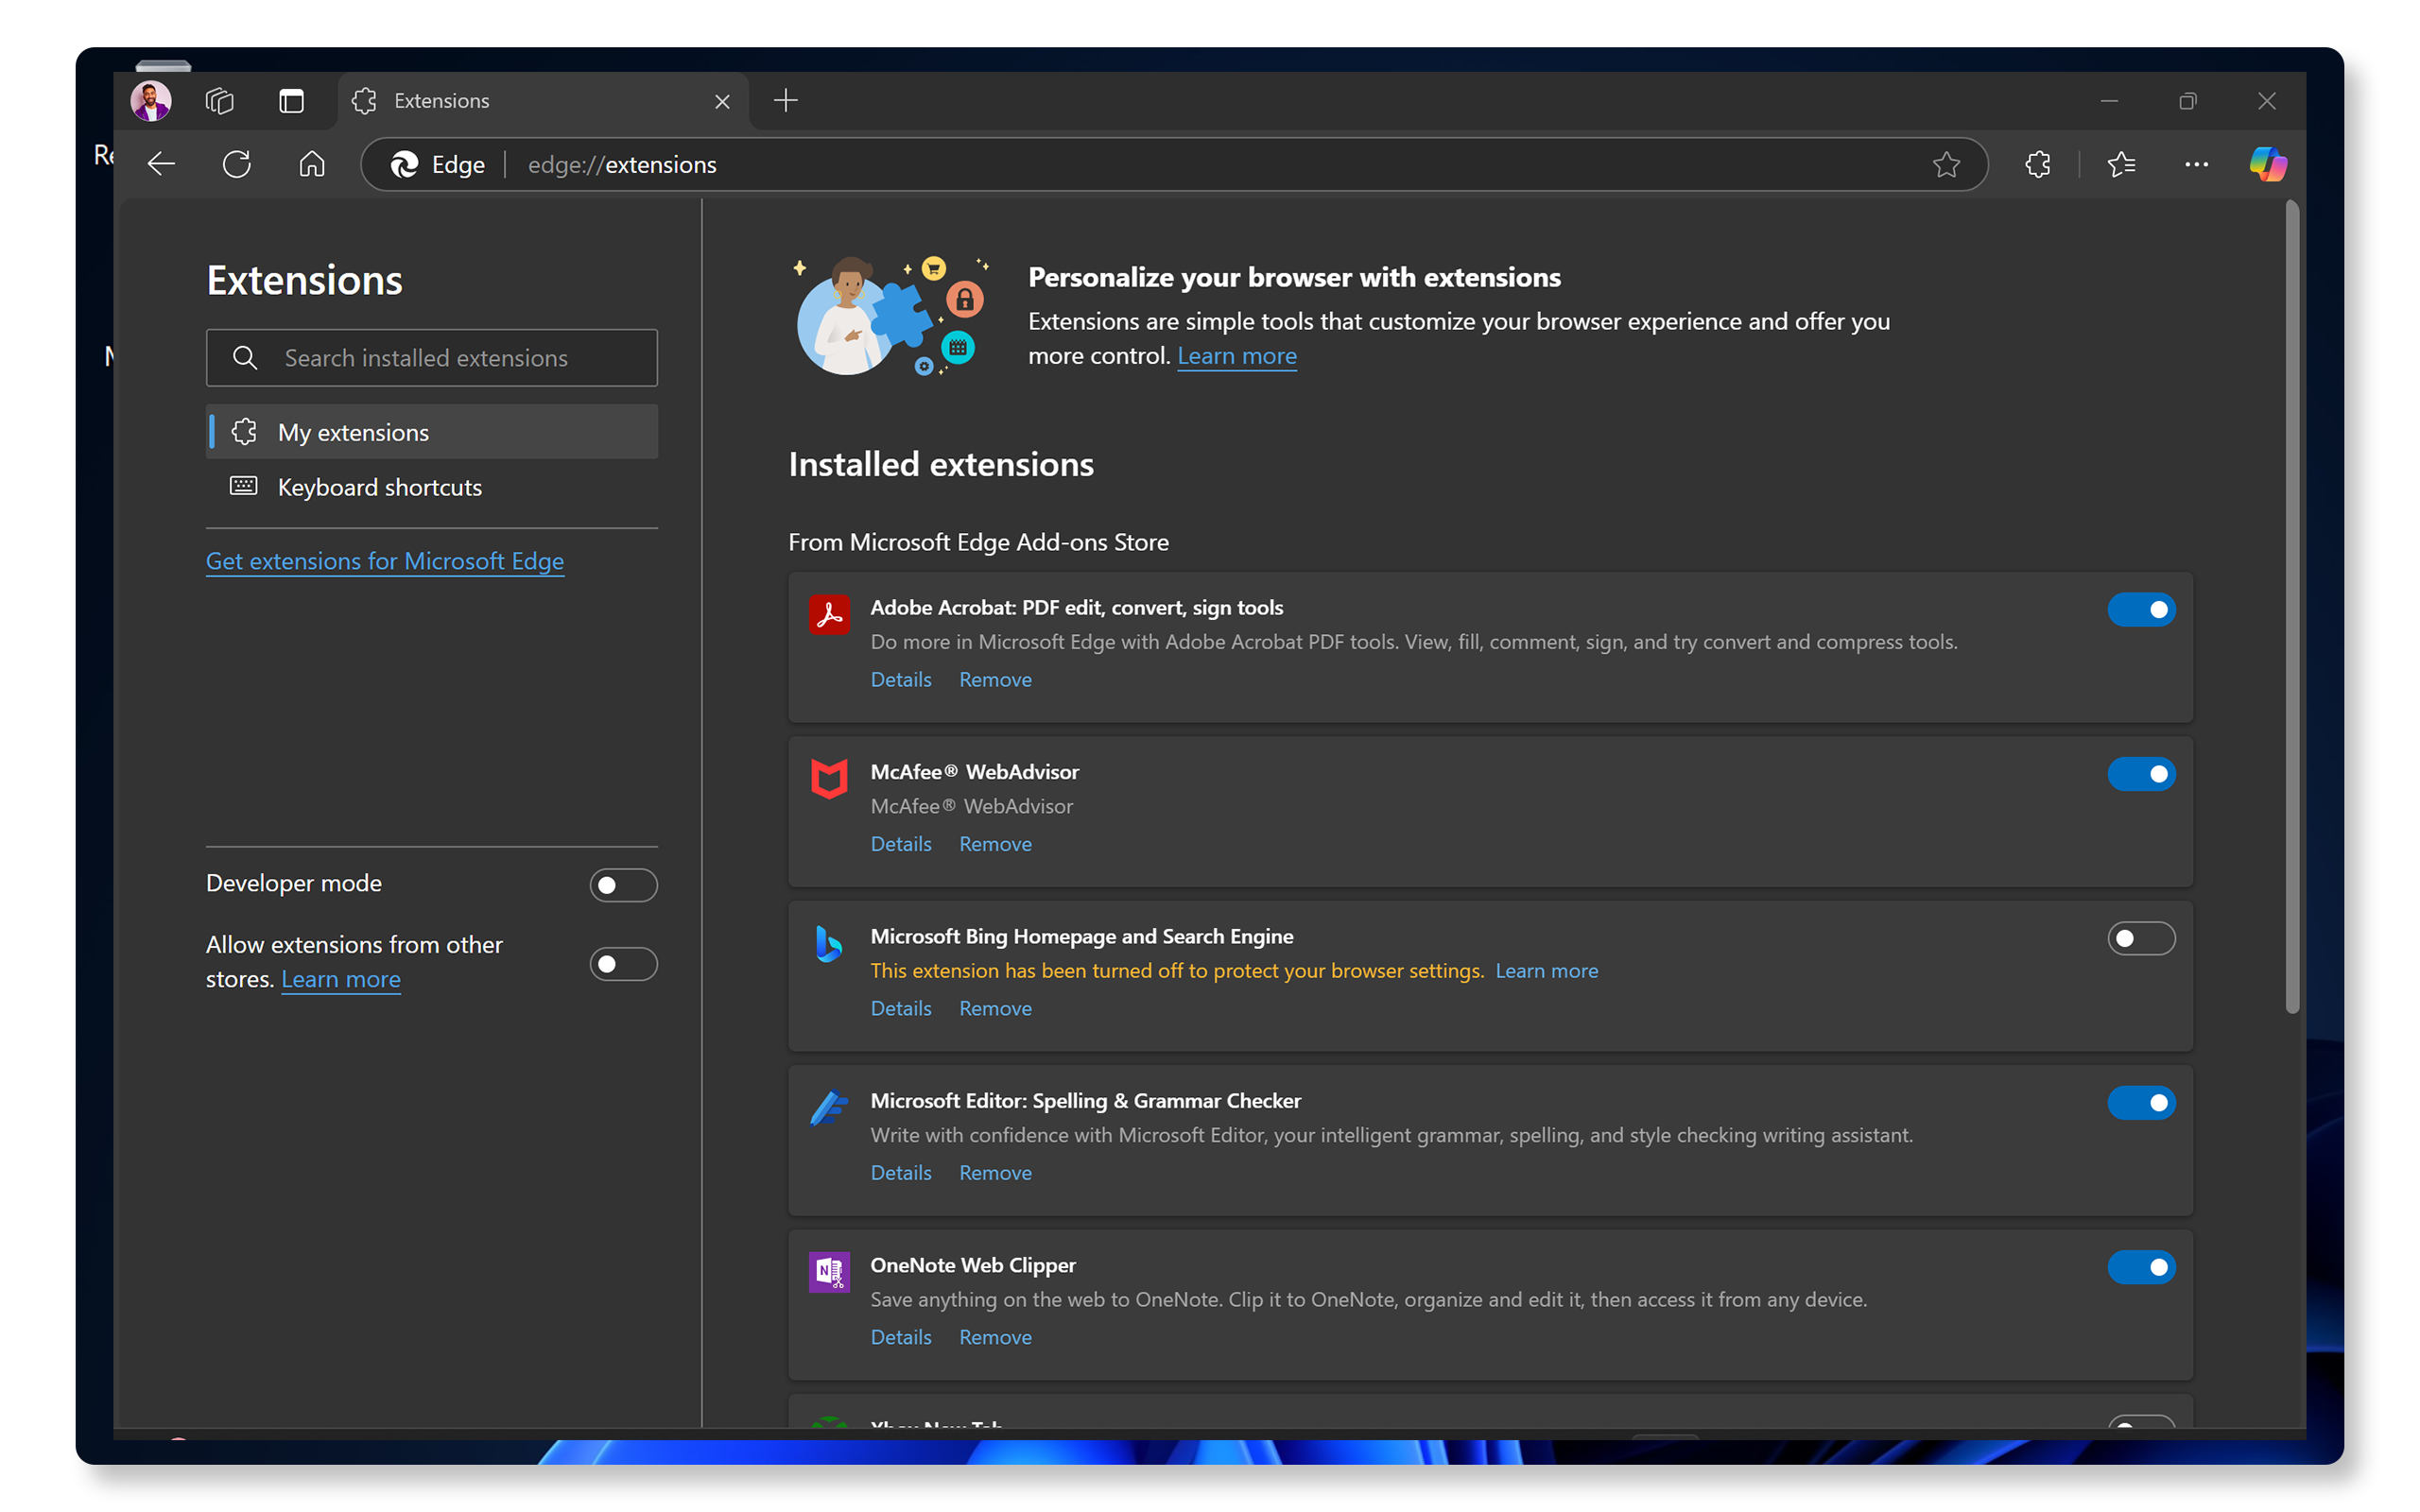
- In your web browser, go to Extensions or Add-ons.
- Disable or remove extensions that are unnecessary in Microsoft Edge, Google Chrome, or Mozilla Firefox.
Conclusion
Speeding up your computer involves a mix of driver updates, software tweaks, and using Dell's SupportAssist for optimization. By following these steps, you'll notice a significant improvement in speed and efficiency.
Still running slow? Don't worry, here are more steps you can take to improve system performance.
Frequently Asked Questions (FAQ)
Here are some answers to common questions users ask about improving the performance of a Dell computer.
1. Why is my computer running slow?
- Your computer might be running slow due to several reasons, such as:
- Too many programs running at once.
- Insufficient RAM.
- Nearly full hard drive.
- Malware or viruses.
- Outdated software.
- Dust and overheating.
2. How do I check my computer's memory (RAM)?
- To check your computer's memory:
- Press Windows key + R to open the Run dialog box.
- Type msinfo32 and press Enter.
- Look for Installed Physical Memory (RAM) to see how much RAM you have.
3. How can I defragment my hard drive?
- To defragment your hard drive:
- Press Windows key + E to open File Explorer.
- Right-click on your hard drive and select Properties.
- Go to the Tools tab and click Optimize.
- Select your hard drive and click Optimize to start the fragmentation process.
4. How do I disable visual effects to improve performance?
- To disable visual effects:
- Go to Start > System > About and click Advanced system settings.
- Go to the Advanced tab, under Performance, click Settings.
- In the Performance Options window, under the Visual Effects tab, select Adjust for best performance to disable visual effects.
5. How do I improve my computer's gaming performance?
- To improve gaming performance:
- Check if your computer's hardware configuration meets the requirements of the game.
- Update your graphics drivers
- Adjust in-game settings to lower graphics quality
- Close unnecessary background programs
- Consider upgrading your hardware (like adding more RAM or switching to an SSD).
6. What is the difference between HDD and SSD, and which one is better for performance?
- HDD (Hard Disk Drive) uses spinning disks to read/write data, while SSD (Solid State Drive) uses flash memory.
- SSDs are faster, more reliable, and consume less power compared to HDDs, making them better for performance.
7. What should I do if my computer is overheating?
- Clean the air vents and fan with compressed air.
- Use the computer on a flat and hard surface. Avoid soft surfaces such as a mattress.
- Provide sufficient space for ventilation around the computer.
8. How can I improve my computer's Internet speed?
- To improve internet speed:
- Update your network drivers.
- Ensure your Wi-Fi signal is strong. Get closer to the wireless router.
- Use a wired connection for steady performance.
- Close unnecessary background programs.
9. What is Virtual Memory and how can I adjust it?
- Virtual memory is a portion of your hard drive used as RAM when your physical RAM is full. To adjust it:
- Go to Start > Settings > System > About and click Advanced system settings.
- Go to the Advanced tab, under Performance, click Settings.
- In the Performance Options window, go to the Advanced tab and click Change under Virtual memory.
- Uncheck Automatically manage paging file size for all drives, choose Custom size, and enter the Initial size (MB) and Maximum size (MB).
- To let Windows automatically manage the virtual memory capacity, choose System managed size.
- Tip: Microsoft recommends that you set virtual memory to be no less than 1.5 times and no more than 3 times the amount of RAM on your computer.
10. Will a full HDD or SSD slow my computer down?
- For hard disk drives, leaving 10-15 percent free space for virtual memory, temp files, and other storage needs is essential.
- Solid-state drives (SSDs) however, need more available space. Typically, between 25 to 30 percent of the total capacity.
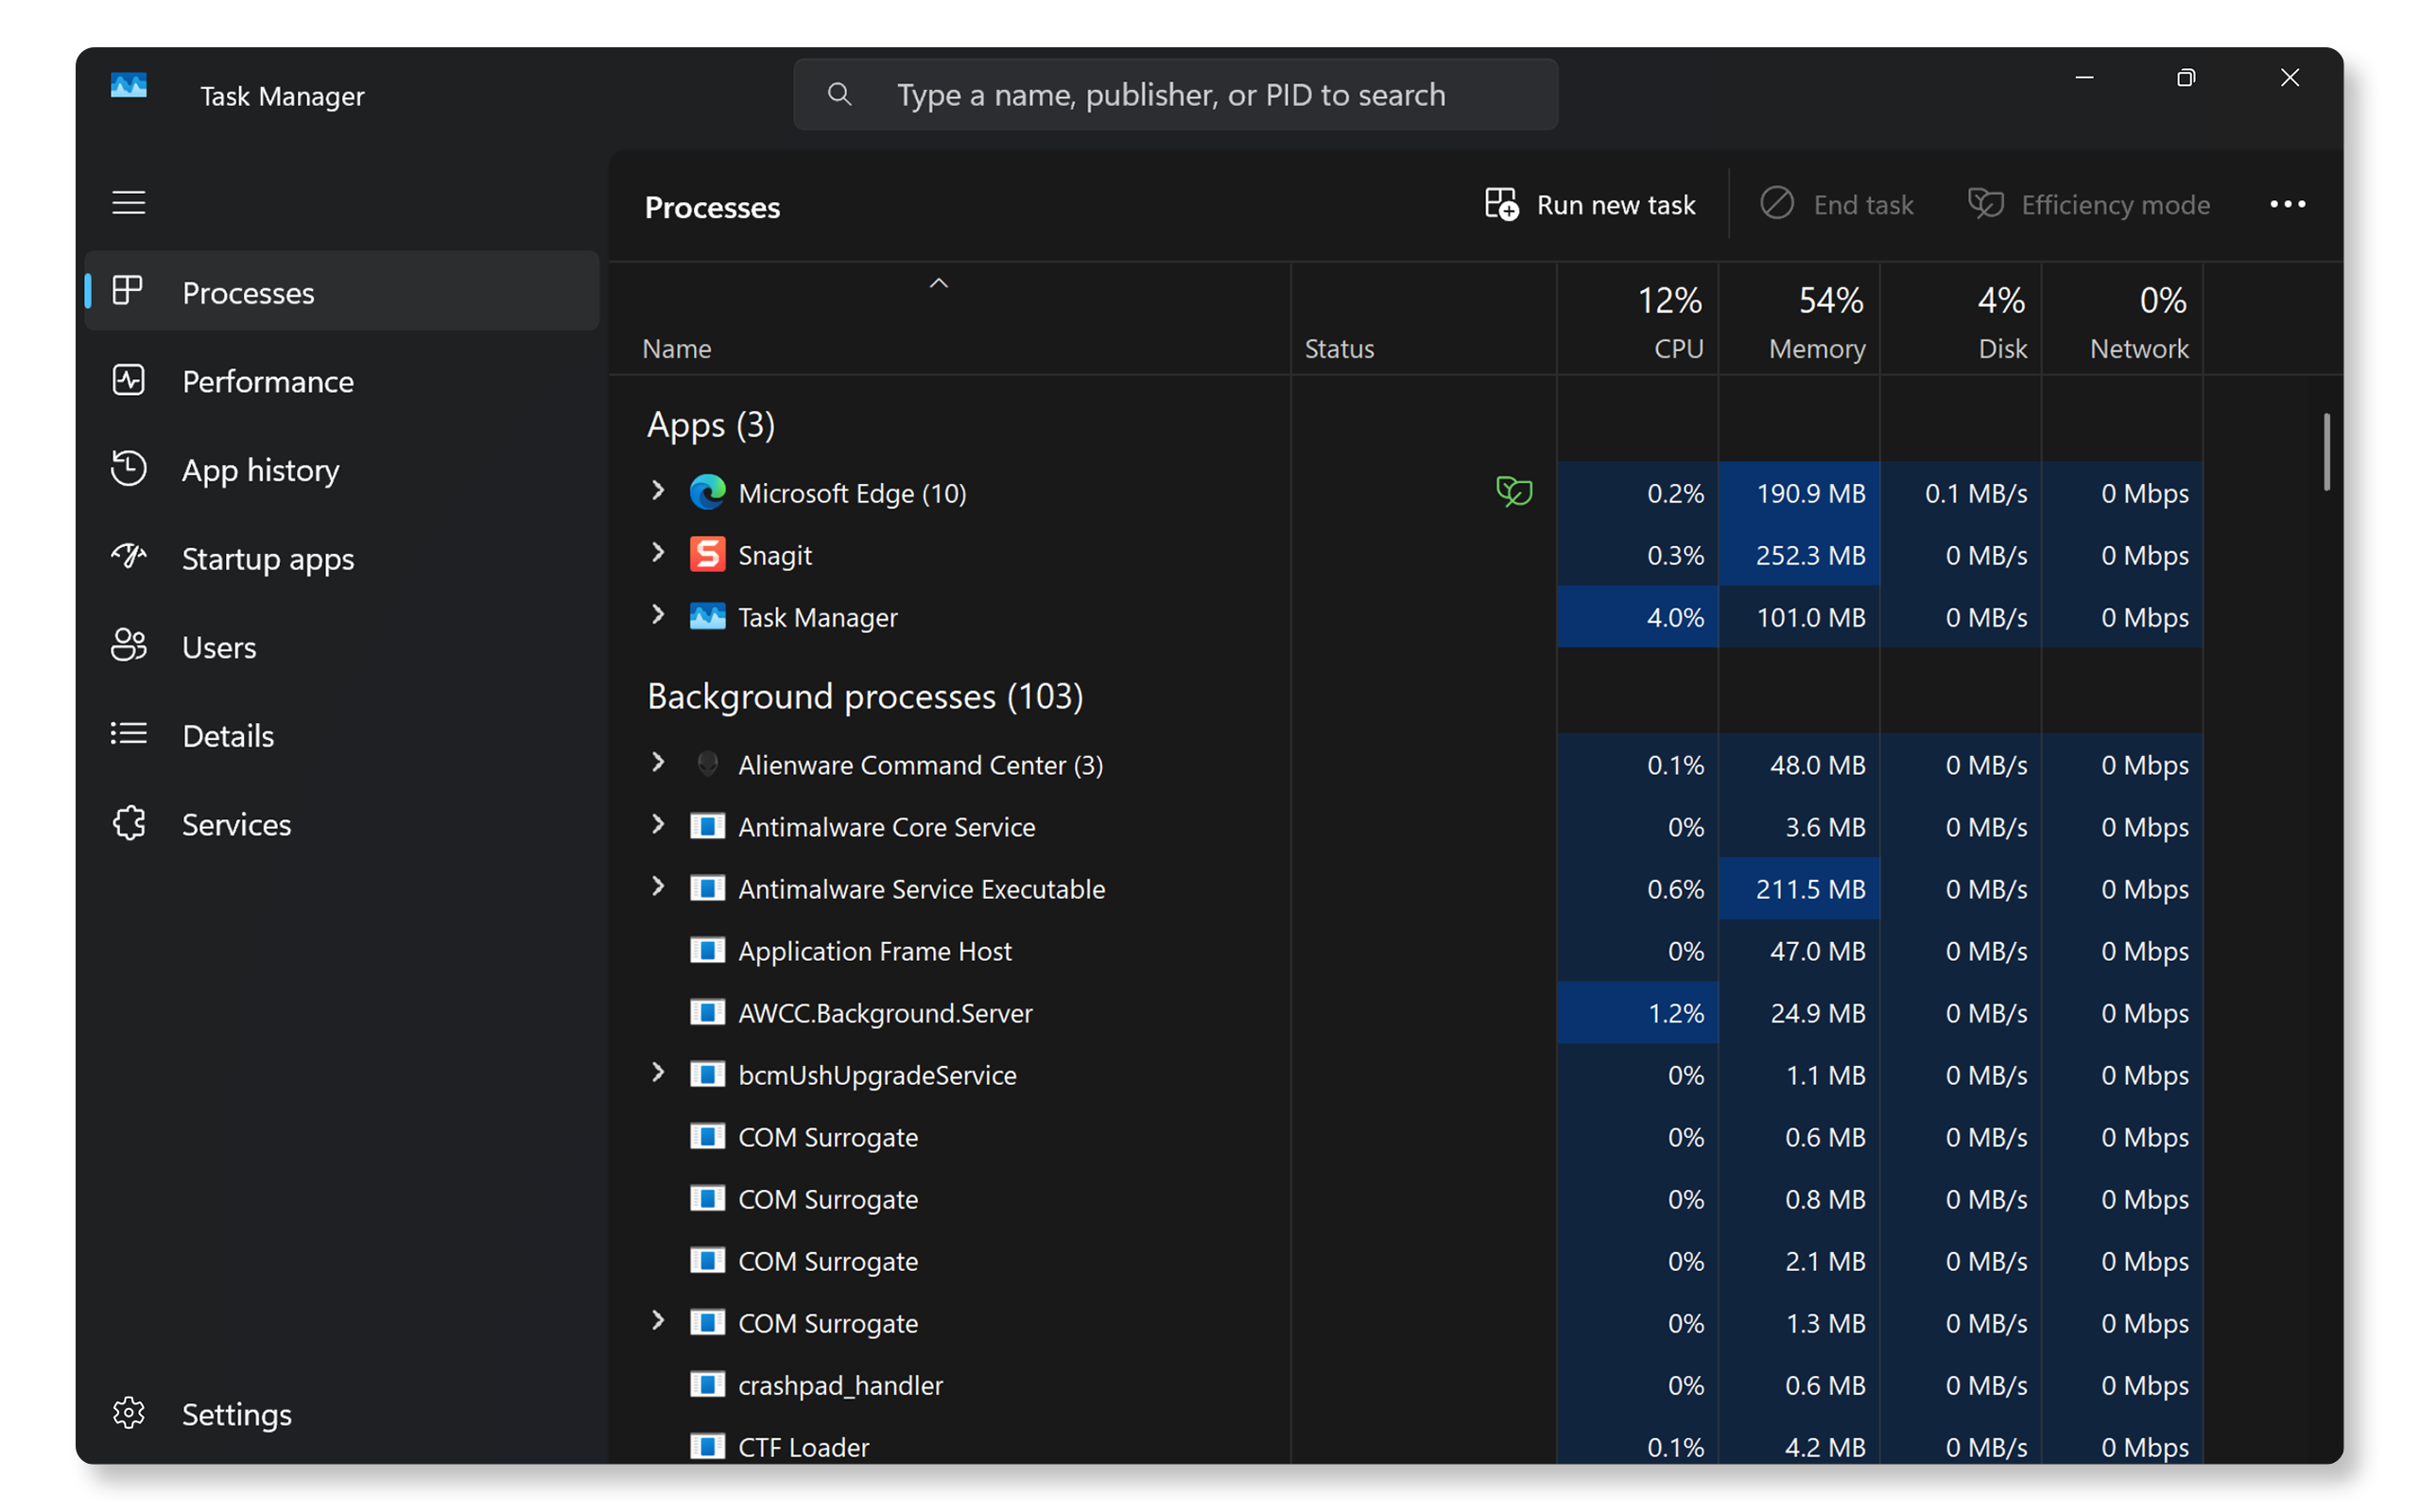
11. How do I find out which programs are slowing down my computer?
- To check which app is consuming
- Press Ctrl + Shift + Esc to open Task Manager.
- On the Processes tab, you'll see which programs are open, and how much CPU and memory they're using.
- To close an app, right-click on the app and select End task.
12. What should I do if none of these troubleshooting steps work?
- Additional Troubleshooting: You can try some additional tips to improve system performance.
- Use Dell Community Forums: Join the Dell Community Forums to get help from other users.
Video Resources
For more written step s on this process, please visit this article:
Troubleshoot and Fix System Performance Issues ...

