Welcome
Welcome to Dell
- Place orders quickly and easily
- View orders and track your shipping status
- Create and access a list of your products
How to Enable Boot from CD or DVD Option with UEFI Boot Mode Enabled
Summary: Learn how to enable boot from CD or DVD option in the Unified Extensible Firmware Interface (UEFI) BIOS with UEFI boot mode enabled.
Instructions
Affected Platforms:
- OptiPlex
- Latitude
- Precision Workstation
- Alienware
- Dell G-Series
- Inspiron
- Vostro
- XPS
- Dell Plus Laptop
- Dell Pro Laptops
- Dell Pro Max Laptops
- Dell Pro Plus laptops
- Dell Pro Premium Laptops
- Dell Pro Rugged Laptops
- Dell Pro Max Micro Desktops
- Dell Pro Max Slim Desktops
- Dell Pro Max Tower Desktops
- Dell Pro Micro Desktops
- Dell Pro Slim Desktops
- Dell Pro Tower Desktops
- Dell Slim Desktops
- Dell Tower Desktops
Affected Operating Systems:
- Windows 11
- Windows 10
This information applies to computers with the below specifications and settings:
- Windows 11 or Windows 10 computer with boot mode set to UEFI
- Computers with an Optical drive such as CD, DVD or Blu-ray
Adding CD/DVD boot option manually in BIOS
Follow the instructions below to add the optical drive to the boot list when your UEFI BIOS computer is unable to boot to DVD or CD.
- Reference the Dell knowledge-base article Access UEFI (BIOS) System Setup from Windows on your Dell Computer for another way to access the BIOS from within Windows.
- The BIOS on your computer may not appear same as images shown in this article. Every Dell computer has a BIOS specific to its needs, and they are all updated regularly.
Expand the sections below according to the BIOS type of your computer.
UEFI BIOS
Follow the steps provided below:
Example: "PciRoot (0x0)/Pci (0x1F, 0x2)/Sata(0x3, 0x0, 0x0)/CD"
- Tap the F2 key at the Dell logo screen to enter System Setup or BIOS.
- On the left pane, click Boot Configuration.

Figure 1: (English Only) Boot Configuration on UEFI BIOS left pane
- Scroll down to view the Secure Boot setting.
- Ensure that Secure boot is set to OFF.

Figure 2: (English Only) Secure Boot Off
- Scroll up to the Boot Sequence section, and click Add Boot Option.

Figure 3: (English Only) Add Boot Option
- A new window appears with blank boot options.
- Click Browse for file.
- Select device > folder > file from the list.
- PciRoot..ESP (for example, EFI\Boot\bootx64.efi)
- Click OK.
- Type CD/DVD/CD-RW Drive in the Boot Option Name field.

Figure 4: (English Only) Add boot option name
- Add wanted boot option.
- Click Exit.
- The computer restarts.
- Tap the F12 key on startup for boot menu, the DVD option is there under UEFI.
Dell Phoenix BIOS
To add the DVD Boot option manually in the Dell Phoenix BIOS setup.
Follow the steps provided below:
- Boot mode should be selected as UEFI (Not Legacy).
- Secure Boot set to Off
- Go to the Boot tab in the BIOS and select Add Boot option.

Figure 5: (English Only) Add Boot Option
- A new window appears with blank boot option name.

Figure 6: (English Only) Add boot option fields
- Name it CD/DVD/CD-RW Drive
Example: PciRoot (0x0)/Pci (0x1F, 0x2)/Sata(0x3, 0x0, 0x0)/CD
- Leave the File Name entry blank.
- Now using Tab key, select YES, and press Enter.
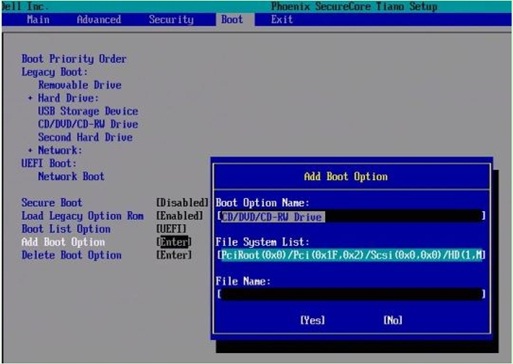
Figure 7: (English Only) Add boot option fields
- Press the F10 key to save settings and restart.
- The computer restarts.
- Press the F12 key on startup for boot menu, the DVD option is there under UEFI.
- Alternatively, if you see an on-screen message to Press any key to boot from CD/DVD, press any key to proceed.
- If you are still unable to boot from the Windows reinstallation CD or DVD or if the CD or DVD is corrupt. Go to the Dell OS Recovery Tool page to download and create a Windows recovery or reinstallation disc for your computer.
See these Dell Knowledge Base articles for related information:
Additional Information
 Is your computer out of warranty? For Out of Warranty support, browse to the Dell.com/support website and enter your Dell Service Tag to view our offers.